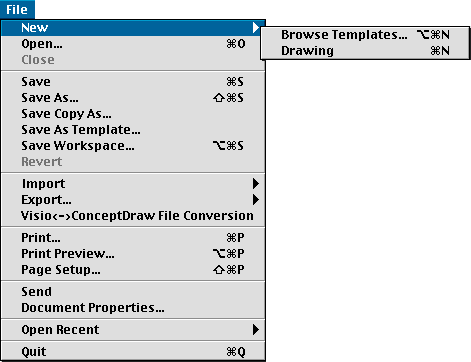
"File" menu items
"Edit" menu items
"View" menu items
"Insert" menu items
"Format" menu items
"Figure" menu items
"Page" menu items
"Library" menu items
"Tools" menu items
"Window" menu items
"Help" menu items
"File" menu items

New ![]() Browse Templates
Browse Templates
Creates a new document from the template which you select.
Please refer to the "Creating a New Document from a
Template" section for more detailed information.
New ![]() Document (Drawing)
Document (Drawing)
Creates a new document.
See the "Creating a New Document" section for
more information.
Open
Opens an existing document.
Also lets you open other ConceptDraw files: templates, libraries, workspace files.
For more specific information, please refer to the "Opening
and Closing Files" section.
New Library
Creates a new empty library in the Library window.
See the "Creating a New Library"
section for details.
Open Library
Opens an existing library.
See the"Opening Libraries" section for
specifics.
Close
Closes the active document together with all the windows where it is displayed.
Save
Saves the active document.
Please refer to the "Saving Documents" section for
more information.
Save As
Saves the active document under a new filename.
Please refer to the "Saving ConceptDraw Files"
section for more information.
Save Copy As
Saves the copy of document under a new filename.
Please refer to the "Saving Documents" section for more information.
Save As Template
Saves/creates a template file.
For specifics, refer to the "Saving a Document as
Template" section.
Save Workspace
Saves/creates a workspace file.
For specifics, refer to the "Saving a Workspace
File" section.
![]() Revert
Revert
Returns the document to the state of the latest saved version.
Import ![]() Graphic File
Graphic File
Opens picture files of various graphic formats, importing the image into a new
ConceptDraw document.
Please refer to the "Importing Files" section
for more specific information.
Import ![]() Text Data
Text Data
Generates a chart from its textual description.
See the "Importing Files" section for more
information.
Import ![]() PowerPoint
PowerPoint
Opens MS PowerPoint presentations, importing the objects into a new ConceptDraw
document.
Please refer to the "Importing Files" section
for more specific information.
Export ![]() Graphic File
Graphic File
This option saves the document in a graphic format. You can select the objects to
be exported, and set the options for the image (size and characteristics).
Please refer to the "Exporting Files" section
for more specific information.
Export ![]() Text Data
Text Data
Lets you save your drawing in the form of textual description (flow or outline)
in a plain text file.
See the "Exporting Files" section for more
information.
Export ![]() HTML
HTML
Saves the document in HTML format. You can select the objects to be exported and
specify the export parameters (behavior of hyperlinks, image format and size.
See the "Exporting Files" section for more
information.
Export ![]() PowerPoint
PowerPoint
Saves the document in MS PowerPoint format.
Please refer to the "Importing Files" section
for more specific information.
Visio <->ConceptDraw File
Conversion
Lets you address the Online Service for the two-way ConceptDraw-Visio file
conversion from within ConceptDraw.
See "Importing Files" and "Exporting Files" for more information.
Print Preview
Lets you view - prior to actual printing - how the printed document will look.
Please refer to the "Print Preview" section
for more specific information.
Print
Prints the active document. In the print settings dialog, you can specify the pages to be
printed, the number of copies, etc.
You can find more specific information in the "Printing"
section.
Page Setup
Lets you set the paper size, orientation and other printer settings.
Please refer to the "Print Page and Printer
Settings" section for more specific information.
Send
Launches the mail client application for sending a document via e-mail.
You can refer to "Sending a Document via E-mail"
for specifics.
Document Properties
Displays the dialog where you can specify the document name, size and orientation
of the document pages, measurement system and other parameters for the document.
For specifics, please refer to the "Document
Properties" section.
Recent Files / Open Recent
Lists the last files which were opened in ConceptDraw. You can select a file from
the list to reopen it.
Exit / Quit
Closes all the open documents and exits ConceptDraw. If you haven't saved changes
you made to a document, the program will offer you to save the document before quitting.
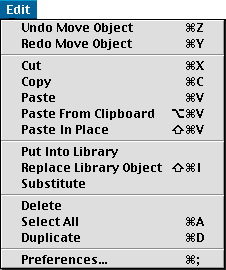
Undo
Reverses the last operation you performed.
See the "Undo and Redo Operations"
section for details.
Redo
Reverses the last Undo operation.
See the "Undo and Redo Operations"
section for details.
Cut
Removes the selected objects or text and places hte selection onto the Clipboard.
Please refer to the "Copying and Pasting"
section for more specific information.
Copy
Copies selected objects or text onto the Clipboard.
Please refer to the "Copying and Pasting"
section for more specific information.
Paste
Pastes the contents of the Clipboard into the document.
Please refer to the "Copying and Pasting"
section for more specific information.
![]() Paste Special
Paste Special
Inserts the contents of the Clipboard into the document, letting you specify the
format in which the pasted object will be stored. This option is most often used for
inserting OLE-objects.
For specifics, see "Inserting an Object from an Open
OLE-Compatible Application".
![]() Paste From Clipboard
Paste From Clipboard
Inserts the content of the Clipboard into the active document as picture.
See the "Copying and Pasting" section
for more specific information.
Paste In Place
If you copied a ConceptDraw object to the Clipboard, this command pastes it on
the active page in the same place as it was copied from.
See the "Copying and Pasting" section
for more specific information.
Put Into Library
Copies the selected object(s) from the document into the active library.
For specifics, refer to the "Adding an Object
from the Document to a Library" section.
Replace Library Object
Replaces the selected library object with a new one without changing the icon.
For more information refer to the "Replacing
an Object under the Existing Library Icon" section.
Substitute
Substitutes the selected library object (or the secondary selected object on the
page) instead of the primary selected object in the document.
See "Replacing Objects and Unifying
their Form (Substitute)" for more information.
Delete
Deletes the selected objects or handles.
See the "Deleting Objects" section for
details.
Select All
Selects all the objects on the active page of the document.
Duplicate
Duplicates the selected object(s).
See the "Duplicating Objects" for
specifics.
![]() Object
Object
Lets you edit the selected OLE object in its native application.
Please refer to the "Editing an OLE Object"
section for specifics.
Preferences
Brings up the dialog where you can specify the global application settings: measurement
units, page size for all new documents, paths to documents, libraries and templates, the
default Internet browser, and some settings for document view.
Refer to the "Application Settings" section
for more detailed information.
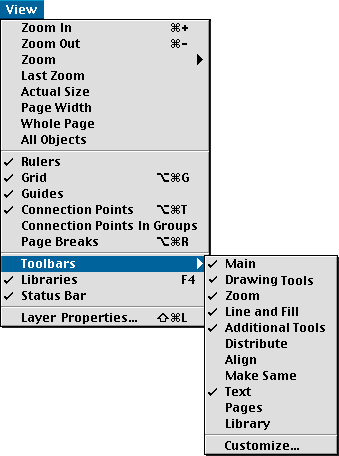
Zoom In
Magnifies the document for detailed editing.
Refer to the "Zooming a Page" section for
more specific information.
Zoom Out
Reduces the zoom level for you to see a bigger part of the page.
Refer to the "Zooming a Page" section for
more specific information.
Zoom
Lets you choose a standard zoom level within the 50% - 400% range from the list.
See "Zooming a Page" section for more
specific information.
Last Zoom
Returns the document to the previous zoom setting.
See "Zooming a Page" section for more
specific information.
Actual Size
Displays the document at its actual size (100 %).
Page Width
Sets the zoom level so that the page width fits in the document window.
See "Zooming a Page" section for more
specific information.
Whole Page
Sets the zoom level so that the entire page fits in the window.
See "Zooming a Page" section for more
specific information.
All Objects
Sets the zoom level so that the all the objects on the page fit in the document
window.
See "Zooming a Page" section for more
specific information.
Rulers
Shows/hides the rulers.
See "Rulers and Grid" for specifics.
Grid
Shows/hides the background grid.
See "Rulers and Grid" for specifics.
Guides
Shows/hides the guide lines.
Refer to the "Guide Lines" section for more
information.
Connection Points
Shows/hides the connection points of objects (they remain active even when
hidden).
See details in the "Connection Points"
section.
Connection Points In Groups
Shows/hides the connection points of objects in groups.
See details in the "Connection Points"
section.
Page Breaks
Lets you choose to show/hide the page breaks for the documents. (Page breaks are
grey lines which mark the non-printable areas and show the borders of the print pages).
See "Viewing the Document Breaking into Print Pages".
![]() Toolbars
Toolbars
Lets you check which toolbars to display.
![]() Toolbars
Toolbars ![]() Customize
Customize
Displays the Toolbars dialog
for you to customize the toolbars: choose the toolbars to display, and set their position
(horizontal or vertical).
Libraries
Shows/hides the library window with all the open libraries.
See the "Library Window" section for more
information.
Status Bar
Shows/hides the Status bar.
Layer Properties
Displays the dialog for modifying the properties of layers for the active
document. It lets you name a layer, specify whether a certain layer is visible, active or
locked, change the layer color.
You can find more detailed information in the "Working with
Layers" section.

Picture
Imports a picture and inserts it into the active document.
See the "Pictures" section for specifics.
Hyperlink
Lets you assign a hyperlink to the selected object. You can create a hyperlink to
jump to another page of the document, open a file, launch an application, open a Web
page in the browser.
For specifics, please refer to the "Using Hyperlinks"
section.
![]() Object
Object
Inserts an OLE object into the document.
Please see "OLE Objects in ConceptDraw Documents"
for details.

Line
Displays the dialog in which you can change the line properties for the selected
object(s),
and also add arrowheads to the line ends.
See the "Line Properties"
section for more specific information.
Fill&Shadow
Displays the dialog which lets you change the fill color and pattern for the
selected object(s),
and also add shadow or modify the shadow color and pattern.
Refer to the "Fill Patterns and
Colors" and "Shadows"
section for more specific information.
Text
Brings up the dialog for you to set the properties for the selected stretch of
text (or whole text blocks in the selected objects). In the dialog, you can set the font
type and size, text color and style, margins and indentation, text background color.
See "Using the Text Properties Dialog
for Formatting Text".
Hyperlink ![]() Open
Open
Follows the hyperlink associated with the selected object. Depending on the
hyperlink type, this command can open a page of the document, open another document,
launch an application, or open a Web page in the browser available.
For more specific information, refer to the "Using
Hyperlinks" section.
Hyperlink ![]() Edit
Edit
Lets you assign a hyperlink to the selected object or modify the existing
hyperlink. You can target the hyperlink to jump to another page, open a document, launch
an application, open an Web page in the browser.
This dialog also lets you disable the existing hyperlink.
For more specific information, refer to the "Using
Hyperlinks" section.
Protection
Displays the Protection dialog letting you lock some properties
of the selected object against deleting or changing width, height, angle etc.
Please refer to the "Protection"
section for specifics.
Double-Click
Assigns the action to be performed on double-clicking the object.
See the "Double-Click" section for
details.
Set Layer
Lets you moves the selected objects onto another layer.
For more specific information, refer to the "Working with
Layers" section.
Behaviour
Opens the Behaviour dialog in which you can specify whether the
object is 1-Dimensional or 2-Dimensional. You can also set how the object should behave
when resized, and show/hide its alignment box and handles.
Please see the "Behaviour" section for
more detailed information.
Information
Calls the Information dialog which displays the specific
information about the selected object. In this dialog, you can name and describe the
object.
See the "Information" section for
specifics.
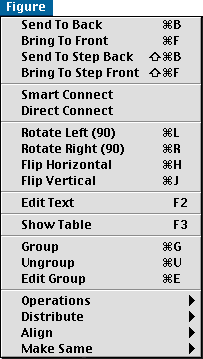
Send To Back
Puts the selected objects to be displayed behind all other objects.
Please refer to the "Changing the Order in which the
Objects are Displayed" section for more detailed information.
Bring To Front
Displays the selected objects above all other objects.
Please refer to the "Changing the Order in which the
Objects are Displayed" section for more detailed information.
Send To Step Back
Positions selected objects one step lower in the order list.
Please refer to the "Changing the Order in which the
Objects are Displayed" section for more detailed information.
Bring To Step Front
Positions selected objects one step higher in the order list.
Please refer to the "Changing the Order in which the
Objects are Displayed" section for more detailed information.
Smart Connect
Connects the selected objects to the primary selected one, using the Smart
connectors.
For more information, see "Tools for Multiple
Connection".
Direct Connect
Connects the selected objects to the primary selected one, using the Direct
connectors.
For more information, see "Tools for Multiple
Connection".
Rotate Left (90)
Rotates the selected objects by 90 degrees counterclockwise.
See the "Rotating" section for more detail.
Rotate Right (90)
Rotates the selected objects by 90 degrees clockwise.
See the "Rotating" section for more detail.
Flip Vertical
Replaces the selected objects with the vertically mirrored copy.
Please refer to the "Flipping Objects" section
for specifics.
Flip Horizontal
Replaces the selected objects with the horizontally mirrored copy.
Please refer to the "Flipping Objects" section
for specifics.
Edit Text
Turns on the text editing mode for the selected object.
For specifics, refer to the "Text Editing Mode"
section.
Group
Groups the selected objects so that they behave as one.
For more specific information, please refer to the "Grouping
Objects" section.
Ungroup
Ungroups the selected grouped unit, so that you get separate objects.
For more specific information, please refer to the "Grouping
Objects" section.
Edit Group
Opens a new window in which you can edit the selected grouped unit without ungroping it.
For more specific information, please refer to the"Grouping
Objects" section.
Operations ![]() Combine
Combine
Combines several selected figures into one. The result is a complex figure consisting of
several geometries with unified line and fill properties.
Please refer to the "Combine" section for
specifics.
Operations ![]() Join
Join
Joins several selected figures so that they form a single figure. As the result
of this operation, the geometries with coinciding ends are merged into one solid geometry.
Please refer to the "Join" section for
specifics.
Operations ![]() Scattering
Scattering
Splits the selected complex figure into separate geometries, so that each solid path
contained in the figure becomes a separate object.
Please refer to the "Scattering" section
for specifics.
Distribute
Equalizes the horizontal or vertical distances between the selected objects (if 3 or more
objects are selected).
You can choose to equalize the following horizontal distances:
Horizontal Spacing - the spacing between the objects,
Left, Right - the distances between
the left or right edges of the objects,
Center - between the centers of the objects.
You can choose to equalize the following vertical distances:
Vertical Spacing - the spacing between the objects,
Top, Bottom - the distances between
the top or bottom edges of the objects,
Middle - or between the centers of the objects.
See the "Distributing Objects" section
for more information.
Align
Lets you align the selected objects (if 2 or more) horizontally or vertically
with respect to the primary selected object (the one displaying green handles).
You can choose to align the objects horizontally:
Left, Right - on the left or right
edges,
Center - on the centers.
You can choose to align the objects vertically:
Top, Bottom - on the top or bottom
edges,
Middle - on the centers.
See the "Aligning Objects" section for
more information.
Make Same
Lets you unify the properties of the selected objects (if 2 or more) after the
primary selected object (the one displaying green handles). You can choose to unify
Style - line, fill, shadow and text properties,
Width, Height - the width or the
height of the objects,
Size - the sizes of the objects (both width and
height).
See the "Resizing" section for more
information.
Make Same ![]() Fit to text
Fit to text
Resizes the selected objects according to the dimensions of text they contain.
See the "Fit to Text" section for more
information.
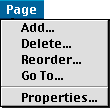
Add
Adds a new empty page to the active document.
See the "Adding a Page" section for details.
Delete
Removes the selected page of the document.
See the "Deleting a Page" section for
details.
Reorder
Allows you to rearrange the pages in the active document.
For specifics, refer to the "Reordering Pages"
section.
Go To
Activates the specified page.
For specifics, refer to the "Navigation by Pages"
section.
Properties
Lets you rename the page.
Please see the "Naming a Page" section for
details.
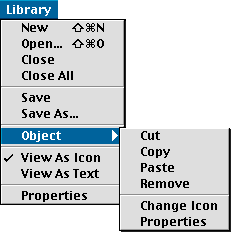
New
Creates a new empty library in the Library window.
See the "Creating a New Library"
section for details.
Open
Opens an existing library.
See the"Opening Libraries" section for
specifics.
Close
Clises the active library.
Close All
Closes the library window with all the open libraries, offering you to save any
unsaved data.
Object ![]() Cut
Cut
Removes the library object selected in the active library and places it onto the
Clipboard.
See "Moving Objects between and within
Libraries".
Object ![]() Copy
Copy
Copies the library object selected in the active library and places it onto the Clipboard.
See "Moving Objects between and within
Libraries".
Object ![]() Paste
Paste
If the Clipboard contains a ConcetDraw object, this command adds it to the active library,
creating the icon automatically.
See "Moving Objects between and within
Libraries".
Object ![]() Remove
Remove
Deletes the library object selected in the active library.
See "Deleting an Object from a Library".
Object ![]() Change Icon
Change Icon
Lets you replace the selected library object's icon with another Bitmap drawing sized
29*29. The object itself is kept intact, only the icon is changed.
See "Changing the Icon of an Object".
Object ![]() Properties
Properties
Calls the Object Properties dialog for the selected library object to let you assign or
change its name and prompt.
See "Properties of Library Objects".
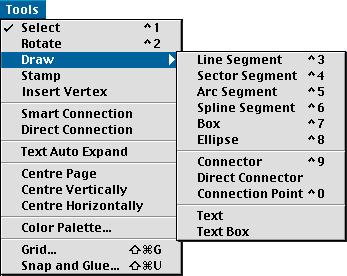
Select
Activates the Select tool mode.
Rotate
Activates the Rotate tool mode and lets you rotate objects.
Draw ![]() Line Segment
Line Segment
Activates the Line tool mode and lets you draw lines and
manipulate vertices of figures.
Draw ![]() Sector Segment
Sector Segment
Activates the Sector tool mode and lets you draw circular
sectors, manipulate vertices of figures, and change the curvature of segments.
Draw ![]() Arc Segment
Arc Segment
Activates the Arc tool mode and lets you draw elliptic arc
segments, manipulate vertices of figures and change the curvature of segments.
Draw ![]() Spline Segment
Spline Segment
Activates the Spline tool mode and lets you draw custom smooth
curves, and also manipulate vertices of figures and change the curvature of spline
segments.
Centre Page
Positions the selected object(s) in the centre of the document page.
Centre Vertically
Changes the vertical position of the selected objects moving them to the center of the
page.
Centre Horizontally
Changes the horizontal position of the selected objects moving them to the center of the
page.
Color Palette
Lets you modify, load or save the color palette for the active document.
For specifics, refer to the "Color Palette"
section.
Grid
Displays the dialog which lets you modify the grid properties for the active document. You
can set the grid type, spacing etc.
Please see the "Rulers and Grid" section
for details.
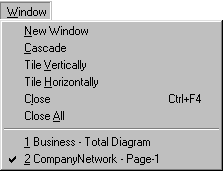
New Window
Opens a new window and displays the active document in it. This is useful when you are
editing a page, but need to see its original copy at the same time, or work with several
pages of the same document simultaneously.
![]() Cascade
Cascade
Arranges all the open windows so that each next window appears slightly down and
to the right from the previous one. This way you can access each window quickly.
![]() Tile Vertically
Tile Vertically
Arranges all the open windows vertically as non-overlapping tiles.
See "Manipulating the Windows".
![]() Tile Horizontally
Tile Horizontally
Arranges the open the windows vertically as non-overlapping tiles.
See "Manipulating the Windows".
Close Window
Closes the active window, offering you to save the unsaved changes to the
document.
Close All
Closes all open windows of the program, offering you to save all unsaved data.
See "Manipulating the Windows" for more
information.
List of Windows
The list of all the open windows and the documents displayed in them.

ConceptDraw Help
Calls the ConceptDraw Help System. It is opened in a separate window
where you can see a number of articles containing information on how to use the product.
You can read or print the articles, search them for the needed information.
The help system is made up of two parts:
1 generals about ConceptDraw;
2 a detailed Reference Manual
for you to consult as necessary.
You can choose the topic from the Contents and click the mouse to see the section you need.
What's New
Displays the information about the new features and fixes as compared with the
previous version of the software, and also the differences between the Standard
and Professional versions..
ConceptDraw On the Web ![]() ConceptDraw Web Site
ConceptDraw Web Site
Launches your Internet browser and opens the ConceptDraw page on the Web:
This web site is devoted to ConceptDraw and other products of the ConceptDraw
line created by Computer Systems Odessa Corp.
On the Web site, you can see the samples and descriptions of ConceptDraw features, and
learn more about the various task-related editions of ConceptDraw and about other
products.
You can download the free demo versions of ConceptDraw and other products to try them
yourself. The latest news are also available on this site. You can order the products
online and take advantage of many other interesting offers and opportunities.
ConceptDraw On the Web ![]() Register Now
Register Now
Registers the program owner on the ConceptDraw web site:
http://www.conceptdraw.com/Register/
About ConceptDraw
Displays general information about ConceptDraw and about Computer Systems Odessa
Corporation, the creators of this product. You can see the title, version number,
developers information and copyright information.
There are also links to CS Odessa Web sites for you to get more
information about the ConceptDraw application and other CS Odessa products and choose the
ones you find helpful for yourself.