Each object has a set of properties which you can change: line color, width and style,
fill pattern, text formatting parameters etc.
In ConceptDraw you can format each single property by using the corresponding tool, or
format groups of properties in the dialogs.
Line Properties
Fill Patterns and Colors
Shadows
Unifying Visual Attributes of Objects (Same
Style)
Replacing Objects and Unifying their Form
(Substitute)
Protection
Double-Click Action
Information
Behaviour
Hyperlink
Line Properties
Lines are part of every object. To change their properties, you can use the Line Properties dialog (Format / Line).
You can also make use of the corresponding buttons from the Line and Fill
formatting toolbar:
Line color ![]() , Width
, Width ![]() and Style
and Style ![]() , and Arrow Style
, and Arrow Style ![]() (for open figures, segments, connectors).
(for open figures, segments, connectors).
These tools let you choose among the options which are most widely used. For each property, you can click "More..." to get to the Line Properties dialog for the full list of options.
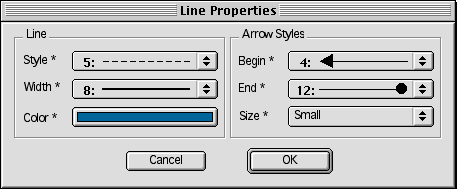
The Line Properties dialog (Format / Line) lets you
set the line formatting for the selected object(s).
You can set the line style, width and color, and also assign various arrowheads to the
lines (which is most useful with connectors and open segments).
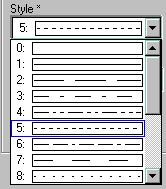
| The Line Style options are as follows: no line (#0), solid line (#1), dashed line (#2), and their numerous variations (17 styles are available). You can select the desired option from the Style drop-down box. |

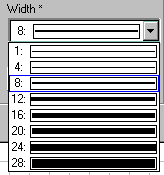
| The Width drop-down box in the Line Properties dialog offers the full list of 8 sizes. |
| The Color box in the Line Properties dialog lets you choose line color from the current palette. |
The full palette includes 256 colors. Click the mouse to select the needed color from
the palette. It will be shown in the Color field of the dialog.
Note: The Line Color tool ![]() offers you the first 16 palette
colors.
offers you the first 16 palette
colors.
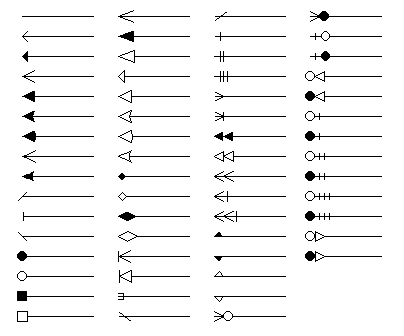
| The Arrow Styles section lets you assign an arrowhead to either or both ends of a line or any other open figure. |
ConceptDraw offers you the choice of using any of 61 arrowhead styles for either of line ends.
The Line Properties dialog lets you specify arrowheads separately for
the beginning and the end of a line (in the Begin and End
boxes respectively).
The size of the arrows can be chosen in the Size box. The following sizes
are available: Tiny, Small, Medium, Large, Huge.

To apply the selected settings to the lines formatted, click OK.
If you don't want your changes to be applied, you can either continue formatting to get
the suitable settings, or just close the dialog.
Fill Patterns and Colors
For all closed figures, you can change their fill properties: colors and pattern.
If you need to change the fill properties for the selected objects,
you can call the the Fill & Shadow dialog (Format / Fill
& Shadow).
Another way is to use the corresponding tools from the Line and Fill formatting
toolbar:
Fill Color ![]() and Fill Pattern
and Fill Pattern ![]() .
.
These tools let you choose among the options which are most widely used.
By clicking "More..." in each button menu, you open the Fill &
Shadow dialog with the complete list of the choices available.
The Fill & Shadow dialog (Format / Fill & Shadow) offers you the full choice to specify the fill and and shadow properties for the selected object(s). You can select the foreground and background colors and the patterns to be used.
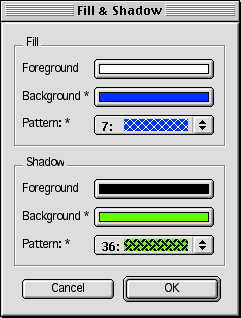
The Fill section in the dialog lets you set the fill colors and pattern for the selected closed figures.
The Foreground box specifies the main fill color (with plain fills
- Pattern #1 - only this color is taken to fill the figure). Click on this box to open the
color palette, and select any of its 256 colors. The selected color will appear in the
box.
In the same way you can choose the Background color which will be used in
the pattern.
The Pattern drop-down box opens a list of 38 plain and 4 gradient pattern styles.
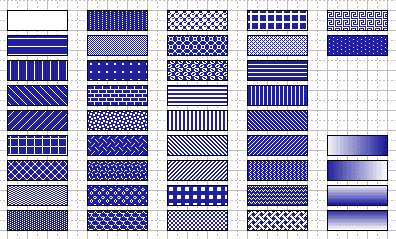
To make the figure transparent, select Pattern #0: None. (With
and Fill Pattern tool, the corresponding option is No Pattern).
To fill the figure with the color specified as Foreground, select Pattern #1
(plain color).
Other patterns use both the Foreground and the Background colors.
The same settings can be performed for Shadows of objects.
Shadow
You can assign shadow to objects, setting its color and
pattern.
To assign or modify the shadow for the selected object(s), you can call the the Fill
& Shadow dialog (Format / Fill & Shadow).
Another option is to use the Fill Shadow Styles tool ![]() from the Line and Fill formatting toolbar. This tool lets you choose among the
options which are most widely used: it can be applied to add plain shadows to
objects and choose the shadow color. You can select one of the 16 colors from the palette
to fill the shadow with. By clicking the "More Styles" option, you open the Fill
& Shadow dialog with the complete list of the choices available.
from the Line and Fill formatting toolbar. This tool lets you choose among the
options which are most widely used: it can be applied to add plain shadows to
objects and choose the shadow color. You can select one of the 16 colors from the palette
to fill the shadow with. By clicking the "More Styles" option, you open the Fill
& Shadow dialog with the complete list of the choices available.
In the Fill & Shadow dialog, use the Shadow section to assign shadow to the selected objects. Shadows, like fills, may be plain or have fill patterns. The Fill & Shadow dialog holds the complete lists of colors and patterns to choose from.
In the Pattern drop-down box, you can choose among 38 pattern
styles available. The colors for the shadow pattern can be specified in the Shadow
Foreground and Shadow Background boxes (you
select them from the color palette).
For a plain shadow, choose #1 pattern style in the Pattern box and
its color in the Foreground box.
To remove the shadow, choose None (or #0 style) in the Pattern
box.

Note: In ConceptDraw you can also specify the shadow offset. All shadows of a document have the same shadow offset. Call the Document Properties dialog from the File menu, and choose the Settings tab. In the Figure Shadow Offset section, enter the values for the shadow offset in the Right and Down boxes (you can use any measurement system - e.g. 1 in, 35 mm). Then click OK to apply the new setting to the active document.
Unifying Visual Attributes of Objects (Same Style)
The Make Same Style tool ![]() is useful when you need to
make several objects appear in a unified style.
is useful when you need to
make several objects appear in a unified style.
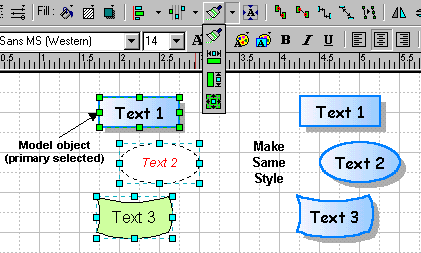
In unifying the style, the following attributes of the primary selected object (model) are applied to the other selected objects:
Replacing Objects and Unifying their Form (Substitute)
It is often the case that you may need to replace an object in a complete scheme with another one, or change the object's form after another one (e.g. in flowcharting, or in a network diagram, etc.). Of course, you can delete the object and create a new one in its place. But in this case you would have to reproduce the object's text and formatting (color, fill etc.), and reconstruct the object's connections to other elements of the scheme.
ConceptDraw lets you manage this task effectively with the Substitute operation. It lets you replace the selected object (source object) with another one (target object), changing its form but preserving the text, formatting and connections to other objects. The target object may be selected in the library or in the same document.
To perform the operation:
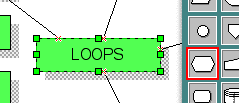
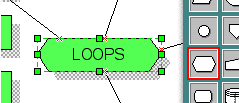
In fact, the Substitute command changes only the form of the
object,
preserving its connections with other objects (by way of connectors tied to the
object)
and its properties: size, line formatting, fill and shadow properties, text
content and text properties.
If the source or target object is a group, the internal formatting such as line and fill properties can not be rendered properly (as they may be different with objects within a group). In this case, only the size, text and connections are preserved.
On formatting other object properties, see also:
Protection
Double-Click Action
Information
Behaviour
Hyperlink