When you select an object you can see its handles: these are small square or round controls of that object. You can drag the handles with the mouse, thus modifying the relevant aspects of the objects, such as position, size, shape etc.
There are handles of several types which differ by their functions:
Resizing
Rotating
Reshaping Figures
Resizing
Resizing Objects with the Mouse and with the
Keyboard
How Objects Behave within a Group
Using the Make Same Tools for Equal Sizing
Fit to Text
Resizing Objects with the Mouse and with the Keyboard
To resize an object, use its resize handles. They look like small
square boxes, usually green or blue, and appear when you select an object in the Select
mode ![]() .
.
To resize an object saving its proportions, drag any of its four corner handles.

To change the width or height only, drag the corresponding side handle.

Note: If you hold down the Shift key as you drag a handle, the resize action is reversed - a side handle resizes the object proportionally, and a corner handle unproportionally.
You can resize objects in either way in the following tool modes: Select ![]() , Rectangle
, Rectangle ![]() , Ellipse
, Ellipse ![]() .
.
In the Rotate mode ![]() , you can only resize objects unproportionally.
, you can only resize objects unproportionally.
If the Snapping ![]() is on, the handle you drag will jump automatically into
the nearest snap location (usually a grid node).
is on, the handle you drag will jump automatically into
the nearest snap location (usually a grid node).
You can also use the keyboard to resize objects: click on the needed resize handle to select it (the selected handle turns magenta), and then use the Arrow keys to move it by pixels, or Shift + Arrow keys to move it by steps.
As you resize an object, the Status Bar registers how the width and height change. (To show the Status bar, check Status Bar in the View menu).
If you need to resize several objects to the same proportion, you can use either of the two ways:
a) Select these objects and group them (menu Figure / Group), resize the group by moving its resize handles, and then ungroup it back (menu Figure / Ungroup) to get separate objects.
b) You can select the relevant resize handles on the objects (hold down Shift when clicking), and then resize all the objects together by moving their selected resize handles all together - using the mouse or the keyboard.
Note 1. You can lock an object against resizing by
using the Protection dialog
(Format / Protection).
In this dialog, you can check the options for protection:
Width (to prevent width from altering),
Height (to prevent height from altering) and
Aspect Ratio (preserves the proportions, and allows to resize
only proportionally).
Locked handles will appear as gray padlocks, indicating that they can't be worked with.
Note 2. Unproportional resizing may also change one segment type into another. For instance, you can change a SectorTo segment into ArcTo by altering its width or height.
Note 3. It is possible to hide resize handles so that they won't appear on the object. To do this, uncheck Show Figure Handles in the Behaviour Dialog (select Behaviour from the Format menu to bring up the dialog).
How Objects Behave within a Group
You can set how an object should behave within a group when the group is resized.
The Behaviour Dialog (Format
/ Behaviour) lets you to choose among the following 3 options:
- Scale With Group - always change the size of the object as the
group's size changes.
- Reposition Only - move the object without changing its size.
- Use Group's Settings - behave according to the settings of the
group to which the object belongs. This option is set by default.
Using the Make Same Tools for Equal Sizing
Sometimes you may need to make one or more objects equal in size with another object
that serves as a model.
You can use the Make Same tools to equalize the dimensions automatically:
![]()
![]() Make Same Width
- to resize the selected objects to the width of the primary object,
Make Same Width
- to resize the selected objects to the width of the primary object,
![]() Make Same Height
- to resize the selected objects to the height of the primary object,
Make Same Height
- to resize the selected objects to the height of the primary object,
![]() Make Same Size
- to equalize both width and height of the selected objects.
Make Same Size
- to equalize both width and height of the selected objects.
The Make Same commands are also available from the Figure / Make Same menu. From the list which opens, you can choose the Width, Height or Size option to unify the dimensions of the selected objects according to those of the primary one.
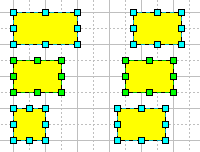
First select the model object, so that it displays green handles (primary
selection).
Then hold down Shift and select the objects which you want to fit in size
to the model.
Use the Make Same tools to equalize their width, height or both.
Here you can see how the Make Same Width tool works:

Note: The width and height of objects are taken as the width and height of their alignment boxes (the object's alignment box is displayed by a green or blue dashed line when you select the object).
Fit To Text
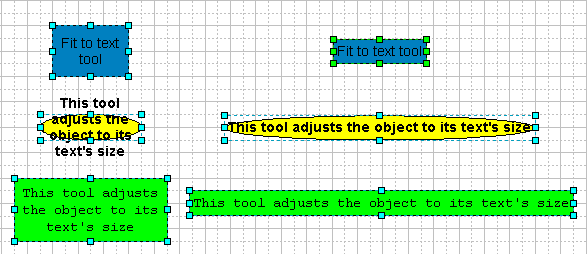
Sometimes you may need to make an object the same size as the text it holds.
The Fit To Text tool ![]() shrinks or enlarges the
selected object so it matches the size of its text box.
shrinks or enlarges the
selected object so it matches the size of its text box.

Note: The Fit To Text command is also available from the the Figure / Make Same menu.
Rotating
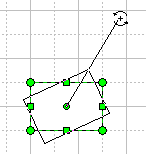
You can rotate an object easily by dragging its rotation handles. These are round handles (usually green or blue) in the corners of the object's alignment box.
To switch to the Rotation mode, you can use the Rotate tool ![]() or
check Rotate in the Tools menu.
or
check Rotate in the Tools menu.
When you select an object in the Rotation mode, it shows the rotation handles,
and you can drag them to rotate the object.
When you drag a rotation handle, the object turns around its rotation centre. By dragging the handle farther out from the object, you decrease the increment of rotation from 30 degree to 0.1 degree, and so increase the accuracy. The angle of rotation (in degrees) is displayed in the Status bar.


The rotation centre is also a handle, it looks like a plus sign in a green circle. You can reposition it by dragging it with the mouse in whatever direction.
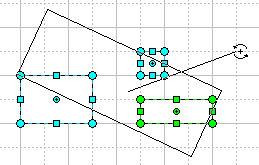
If several objects are selected, you may rotate each of them separately, by dragging a
rotation handle of an object.
If you start dragging with Ctrl (in Windows) or Cmd
(in Mac OS) held down, all the selected objects will rotate simultaneously around
their common rotation centre.

Note: You can switch between the Select and Rotate tool modes by clicking on the alignment box of the object.
You can also use the keyboard to rotate the selected object(s):
| Ctrl + Left Arrow | Cmd + Left Arrow | counterclockwise by 1 degree |
| Ctrl + Right Arrow | Cmd + Right Arrow | clockwise by 1 degree |
| Ctrl + Shift + LeftArrow | Cmd + Shift + Left Arrow | counterclockwise by 0.1 degree |
| Ctrl + Shift + RightArrow | Cmd + Shift + Right Arrow | clockwise by 0.1 degree |
To rotate the selected objects by 90-degree increments, you can
a) use the Rotate Left ![]() or Rotate Right
or Rotate Right ![]() tools;
tools;
b) apply the Rotate Left (90) and Rotate Right (90)
commands from the Figure menu (or the same options for Figure
in the context menu);
c) use the keyboard:
| Ctrl + L | Cmd + L | Rotate left (90) |
| Ctrl + R | Cmd + R | Rotate right (90) |
Note: You can protect an object from rotating and its rotation centre from repositioning. To do this, call the Protection Dialog (Format / Protection) and check Rotate. Then the object will display gray padlocks in place of rotation handles and the rotation centre, indicating that you can't perform the action.
See also:
Reshaping Figures
See related topics:
Selecting Objects
Basic Operations
Moving, Arranging and Flipping Objects
Formatting Object Properties