ConceptDraw lets you create your own libraries and edit the existing ones (move, delete, add and replace objects).
Creating a New Library
Saving a Library
Library Properties
Properties of Library Objects
Adding an Object from the Document to a Library
Changing the Icon of an Object
Moving Objects between and within Libraries
Deleting an Object from a Library
Replacing an Object under the Existing Library
Icon
Creating a New Library
You can create your custom object library, using the Library / New command from the menu. An empty library box will appear in the library window. Now you can add objects into it: from documents or from other libraries.
Note: Make sure to save the library after you finished working with it.
Saving a Library
To save a library, get the context menu on its title
and use the Save command.
If you need to save the library under another name, choose the Save As
option. The Save As dialog will come up to let you specify the name and
location of the the library file.
For saving the active library, you can also use the Save and Save As commands from the Library menu: the command , and the Close All command to close the library window with all the libraries it contains.
Note: If any changes were made to a library after the previous saving, the application offers you to save the changes when you close it.
Library Properties
To set or modify the properties of a library, or to assign a title to a new library, use the Library Properties dialog.
To call this dialog, get the context menu on the library's title and
select the Properties option.
For the active library, you can also use the Library / Properties
menu.

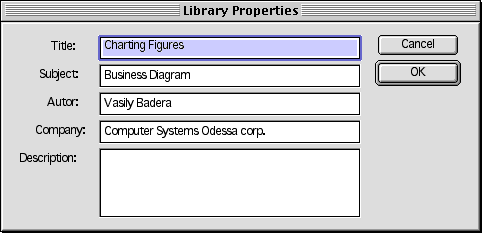
The Library Properties dialog lets you specify the Title of the library to be displayed on its tab, and also add information about the author and company, the subject field to which the library can be related, and provide a short description.
To save the changes, click OK in the dialog and then save the library.
Properties of Library Objects
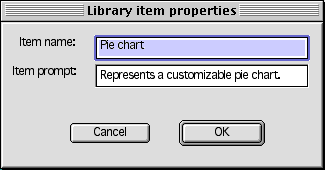
To assign or change a library object's properties, use the Library Item Properties dialog.
To call this dialog, open the context menu of the needed library object and
click Properties on the menu.
For the active library, you can also use the Library / Object /
Properties menu.

This dialog lets you specify the following text attributes which appear when you pause
the pointer over this object:
the Item Name for the tip, and the Item Prompt for the
status bar.
Adding an Object from the Document to a Library
There are several ways of adding a new object to a library:
a) By dragging and dropping:
Point to an object in the document (or just select it), and holding down the mouse button,
drag the object from the document window to the library window. When you release the mouse
button, a copy of the object will be added to the library.
b) By copying and pasting:
Select the object and copy it to Clipboard (you can use the Copy tool ![]() or the Copy
command from the context menu). Then, in the library window, call the context
menu for an object in the library, and click Paste on the menu. The
object will be inserted from the Clipboard to the library. The inserted object is shown
selected. To add an object to the end of the library, call the context menu on an empty
place in the library window and paste the object there.
or the Copy
command from the context menu). Then, in the library window, call the context
menu for an object in the library, and click Paste on the menu. The
object will be inserted from the Clipboard to the library. The inserted object is shown
selected. To add an object to the end of the library, call the context menu on an empty
place in the library window and paste the object there.
Note: To add the object from the Clipboard to the active library, you can also use the Library / Object / Paste menu.
c) By inserting the selected object:
Select the needed object and click Put into Library from the Edit
menu. The object will be added to the library which is currently active.
Note: If you select several objects and then drag or paste them to the library, they will be inserted as group.
As an object is inserted in the library, the software creates its library icon automatically. But you can change the library object's icon if necessary.
Changing the Icon of an Object
In the icon view mode (the View as Icon in the context
menu), the objects are displayed in the library window in the form of icons sized
29*29 pixels.
When you add an object into a library, the application creates its icon automatically.
The icon of any object can be replaced with a custom icon:
Moving Objects between and within Libraries
You may find it handy to create your own custom library and compile the objects you use most frequently. You can put the needed objects from the existing libraries there, as well as new objects.
You can move objects between the libraries by using the Copy and Paste operations for the library objects:
Another way is dragging library objects with the mouse. To insert a copy of an object into another library, drag it with the mouse, move over the target library title tab, wait until the library opens, and release the mouse where you want the object to be inserted.
To reposition an object within a library, simply drag it to the new location. If you hold down the Ctrl key (in Windows) or Cmd (in Mac OS) while dragging, a copy of the object will be inserted.
Deleting an Object from a Library
To delete an object from a library, you can use the the Remove command from the object's context menu or from the Library / Object menu.
After you confirm deleting, the object will be deleted.
Another option is to use the Cut operation. In this case the object will be copied onto the Clipboard first, and then deleted from the library. Then you can use the copy to paste it into a document, or in another library.
Replacing an Object under the Existing Library Icon
When expanding your libraries, you may need to update a library object without changing its icon. To do this, use the Replace Library Object command from the Edit menu.
Select the object in the library, then the updated object in the document, and perform the command. A confirmation message will be shown when the operation is over.
See related topic: