ConceptDraw offers you convenient features and extensive options for printing your documents: you can specify the print settings for each particular document, see the Page Breaks and Print Preview before printing, customize the size of the document in printing and the number of pages it should be printed on.
Print Page and Printer Settings
Document Printing Parameters
Viewing the Document Breaking into Print Pages
Print Preview
Printing
Before printing, you should prepare the document and set up the printer and print parameters.
Print Page and Printer Settings
To adjust the printer and print page settings, select Page Setup from the File menu.
A standard printer setup dialog will be displayed. These dialogs can differ depending on the particular printer. You can use this dialog to set up the size and orientation of the print page, and other parameters.
The Printer section shows the current printer. You can change it or set the options if necessary.
The Paper section lets you select the size of the print page (the options offered may vary with the printer). You can also modify other page attributes available (e.g. paper type and source, the scale at which the document must be printed, etc.)
The Orientation section is used to set the print page orientation: Portrait (vertical) or Landscape (horizontal).
Note: The printer setup dialog is also available from the File / Document Properties dialog. Use the Page Setup button on the Printing tab.
Document Printing Parameters
The printing parameters of the document can be specified in the Document Properties dialog (File / Document Properties).
On the Page tab, you can see the document page size.
The Printing tab shows the
following parameters which you can change as necessary:
- paper orientation,
- paper placement method (if the document page size is bigger than one print page),
- justification (the position on the printed page if the document page size is smaller
than the print page),
- and print size:
you can print the document page at its actual size,
or according to the current zoom level,
or use the Fit to Page option to fit
it to the specified number of print pages.
Viewing the Document Breaking into Print Pages
The document size may be larger or smaller than one print page.
Note that the print pages sometimes don't coincide with the document pages:
The document page size is set when the document is created. You can modify it in the File / Document Properties dialog on the Page tab.
The print page size is selected from the list of those offered by the printer and page setup dialog (Page Setup command in the File menu).
That is why it is important to preview the document breaking into the print
pages.
Check Page Breaks in the View menu: the non-printable
areas in the document will be marked with thick grey lines, and the thin grey lines will
separate the print pages.
If necessary, you can modify the document parameters (File / Document Properties) and the print settings (File / Page Setup).
Print Preview
All the necessary settings completed, you can preview the document before printing.
To see how the printed document will look, select Print Preview from the File
menu, or just click ![]() on the toolbar.
on the toolbar.
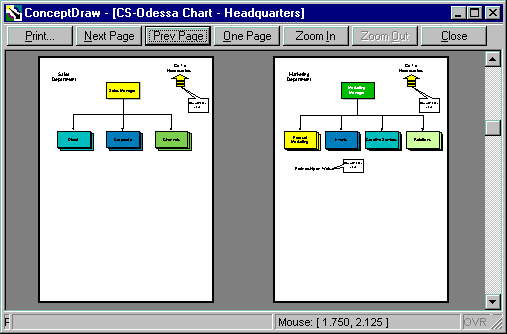
The preview window will appear and show the print pages.

You can use the buttons Prev Page and Next Page to
shift between the print pages.
The Print button can be used to give the command to print the document,
and the Close button lets you quit the preview to change some settings.
Printing
Once the document preparation is completed, you can give the command to print the document. This command will open the printer's standard dialog in which you can specify the print parameters, and start printing.
To give the print command, you can use one of the alternatives:
a) click Print in the Print Preview
window;
b) click the Print button ![]() on the toolbar;
on the toolbar;
c) select the Print command from the File menu;
d) or use the keyboard shortcuts:
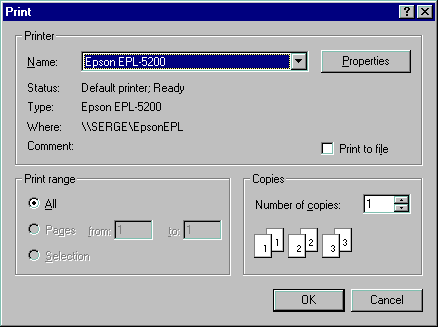
The Print dialog will appear and show the active printer.
In this dialog you can specify the range of pages to be printed, the number of copies, and
some other settings.

In the Printer section, the active printer is specified. If necessary,
you can still select another printer or modify the settings.
If the Print to file option is available, you can choose to save the
document together with the print settings. Then you will be able to print it elsewhere,
even without resorting to ConceptDraw. This option can also be used for creating
PDF-files.
The Print Range section lets you select the range of the pages to be printed: just enter the page numbers to specify the range. The default setting is All to print the entire document.
The Copies section is used to specify the desired number of copies (and sometimes the order of printing: this option depends on the printer).
Once all the parameters set, click OK to print the document.
![]() In Mac
OS the print setting dialogs usually differ depending on the particular printer. They
may offer some additional settings such as the paper quality and source, printing quality,
etc.
In Mac
OS the print setting dialogs usually differ depending on the particular printer. They
may offer some additional settings such as the paper quality and source, printing quality,
etc.