Internet Integration
ConceptDraw provides you with extended Internet integration: you can
create and use hyperlinks, send documents via E-mail, and save your drawings in HTML
format to place them on the Web easily.
Sending a Document via E-mail
Searching the Internet
Using Hyperlinks
Exporting a Document to HTML
Sending a Document via E-mail
ConceptDraw is an Internet-integrated application. You can e-mail your documents from
within ConceptDraw.
 Open
(or activate) the document you need to mail, and apply the Send command
from the File menu.
A new e-mail message window appears. The active document is already attached to this new
message. Just enter the addressee in the specified line, and write your comments in the
body of the message if necessary.
To send off the message (the attachment included), apply the respective mail client
command (as a rule, it is the Send button).
 Select the Send command from the File menu to launch the
mailer.
Create a new message and specify the addressee. To attach a file to your message, use the
corresponding means of the mailer (click the Attach button and browse to
select the file you need to mail).
Once the message completed, click the Send button to send it off.
Searching the Internet
ConceptDraw is integrated to work with the Internet and supports Internet search.
Click Search the Internet  button on the toolbar, and
ConceptDraw will launch the searcher in the browser which is available in your system.
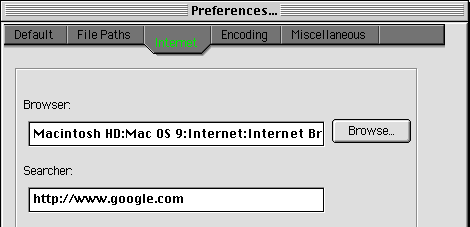
You can set which Internet browser and searcher should be addressed
by default:
call the Edit / Preferences dialog, and use the Internet
tab to make these settings.

Using Hyperlinks
ConceptDraw lets you link your drawings to other documents or Web pages, as well as to
other files and programs, providing quick access to data of various kinds. A hyperlink can
be assigned to any object in your document.
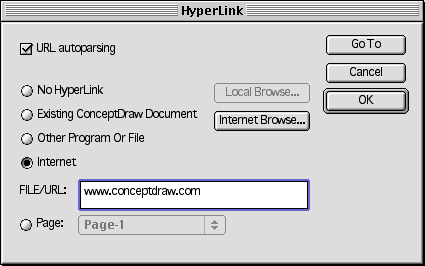
You can assign and edit the hyperlinks of the objects by using the Hyperlink
dialog. It lets you create hyperlinks of different types or disable the hyperlink.
You can also create the links to Internet and e-mail addresses by typing them
directly in the object's text. The URL autoparsing enables the software to
recognize and assign such links automatically.
URL Autoparsing for Internet and E-mail Addresses
Hyperlinks of All Kinds
Opening Hyperlinks
URL Autoparsing for Internet and E-mail Addresses
ConceptDraw is set to URL autoparsing by default. This means that if you enter an Internet
or e-mail address in the text assigned to an object (or in a text box, or in the text
of the topic on a branch), the application will automatically recognize and assign the
hyperlink to this object when you finish editing the text.
ConceptDraw will detect the following words in the text:
"http://"
"https://"
"www."
"mailto:"
"ftp://"
"news:"
"file://"
"gopher://"
"telnet:"
"wais:"
All the text following such a word up to a space will be regarded as hyperlink
destination.
This is an easy and useful way of assigning hyperlinks to objects if the destination is
an Internet or e-mail address which should be visible in the document.
To disable URL autoparsing or create links to other destinations, you can use the
Hyperlink dialog - see below.
To open a hyperlink, double-click on the object when the
mouse cursor turns into  .
.
To edit a text hyperlink, select the object and
press F2 to activate the text editing mode. When you finish editing
(click outside the object), the software will recognize the new hyperlink automatically.
Hyperlinks of All Kinds
Besides e-mail and Internet addresses, you can link your map to another page or another
ConceptDraw document, or to any other file or application. To create and edit
hyperlinks of all kinds, you can use the Hyperlink dialog.
Creating and Editing Hyperlinks
To assign a hyperlink to an object, or to edit
the existing link:
1. Select the object.
2. Open the Format / Hyperlink menu, and select the Edit
option.
You can also get this command from the object's context menu,
or from the keyboard:
 Ctrl + Shift + E
 |
 Cmd + Shift + E
 |
The Hyperlink dialog will come up for you to specify the destination
of the hyperlink:

For specifying the destination, you can use one of the following options:
- No Hyperlink: Disables the hyperlink.
Note that the text of the hyperlink is kept intact so it can be easily reactivated if
needed.
- Existing ConceptDraw document: Link to some existing ConceptDraw
document.
You can either type the path into the entry field, or click Local Browse
to navigate to the file. You may use a relative path. It describes the path to the linked
document starting from the location in which the current document is stored.
On opening such a hyperlink, the destination document will be opened in a new window.
- Other program or file: Link to a file.
You can either enter the path, or click Local Browse to navigate to the
file. You may use a relative path starting from the location in which the current document
is stored.
On opening such a hyperlink, ConceptDraw will launch the application used to process such
files, or run the destination application.
- Internet: Link to an URL address.
You can type the address into the File/URL field, or use the Internet Browse
button to launch the Internet search system in your Internet browser. When you find the
address you need, copy it, return to ConceptDraw and paste the address into the File/URL
field.
On opening such a hyperlink, your Internet browser will be launched. It will start with
the address specified.
 Note: You
can drag hyperlinks directly from your browser into the File/URL field of
the dialog. The Internet option will be activated automatically.
-Page: Link to a specific page within the same document.
Select the needed page from the list in the Page box. When you open the
hyperlink, the selected page will be opened in the same window.
Note 1. A hyperlink remains active even if the object
is included into a group. This allows you to create complex objects with multiple
hyperlinks.
Note 2. By assigning a hyperlink to an object you also
change the double-click action: double-click will open the hyperlink (see
"Double-Click Action"). If you need
to edit the text assigned to such an object, switch to the Edit
Text mode  , or just select the object and press F2.
Opening Hyperlinks
To open a hyperlink, you can use one of the following
alternatives:
a) double-click the object when the mouse cursor turns into  ;
;
b) get the context menu of the object and use the Hyperlink / Open
command (also available from the Format menu),
c) select the object and use the Open Hyperlink button  ,
,
d) select the object and use the keyboard:
 Ctrl + Shift + H
 |
 Cmd + Shift + H
 |
If you opened a link to a file in another application, and then need to return to the
source document:
- you can close that new application if you don't need it any longer,
- or you can switch to ConceptDraw on the task bar (in Windows) or in the applications menu in the top right corner of the screen (in Mac
OS). In this case the file opened in another application will remain
available.
You can also use the keyboard to switch between the applications:
 Alt + Tab
 |
 Cmd + Tab (for Mac OS 8.6 or later)
 |
If you followed a link to another ConceptDraw document, you can use the Window
menu to switch between the open windows.
Exporting a Document to HTML
ConceptDraw lets you export your drawings to HTML to place them on the Web easily.
To save a document in the HTML format, use the Export / HTML menu.
If you need to export only the particular objects from the page, select
them before exporting.
In ConceptDraw, the HTML export is highly customizable.
When you export to HTML, the application brings up the HTML
Properties dialog:

In the Save Picture As section you can specify the picture format for
the HTML file. You can choose GIF or JPEG. GIF images take up less space, so GIF is set by
default. However, if a document contains many colors (over 256), JPEG is preferable.
The Objects section lets you choose which objects of the document
should be taken for generating the HTML file:
- Whole page - exports the whole page. The resulting HTML page
gets the same dimensions as the document page.
- All - exports all the objects on the page. The size of the
HTML page is determined by the number of the objects and their arrangement.
- Selected - exports the selected objects only.
In the Image Size section, you can set the size for the picture in
HTML:
- Original Size:
With Use Zoom on (checked), the resulting image will be of the same size
as it looks onscreen. With Use Zoom off, all the objects will keep their
original size, regardless of current zoom level.
- Fit To Size:
Specify the width and height in pixels to fit the image to the desired size.
The Background box lets you set the background color for the image.
Click on this box to open the Choose Color dialog and select the needed
color from the palette.
The Hyperlinks section lets you set the behavior of hyperlinks in the
HTML file:
- Object's HyperLink:
Check this option if you need to preserve the hyperlinks assigned to objects.
- Prev/Next Page Links:
This check lets you set whether to display buttons for the previous/next page in
a multi-paged HTML document. You may disable this option if you can navigate the pages by
using object hyperlinks - then ensure that the Object's HyperLink
option is enabled.
In the Page(s) to Export section you can select the pages of the
document to be converted in HTML. For multiple selections, the Ctrl(Cmd)
or Shift keys can be used.
Click OK to start the conversion. When it is completed, the resulting
dialog shows the list of the files generated. You can click Preview to
see the newly created HTML pages in your Internet browser available in your system.
Note: If there is any text in the Description
field of the objects you export to HTML, this text will be displayed as a hint in the
browser when the mouse is paused over such an object's image on the HTML page (see "Formatting Object Properties - Information").
CONTENTS


