To move several objects at a time, select them (holding down the Shift key) and start dragging when the pointer turns into
Moving Objects
Aligning Objects
Distributing Objects
Changing the Order in which the Objects are Displayed
Flipping
Moving Objects
You can use the keyboard or the mouse for moving objects.
Moving Objects with the Keyboard
Only the selected objects can be moved with the keyboard. (See "Selecting Objects" for specifics).
Moving objects by pixels helps you position the objects more precisely. Hold down Shift
and press an Arrow key to move the selection by one screen
pixel with each keystroke. Use a higher Zoom level
for more precise positioning.
Note: Make sure there are no handles selected on the object before you start moving it with the keyboard, otherwise you'll move the handles instead of the object itself.
Moving Objects with the Mouse
You can drag an object with a mouse when you see the pointer turns into a black arrow![]() over
this object.
over
this object.
To move several objects at a time, select them (holding down the Shift
key) and start dragging when the pointer turns into![]() over one of the selected
objects.
over one of the selected
objects.
The ways of moving an object may vary depending on the tool mode which is currently on.
1) When the Select ![]() , Rotate
, Rotate ![]() , Rectangle
, Rectangle ![]() or Ellipse
or Ellipse ![]() tool is active, you can move an object by dragging
either its body or the alignment box.
tool is active, you can move an object by dragging
either its body or the alignment box.
2) With such tools as Line ![]() , Sector
, Sector ![]() , Arc
, Arc
![]() , Spline
, Spline ![]() or Connectors
or Connectors ![]()
![]() , you can move an object by
dragging its alignment box (so the object(s) should be selected).
, you can move an object by
dragging its alignment box (so the object(s) should be selected).
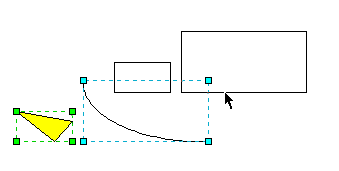
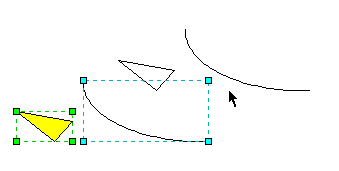
When moving an object with the mouse you only see the outline of its alignment box. In case you'd like to see the whole object, stop the mouse and wait a moment - the contours of the object moved will appear in full detail.
To constrain the movement of an object to strictly vertical or horizontal, hold down the Shift key while you drag the object, or use the Shift + Arrow keys.
Note: You can protect an object from being moved horizontally or vertically. Call the Protection Dialog: select Protection from the Format menu. In the dialog, you can check X Position to prohibit the horizontal movement, and Y Position for the vertical movement. By checking both of these options you lock the object against repositioning.
The way objects behave when moved is also determined by whether the Snap
mode ![]() is on or off. If the Snapping is on, the object you are moving jumps to the nearest snap
locations (usually the grid nodes), instead of following the mouse directly. This
functionality lets you easily align objects with the grid lines and guides. (See the
"Snapping" section for details.)
is on or off. If the Snapping is on, the object you are moving jumps to the nearest snap
locations (usually the grid nodes), instead of following the mouse directly. This
functionality lets you easily align objects with the grid lines and guides. (See the
"Snapping" section for details.)
Sometimes you may need to position an object right in the centre of the page. To do this, select the object and use the Centre Page command from the Tools menu. With the Centre Vertically and Centre Horizontally commands you can centre the vertical or horizontal position of the object(s) respectively.
To align and position objects with respect to one another, you can use the Align and Distribute tools.
Aligning Objects
When several objects are selected, you can align them in different ways with respect to the primary selected object (the one displaying green handles). The Align tool places the objects so that their alignment boxes are arranged along a certain horizontal or vertical line. This line is related to the primary object, going either along one of the sides, or through the center of its alignment box.
![]()
The object with the primary selection (the one that displays green handles) is the one to
which other objects are aligned.
You can choose among the following 6 types of alignment:
Vertical alignment -
![]() Align Left
- on the left sides,
Align Left
- on the left sides,
![]() Align Centre
- on the central vertical line,
Align Centre
- on the central vertical line,
![]() Align Right
- on the right sides.
Align Right
- on the right sides.
Horizontal alignment -
![]() Align Top - on
the tops,
Align Top - on
the tops,
![]() Align Middle
- on the middle horizontal line,
Align Middle
- on the middle horizontal line,
![]() Align Bottom
- on the bottoms.
Align Bottom
- on the bottoms.
All these commands are also available from the Figure / Align menu:
you can choose Left, Centre or Right
for vertical alignment, and Top, Middle or Bottom
for horizontal.
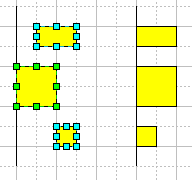
Here you can see how objects are aligned vertically on their left sides:
Distributing Objects
The Distribute tool lets you place three or more objects at equal distances between the alignment boxes (or between their sides or centers).
![]()
The objects are distributed with respect to the primary object (the one that displays green handles).
You can choose among the following 8 distribution options:
Horizontal distribution -
![]() Distribute
Horizontal Spacing - creates unified distances between the alignment boxes,
Distribute
Horizontal Spacing - creates unified distances between the alignment boxes,
![]() Distribute Left -
between the left edges of the alignment boxes,
Distribute Left -
between the left edges of the alignment boxes,
![]() Distribute Centre -
between the centres of the objects,
Distribute Centre -
between the centres of the objects,
![]() Distribute Right -
between the right edges of the alignment boxes;
Distribute Right -
between the right edges of the alignment boxes;
Vertical distribution -
![]() Distribute
Vertical Spacing - creates unified distances between the alignment boxes,
Distribute
Vertical Spacing - creates unified distances between the alignment boxes,
![]() Distribute Top -
between the top edges of the alignment boxes,
Distribute Top -
between the top edges of the alignment boxes,
![]() Distribute Middle
- between the centres of the objects,
Distribute Middle
- between the centres of the objects,
![]() Distribute Bottom -
between the bottom edges of the alignment boxes.
Distribute Bottom -
between the bottom edges of the alignment boxes.
All these commands are also available from the Figure / Distribute
menu:
the options for horizontal distribution are Horizontal Spacing, Left,
Centre, Right;
the options for vertical distribution are Vertical Spacing, Top,
Middle, Bottom.
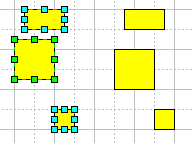
Here you can see how the Distribute Vertical Spacing option works: it unifies the vertical spacing between the objects.
Changing the Order in which the Objects are Displayed
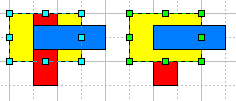
Each time you draw an object, or take it from another document or from a library and drop on the page, the object gets registered in the order list. ConceptDraw displays objects according to their position in the order list, so most recent objects may overlap the ones you created earlier.
Sometimes you may want to change the display order of the objects. To put the selected objects to back or to front in the view, you can use the following operations:
1) Send To Back - sends the object to the back of the order list, so
that it is displayed behind all other objects.
Select Figure / Send To Back or use the same command from the context
menu.

2) Bring To Front - brings the object to the front of the order list,
so that it is displayed above all other objects.
Select Figure / Bring To Front.

3) Send To Step Back - positions the object one step lower in the
order list.
Select Figure / Send To Step Back.

4) Bring To Step Front - positions the object one step higher in the
order list.
Select Figure / Bring To Step Front.
Flipping Objects
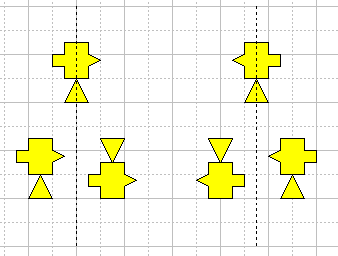
Flipping changes the direction the object's face, mirroring its halves
against the horizontal or vertical central line.
To flip the selected objects, you can
a) click on the Flip Vertical ![]() or Flip Horizontal
or Flip Horizontal
![]() tools on the toolbar,
tools on the toolbar,
b) use the Flip Vertical or Flip Horizontal commands
from the Figure menu (also found in the object's context menu),
c) or use the keyboard:
| Ctrl + J | Cmd + J | Flip Vertical |
| Ctrl + H | Cmd + H | Flip Horizontal |
These operations transpose opposite sides of an object with respect to an imaginary horizontal or vertical line that goes through the rotation centre of the object.


If several objects are selected, the imaginary line goes through their common rotation centre.
See related topics:
Selecting Objects
Basic Operations
Connecting Objects
Formatting Object Properties