ConceptDraw gives you flexibility in working with the documents: you can select and modify the global application settings (used by default and applied to every new document) and specify the custom settings for any particular document.
Application Settings
Manipulating Toolbars
Document Page Settings
Printing Setup
Application Settings
Global program configuration can be set in the Preferences dialog. This dialog lets you select the default template and specify such settings as scale and units of measure, initialization paths for main files and Internet browser, set the document page properties and check the parameters for document view.
To call the dialog, select Preferences from the Edit menu.
The Preferences dialog holds the
application settings grouped on the following tabs:
Default, File Paths, Internet, and Miscellaneous.
| The Default tab describes the settings applied to each new document you create. |
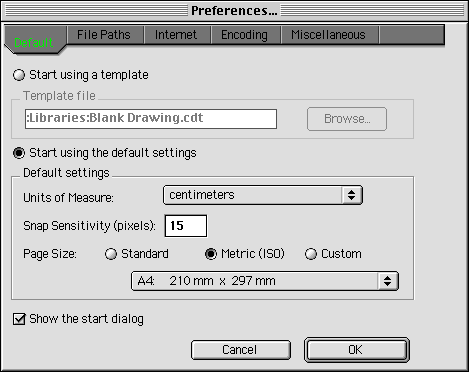
When creating a new document, ConceptDraw either takes the settings from a template file or uses those set directly by the user.
1. If you choose Start using a template, the software will create every new document basing on the Template file you specify in this field (by default, it is Blank Drawing.cdt stored in the Libraries folder). Use the Browse button to select another template file.
2. If you select Start using the default settings, a new document will be set up according to the configurations described below:
- Units of measure: specifies the default units of measure. The rulers, the status bar, entry fields in dialogs and the table will display values in this units of measure. For specifics, refer to the "Measurements" section.
- Snap Sensitivity: sets the default distance from which snapping and gluing activate. This distance is set in pixels and doesn't depend on the scale or magnification.
- Page Size: specifies the default page size. You may choose one of
the standard sizes by selecting Standard or Metric(ISO)
and choosing a size from the drop-down list.
If you need a ustom page size, choose Custom to enter the
dimensions manually. You can type in the values in any units of measure supported by the
application (see the "Measurements"
section).
The check box at the bottom of the dialog sets whether to show the Start dialog when you launch this software.
Note: The default settings will be applied to every new document, and if you need to change the parameters for a particular document, activate it and apply the File / Document Properties menu (see the tabs for Page and Settings).
| The File Paths tab describes the default paths to ConceptDraw components: documents, libraries, templates, help system. |
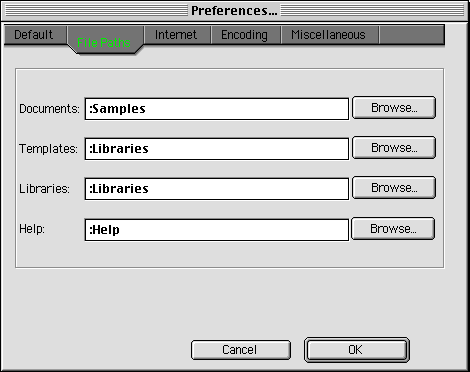
To set a path, use the Browse button or type the path in the corresponding field.
When you call the File / Open dialog for documents, templates or libraries first time after the application started, the dialog displays the contents of the respective default folder. Later, the File / Open dialog displays the current folder for each file type.
| The Internet tab specifies the path to the Internet browser which the software uses to open hyperlinks and search the Internet. You can also choose the default Internet searcher to be used. |
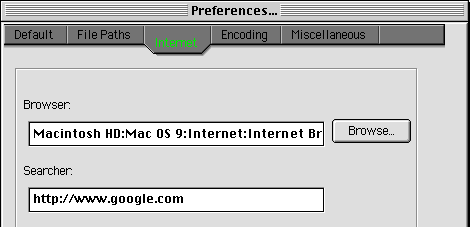
Initially, this path corresponds to your default Internet browser. However, if for some reasons this path is incorrect, you may specify the path to your Web browser manually.
| |
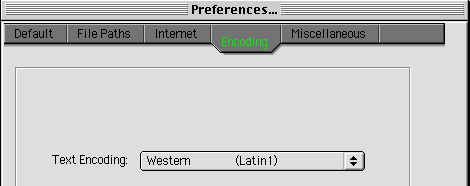
| The Miscellaneous tab provides the control over additional settings of the drawing environment. |
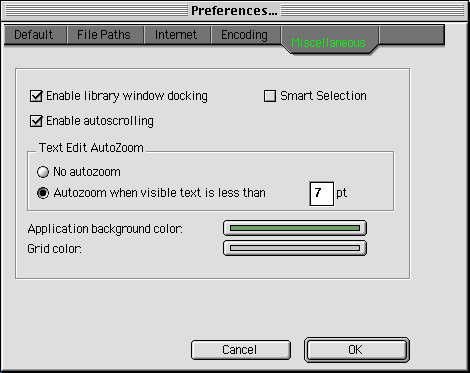
The check box Enable library window docking turns to enable/disable the docking feature for the library window.
The Enable autoscrolling check can be used to enable/disable the autoscroll feature for viewing documents. When the autoscrolling is enabled, the document's view area will be moved automatically (that is, the document will be scrolled in the needed direction) once you move any object or handle on the edge of the viewing area.
The Enable Smart Selection check box lets you activate/deactivate the Smart Selection mode: if you selected several objects recently, this mode restores the whole selection when you click any of these objects.
The Text Edit AutoZoom section lets you adjust the text editing functionality. You can enable the autozoom in the document if the text looks too small, and set the minimum font size acceptable for text editing mode (setting the font size best viewed).
The Application background color box shows the color of the document windows background area surrounding the document page. Click on the box to modify the current color. A color palette will come up. You can either select one of the basic colors, or use the palette and scales to adjust a custom color. Click OK to apply the selected color.
The Grid Color box lets you set the color for grid displayed in documents. You can adjust it in the same way as the background color.
To save the preferences you have selected, click OK in the Preferences dialog.
Manipulating Toolbars
ConceptDraw has several toolbar lines in which the tools are grouped by their functions. The ways for managing the toolbars are essentially different in the Windows and Macintosh versions of the software.
Mac OS Version Toolbars
In the Mac OS version, there are 11 independent toolbar lines.
They can be docked to the application menu bar in the upper part of the screen,
or placed in floating state anywhere in the screen area.
To move a toolbar, grab it by its window caption or by the space between the icons, and drag it to the needed location.
As the toolbar windows occupy much space on the screen, you can hide the ones you use
most seldom.
You can use the View / Toolbars menu to show/hide
the toolbars. In the list of the toolbars, just check which toolbars should be displayed,
or uncheck the toolbars which you want to hide.
The tools and operations from the hidden toolbars can be easily called from the main
menu.
You can also use the shortcuts for switching betwen the tools or performing
certain operations (see Appendix A).
The toolbars can be positioned vertically (as it is conveniient, for example for drawing tools) or horizontally. To change the orientation of a toolbar, get its context menu and select the needed option - Vertical or Horizontal.
You can specify the properties for several or all the toolbars simultaneously. The Toolbars dialog (from the View / Toolbars / Customize menu) lets you show/hide the toolbars and set their orientation.
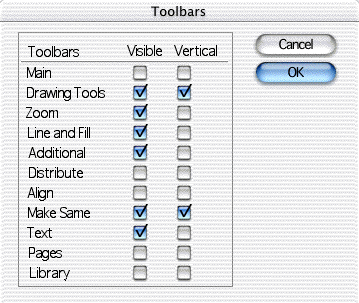
Note: The toolbar settings are preserved when you quit the application.
Windows version Toolbars
In the Windows version of the application, all the toolbars are placed in 3 lines at
the top of the aplication window.
You can click the control bar at the left end of each toolbar to reduce/open
the toolbar.
Note: The toolbar settings are preserved when you quit the application.
Document Page Settings
When creating a document, you may need to specify its page size and other parameters.
The global default settings for every new document are taken
from the active template or from the current defaults set by the user (see the Edit
/ Preferences dialog, Default tab).
If you need to change the settings for a particular document,
activate this document and call the File / Document Properties dialog:
- on the Page tab in this dialog, you can set the page size and orientation
for the active document,
- on the Settings tab, you can specify the units of measure, Undo and
Snap parameters, shadow offset,
- the Printing tab lets you set the printing parameters for the active
document, including the option to fit the document to the given
number of printed pages (Fit to Page).
Printing Setup
In ConceptDraw, you can set the global printing parameters (to be applied to
every printed document),
and also specify the print settings for a particular document if necessary.
To make or change the global settings, use the File / Page Setup command. In the Page Setup dialog, you can set the print page size and orientation and the printer parameters.
To specify the print settings for a particular document,
activate it and call the File / Document Properties dialog. On the Printing
tab in the dialog, you can set paper orientation, paper placement method (if the
document page size is bigger than one print page), and justification (the position on the
printed page if the document page size is smaller than the print page).
This tab also contains the Fit to page section to let you fit the
document page to the given number of the pages in printing.
See the details in the "Printing" section.