The Document Properties dialog displays and lets you
modify the properties of any document opened in ConceptDraw.
To call this dialog, select Document Properties from the
File menu.
The Document Properties dialog holds the information
on the document and the main settings saved with the document: document page parameters,
units of measure, print settings etc.
This dialog lets you modify the settings for a particular document, without changing the
global settings applied to all new documents (see "Application
Settings").
The properties of the document are grouped on the four tabs: General, Page, Settings and Printing.
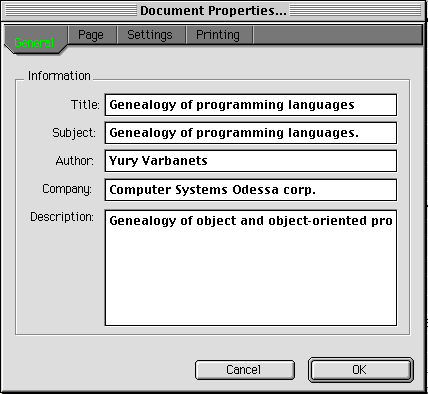
| The General tab holds the description of the document. |
It lets you specify information describing the document: the author and the company, the subject of the document, and a brief comment.

Note: If you need to use the same general data (author, company, etc.) for multiple documents, you can specify this information in Document Properties once, and save this document as a template for future use (apply the File / Save As Template command). Then you can create your new documents from this template by opening the template file (you can use the File / New / Browse Templates menu command). See the "Templates" section for more information.
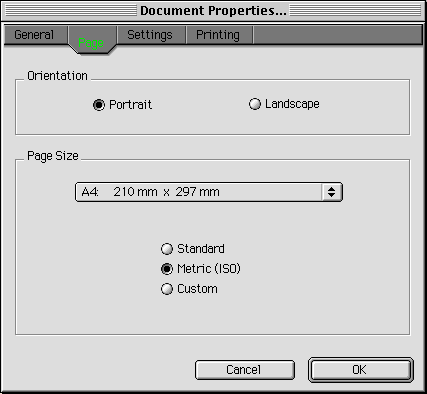
| The Page tab contains the characteristics of the entire page of the document. |

- Orientation: lets you specify the document page orientation:
Portrait stands for vertical orientation, and Landscape
for the horizontal.
- Size: this section sets the document page dimensions.
For Standard and Metric(ISO) options,
you choose one of the preset sizes from the corresponding list (use the drop-down box):
For Standard:
Letter(8.5in*11in);
Folio(8.5in*13in);
Legal(8.5in*14in);
Tabloid(11in*17in).
For Metric (ISO):
A5(148mm*210mm);
A4(210mm*297mm);
A3(297mm*420mm);
A2(420mm*594mm);
A1(594mm*841mm);
A0(841mm*1189mm).
The Custom option lets you enter custom values for the width and height of the page. By default, all the dimensions are displayed in the current measurement system. However, you can enter values in any measurement system supported (see the "Measurements" section).
Note: If you need to use the same page settings (size, orientation) for multiple documents, you can specify them in Document Properties once, and save this document as a template for future use (apply the File / Save As Template command). Then you can create your new documents from this template by opening the template file (you can use the File / New / Browse Templates menu command). See the "Templates" section for more information.
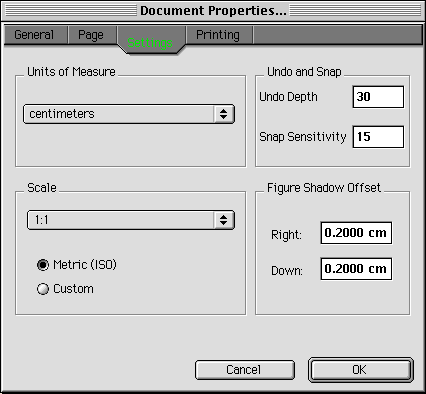
| The Settings tab displays various document settings which you can modify. |

- Units of measure: shows what measuring unit used in the document. It is applied to all numeric values on the rulers, on the status bar, in the input fields of dialogs. For specifics, refer to the "Measurements" section.
- Scale: lets you choose a standard scale or specify a custom scale
for the document.
When the Metric (ISO) option is active, you can choose one
of the standard scales from the drop-down box.
If you need a custom scale, choose the Custom option.
The two fields will appear for you to specify the ratio of the visual dimensions on the
page to the real dimensions of the objects: e.g. For example, 1 in = 1 ft, 1
cm = 1 km, etc. It is recommended that the units of measure in the first field
correspond to the current units of measure of the document.
For more specific information, refer to the "Scaling
in Documents" section.
- Undo Depth: specifies the number of consecutive actions you can undo. The default value is 30.
- Snap Sensitivity: sets the distance from which snapping and gluing are activated. This distance is set in pixels and does not depend on the scale or magnification. The default value is 15 pixels.
- Figure Shadow Offset: indicates the values for the horizontal and vertical shadow offset for all shadowed objects in the document.
Note: If you need to create multiple documents with the same specific settings (scale, units of measure, shadow offset), you can specify them in Document Properties once, and save this document as a template for future use (apply the File / Save As Template command). Then you can create your new documents from this template by opening the template file (you can use the File / New / Browse Templates menu command). See the "Templates" section for more information.
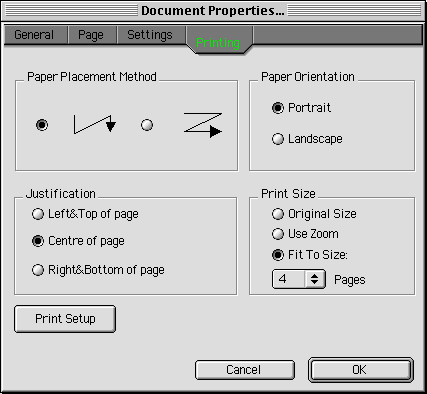
| The Printing tab specifies the settings for printing the document. |

- Paper Placement Method: specifies how the document is tiled across paper sheets (if its page is larger than one print page). It can be tiled either down and then over, or over and then down. If the document page is smaller than the print page, this parameter is ignored.
- Justification: controls the position of the document on the print page (if the document page is smaller than the print page). It can be placed in the top left corner, in the center, or in the bottom right corner. This setting is ignored if the document page is larger than the print page.
- Paper Orientation: this parameter specifies the print page orientation - Portrait stands for vertical orientation, and Landscape for the horizontal. This setting is saved together with the document, and if it does not coincide with the page orientation set for the printer, the software will use this setting rather than the printer's.
Note: Changing the paper orientation does not change the drawing page orientation and only affects the orientation of the paper you print on.
- Print Size: this section lets you specify at which size the
document page will be printed.
The Actual Size is set by default.
The Zoom option lets you print the page according to the current
zoom level (as you see it on the screen).
The Fit to Page option lets you fit the document page to the
given number of the print pages (the zoom level will be adjusted automatically).
The tab also has the Page Setup button which calls a standard printer setting dialog. It displays the active printer and lets you set the print page size and orientation, paper source and other parameters available.
Note: If you need to use the same print settings for multiple documents (e.g. fit the document to the specific number of paper sheets in printing), you can specify the settings in Document Properties once, and save this document as a template for future use (apply the File / Save As Template command). Then you can create your new documents from this template by opening the template file (you can use the File / New / Browse Templates menu command). See the "Templates" section for more information.