Protection
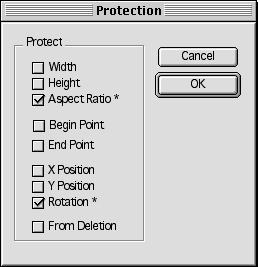
Various attributes of the ConceptDraw objects can be locked against changes that you perform by using the menu commands, the mouse or the keyboard. You can do this easily by setting the corresponding options in the Protection dialog.
To lock some characteristics of one or more objects, select these objects and call the Protection dialog from the Format menu.

You can check the following options for protection:
- Width - locks/unlocks the object's width against resizing by
the resize handles.
- Height - locks/unlocks the object's height against resizing by
the resize handles.
The locked handles will be displayed as gray padlocks, indicating that you can't apply
actions to them.
- Aspect Ratio - locks or unlocks the proportion of the object's height and width. When this option is checked, the object will be resized only proportionally when you drag any of its resize handles.
- X-Position - locks/unlocks the horizontal (X)
position of the object.
- Y-Position - locks/unlocks the vertical (Y) position of
the object.
- Rotate - locks/unlocks the object against rotation. If
the object is locked, its rotation centre cannot be repositioned either.
The locked handles appear as gray padlocks indicating you can't apply actions to them.
- From Deletion - locks/unlocks the object against deleting the object itself or its handles. If an attempt is made to delete a protected object, the warning appears: "Some objects were licked against deleting and couldn't be removed".
Double-Click Action
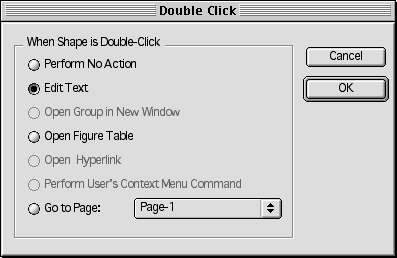
When you double-click an object, some action is usually performed: the text editing
mode is switched on, or the hyperlink is opened, etc.
You can modify the double-click action for one or more objects. Select these objects (you
can hold down Shift for multiple selection), and use the Format /
Double-click menu to get the Double-Click dialog.

By selecting one of the following options you set the action that will be performed when the object is double-clicked:
- Perform No Action - takes no action.
- Edit Figure's Text - opens the object's text box, and
the text editing mode is switched on. This is the default option for most objects
(excepting groups, hyperlinked objects and OLE objects). Another, independent, way for
editing text is to select the object and press the F2 key.
- Open Group in New Window - opens the group in a
separate window in the Edit Group mode. The same can be done by choosing
the Edit Group option from the Format menu. This option
is available for groups only, and set for groups by default.
- Open Figure's Table - opens the table which holds the
object's parameters and lets you modify them.
- Go To Hyperlink - double-click opens the hyperlink
assigned to the object. This option is set by default for objects bearing a hyperlink.
- OLE Verb - for OLE objects (in Windows),
double-clicking will open it for editing in the native application. This is the default
option for OLE objects.
- Perform User's Context Menu Command - performs a command in
the user's context menu. If there are several items, each double-clicking will perform the
next command in the list.
- Go To Page - on double-click the program opens another
page of the same document: you specify this page in the box.
Information
In the Information dialog, you can alter the additional information about the object. Select the needed object and click Information form the Format menu.
If several objects are selected, the dialog shows the information for the primary selected object (displaying green handles).

In the Name field, you can type the name you want to assign to the object.
In the Description field, you can provide information describing the object. If such object is exported to HTML, these notes will be displayed as tips in the browser when the mouse cursor points to this object.
The ID and SubID fields are used for reference
only, and cannot be modified.
ID is the individual number of the object
according to the order in which objects are created on the page.
SubID is the sequential number of the object within a
group. It is changed when the operations like SendToStepBack are
performed (see "Changing the order in which the objects are displayed").
Note: The ID and SubID values are used when you describe one object through another using formulas. In the table, they are used as references to parameters of other objects. For more specific information, refer to the "Formulas" section.
Behaviour
You can describe or modify the behaviour of the selected objects easily by using the Behaviour dialog. To call this dialog, click Behaviour in the Format menu.

The Interaction Style section determines whether the object is
a connector or not, and lets you turn any object into a connector if necessary.
- Line (1-Dimensional): the object is a connector.
Besides, it behaves as a line when you work with it.
- Box (2-Dimensional): the object is not a connector. It behaves
as a 2D object.
The Selection Highlighting section describes how the object is
displayed when selected. The following options are available: Show Figure
Handles, Show Control Handles, Show Alignment Box.
They are all active by default, but you can choose to hide some of these elements if
necessary. For instance, if you lock an object against resizing, it's quite reasonable not
to show its resize handles.
The Resize Behaviour section describes how the object should behave
within a group when the group is resized.
- Scale With Group - always resize the object as the group is
resized.
- Reposition Only - simply move the object without changing its
size.
- Use Group's Settings - to use the behaviour settings of the
group to which the object belongs. This option is set by default.
Hyperlink
ConceptDraw lets you link its objects to documents, document pages, files or Internet locations, providing quick access to data of various kinds.
You can assign and edit the hyperlinks of the objects by using the Hyperlink dialog. Select the object and use the Format / Hyperlink / Edit menu to call this dialog. It lets you create hyperlinks of different types or disable the hyperlink.
You can also create the links to Internet and e-mail addresses by typing them directly in the object's text. The URL autoparsing enables the program to recognize and assign such links automatically.
See the "Using Hyperlinks" section for detailed description of how to create and edit hyperlinks of different kinds.
By assigning a hyperlink to an object you also change the double-click action:
double-click will open the hyperlink (see "Double-Click Action"). If you need to edit
the text assigned to such an object, just switch to the Edit Text mode
![]() or
select the object and press F2.
or
select the object and press F2.