ConceptDraw offers you extended operations on objects to let you create complex
drawings quickly and easily.
You can take advantage of the intelligent connectors which reshape automatically when the
objects are repositioned or resized.
In ConceptDraw you can also use extended object formatting, assign text and hyperlinks to
objects.
Selecting Objects
Basic Operations
Moving, Arranging and Flipping Objects
Connecting Objects
Formatting Object Properties
Selecting an Object
Multiple Selection
Primary and Secondary Selection
Selecting an Object within a Group
Selecting Objects in the Order as they were Created
Smart Selection
Selecting an Object
To work with an object, you need to select it. The selected objects are surrounded by a dashed green or blue line which shows the object's alignment box.

In most cases, the Select mode is used for selecting objects. To switch to the Select mode, use any of the following ways:
a) click on the Select button ![]() on the on the toolbar,
on the on the toolbar,
b) check the Select option in the Tools menu,
c) or use the keyboard:
Enter |
To select an object, just click on it.
When you select an object, it also shows handles which you can drag to
modify some properties of the object.
Handles vary with the type of the object and the tool which is currently active on the
toolbar. Here you can see how an ellipse looks if selected in different tool modes:
Select, Line, Arc.

Multiple Selection
To select several objects at a time, click them one by one holding down the Shift key. To deselect one of the selected objects, hold down Shift and click on this object again (this applies for Select Box as well, see below).
In the Select ![]() or Rotate
or Rotate ![]() tool modes, you can also
use Select Box for selecting multiple objects. Click the mouse beyond all
the objects you want to select, and while holding down the mouse button, drag across the
objects to embrace them with a box. All the objects touched by the resulting thin-line box
will appear selected.
tool modes, you can also
use Select Box for selecting multiple objects. Click the mouse beyond all
the objects you want to select, and while holding down the mouse button, drag across the
objects to embrace them with a box. All the objects touched by the resulting thin-line box
will appear selected.


Note: In the Connection Point ![]() and Edit Text
and Edit Text ![]() tool
modes, you can select objects without quitting the mode you work in:
tool
modes, you can select objects without quitting the mode you work in:
hold down Ctrl (in Windows) or Cmd (in Mac
OS) when clicking, and add Shift for multiple selection.
To select all the objects on the page, choose Select All from the Edit menu.
To cancel the selection, click outside the selected objects.
Primary and Secondary Selection
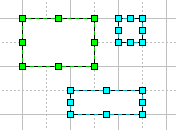
When several objects are selected, one of them displays green handles: this is the primary selected object. All the other selected objects show blue handles: they are secondary selected objects.

Some operations distinguish between the primary object and the secondary selected
objects:
for example, the result of the Connect Figures
and Direct Connect operations is that all the
secondary selected objects are connected to the primary one.
Some other operations, like Hyperlink, Edit Text, Connection
Point work with the primary object only, and ignore the rest.
Among the selected objects, you can shift the primary selection to any one of
them:
to make an object primary selected, just click on it with the mouse, and it will display
green handles.
(You should click on the object itself - on the line or contour if the object is
a segment or a transparent figure).
Selecting an Object within a Group
If you need to modify the formatting of an object included into a group, you can select it in the same way as you select ordinary objects.

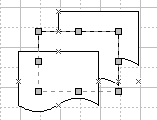
Unlike common objects, objects selected within a group display gray handles. This
indicates that grouped objects are protected against some operations, such as moving and
rotating, though you can change their line color and thickness, fill color, add text, etc.
To select an object within a group, select the group first, and then click on the needed
object. If the group includes other groups, you may have to click more then once until you
select the object you need.
For more extensive operations (moving, rotating, reshaping, adding or deleting elements), you can use the Figure / Edit Group command.
Selecting Objects in the Order as they were Created
Another option for selecting is to use the Tab key. Each time you hit Tab, you activate objects in the order in which they were created or dropped on the page, starting from the currently selected object. The program will adjust the document page each time you press Tab, so that the selected object is shown in the centre of the screen. If no object is selected, hitting Tab will affect the first object you have drawn or dropped on the page.
Holding down the Shift key when hitting Tab reverses the selection order.
Smart Selection
The Smart Selection mode is helpful when you need to work most often
with the same set of objects in the document.
When the Smart Selection mode is on, the program remembers which objects
were selected the last time (if more than one) and lets you restore the entire selection
by clicking on any of these objects.
To toggle this mode on/off, use the Edit / Preferences dialog: on the Miscellaneous tab in this dialog, check or uncheck Smart Selection.
See further:
Basic Operations
Moving, Arranging and Flipping Objects
Connecting Objects
Formatting Object Properties