Connection Points
Connection Points are associated with an object. They indicate the
locations in which other objects can be glued to it (by the endpoints or control handles
at their endings).
They take effect when the object is repositioned: all connectors glued to the object's
connection points will then reshape to maintain the connection.
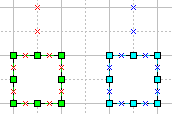
The connection points look like blue crosses that appear on an
object or near it. When the object is primary selected, the connection points
assigned to this object are displayed in red. The connection points may lie
both on the body of the object and outside it. Then the red color helps us tell to
which object the connection point belongs.

To create, move or delete connection points, switch to the Connection Point
mode in either of the following ways:
a) click on the Connection Point tool ![]() on the toolbar,
on the toolbar,
b) check Connection Point in the Tools / Draw menu,
c) or use the keyboard:
Creating a Connection Point
To add a connection point to an object:

Note: If the Snap mode ![]() is active, the connection points you add
will be pulled to the nearest snap locations (grid lines and nodes). If you want to
position the connection points precisely, you can turn Snap off on the
fly by holding down the Alt key (in Windows)
or Cmd key (in Mac OS). When you release the modifier
key, the Snap mode will be restored again.
is active, the connection points you add
will be pulled to the nearest snap locations (grid lines and nodes). If you want to
position the connection points precisely, you can turn Snap off on the
fly by holding down the Alt key (in Windows)
or Cmd key (in Mac OS). When you release the modifier
key, the Snap mode will be restored again.
If you put a new Connection Point over an object (no matter whether selected or not), the new connection point is assigned to this object (the object will become selected automatically).
If you put a new Connection Point outside any object, it is assigned to the currently selected object. If several objects were selected, the new connection points are added to the object with primary selection.
You can select objects without quitting the Connection Point mode. Hold down the Ctrl key (in Windows) or the Cmd key (in Mac OS) and click on the needed object to select it. To select several objects, you also need to hold down the Shift key.
Manipulating Connection Points
In the Connection Point mode ![]() , you can select, reposition
and delete connection points.
, you can select, reposition
and delete connection points.
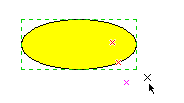
To select a connection point, move the mouse over it, so that
the pointer changes into ![]() , and click the mouse. The selected connection point
turns magenta. If you need to select several connection points, hold down Shift
when clicking.
, and click the mouse. The selected connection point
turns magenta. If you need to select several connection points, hold down Shift
when clicking.
To move a connection point, drag it with the mouse to a new
location.
To move several connection points at a time, select them and drag by one of the selected
connection points (start dragging when the pointer changes into ![]() over this connection point).
over this connection point).
To delete one or more connection points, select them (hold down Shift for multiple selection) and press the Del key.
In ConceptDraw, you can choose to show / hide connection
points of objects. In the View menu, uncheck the Connection
points item to hide the connection points, or check this item to show them.
Note that the connection points remain functional even when they are not visible.
Connection Points of Grouped Objects
When objects are included into a group, you can still use their connection points. Normally, these connection points are not visible. But when you select an object in a group, its connection points appear in grey, and you can glue connectors to them.

If you want to always see the connection points of grouped objects, enable Connection Points In Groups in the View menu.

Note that connection points remain functional even when they are not visible.
See also:
Connecting Objects
Smart Connector
Direct Connector
Tools for Multiple Connection
Auto-Connection Modes