Measurements Table
|
|
Tool/Menu |
Measures |
|
|
Manual Measurements
included in the Tools Palette |
 Straight Line Straight Line
|
Length, Control Points coordinates |
|
|
 Angle Angle
|
Angle, Length, Control
Points coordinates |
|
|
 Polygon Polygon
|
Perimeter, Area, Control
Points coordinates |
|
|
 Rectangle Rectangle
|
Perimeter, Area, Control
Points coordinates |
|
|
 Ellipse Ellipse
|
Perimeter, Area |
|
|
 Manual Tag and Counter Manual Tag and Counter
|
Control Point coordinates |
|
|
Semi Manual Measurements |
 Automatic Area (also
in the Tools Palette) Automatic Area (also
in the Tools Palette)
|
Area, Control Point coordinates |
|
|
 Find Objects Find Objects
|
Objects Area, Number and Statistics |
|
|
Automatic Measurements |
 Statistics Statistics
|
Statistics can be calculated from:
|
|
|
|
Statistics |
|
|
|
|
|
|
|
|
|
|
|
|
move
the first point without actually closing the path, press the Alt
key while clicking it.
The Rectangle and Ellipse tools
place a 10x10 pixels size rectangular or elliptical shape on the image
(that size may be modified at Preferences
tab). To move or resize the measurement click the shape control points.
If the SHIFT key is pressed while resizing the shape it will have exactly
the same width and height, so it will become a perfect square or a circle.
To scroll up/down or left/right the image while making a
measurement, press the spacebar
to turn on temporarily the  Hand Grabbing Tool.
To write the measurement right click and select Write
measurement, or choose Unselect (Cancel) if you want to cancel
it.
Configuring predetermined options
Some tools can be work in different ways depending on its
settings. To define how tools work right click on the tool you want to
configure, or just select the Edit >
Preferences menu command to open the Preferences
window.
The following table describes how each tool work.
Options: CF: Uses
the Conversion Factor. S: Supports
Statistics.
H: Supports Histogram. CO: Supports copying.
| Tool |
Options
|
Description
|
|
Angle Measurement Tool |
|
The Angle tool allows you to determine the angle defined
by three points within the digital image.
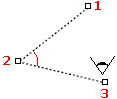 Angles are drawn by clicking on three points: on one point
subtending the angle, the vertex and the second point on the rays subtending
the angle to be measured. Place the cursor over the initial point (1),
click, point to the angle center (2) and click other time, point to the
final point (3), and click again. Angles are drawn by clicking on three points: on one point
subtending the angle, the vertex and the second point on the rays subtending
the angle to be measured. Place the cursor over the initial point (1),
click, point to the angle center (2) and click other time, point to the
final point (3), and click again.
To write the measurement right click and choose Write
measurement.
If
End segment and angle measurement
automatically is set ON in Preferences window, the measurement will
be written automatically as soon you click for a third time. |
|
|
Line Measurement Tool |
|
The Line tool allows you to determine the distance
defined between two points within the image.
To draw a single-segment line, click at one end of the line, point to the
other end and click again.
To write the measurement right click
and choose Write measurement.
If End segment and angle measurement
automatically is set ON in Preferences window, the measurement will
be written automatically as soon you click for a second time. |
|
|
Manual Tags and Counter Tool |
|
The Manual Tag and Counter Tool allows counting manually objects within
an image. Each time you click on an image point, it is tagged using a
colored pixel and the total counting is incremented by one. Each
tag is stored in the Measurements window
and numbered accordingly to the counting. To change the actual counting
right-click . |
|
Manual area/perimeter measurement |
|
|
Polygonal Area/Perimeter Measurement
Tool |
|
Click on the first point, and continue moving and clicking
until you have marked all segments. To measure a polygonal area click
on the first point at the end of the measurement in order to close the
polygon.
To write the measurement right click.
NOTE: Important
notice about irregular selections. |
|
Rectangular Area Measurement Tool |
|
Drag on the image to select a rectangular area.
You may adjust the boundaries and position of a rectangular selection
while it is active. To adjust a boundary, place the cursor along the edge
or corner of the rectangle selection and drag it when the 2-way cursor
appears. To move the rectangle selection, place your cursor in the middle
of the rectangle and drag it when the 4-way cursor appears.
To write the measurement right click and choose Write
measurement.
The Rectangular Area Measurement Tool supports Basic
Statistics and Frequency Analysis and Histogram. |
|
Elliptical Area Measurement Tool |
|
Drag on the image to select an elliptical area. The selecting is drawn
from the center. To move the selection, place your cursor in the middle
of the rectangle and drag it when the 4-way cursor appears.
To write the measurement right click and choose Write
measurement or Write measurement and extended information.
The Elliptical Area Measurement Tool supports Basic
Statistics and Frequency Analysis and Histogram.
NOTE: Important
notice about elliptical selections. |
| Automatic
selection area measurement |
| |
Automatic Area Measurement Tool |
|
Makes automatic selections of pixel areas with similar color.
Click the color you want to select. A mask will mark the selection.
To modify the selection scope and modify other related settings, open
the Selection Settings palette. |
The following buttons are not measurement
tools but perform other useful functions:
|

|
Line Selection Tool |
Use the Line Selection Tool to edit measurements previously done with
the , , , or
tools.
To select a measurement click on any of its lines, after the measurement
is selected its lines can moved or stretched.
To write the measurement (replacing the previous measurement
by the modified one) right click and choose Write measurement. To cancel all modifications and keep the previous
measurement, right click and choose Unselect
(Cancel).
Note: To modify a measurement done by the tool
you should select it in the Measurements
window. |
 |
Color Picker Tool
|
Use the Picker Tool to set the foreground
color.
Click the color you want to pick. |
 |
Freehand Pencil Tool
|
Use the Freehand Pencil Tool to paint over the image. |
|
Hand Grabbing Tool
|
Scrolls an image in any direction when the whole image is bigger than
the image window.
Note: Pressing the spacebar
turns on temporarily the Hand Grabbing Tool without interrupting the measurement
in progress. |
 |
Zoom Tool
|
Enlarges or reduces your view of the image depending on
which mouse button is clicked. Right-click enlarges and left-click reduces
the zoom. |
 |
Foreground/Background Color |
Click on the Foreground (left box) or Background (right box) boxes to
open the color window to select a new color.
The Foreground color determines the color used to draw the new measurements,
although after a measurement is done, its color can be modified at the
Measurements window.
The Background color is also used when a selection is transferred another
window.
Learn more: Important notice about transferring
selections. |
|

|
Brush size |
The brush size affects the tool
and also the tool (when adding/subtracting
selections manually). |
|

|
Selection Lines color |
If selected the selection lines will be drawn using
the Foreground/Background colors. It unselected they will be drawn in
black and white colors. This option doesn't affect the color used to draw
the lines on the Measurement Layer. |