Toolbar button:
Also shown in the Measurements window bottom status bar. By clicking the status bar the Set Conversion Factor window will pop-up.
Conversion Factor
Main Menu: Measurements > Set Conversion
Factor
Toolbar button: ![]()
Also shown in the
Measurements window bottom status
bar. By clicking the status bar the Set
Conversion Factor window will pop-up.
Although Bersoft Image Measurements (BIM) performs all measurements in pixels it can convert automatically the pixel values to any other real world dimensional measurements such as millimeters, microns, feet, miles, etc. The conversion is done by multiplying the pixel measurements values by a numeric constant called Conversion Factor.
The Conversion Factor can entered by hand or by measuring a known length object in the image.
By way of example, if you are measuring images scanned
at 300 DPI (dots per inch), because each inch in the scanned object corresponds
to 300 pixels in the resulting image, by entering a conversion factor
equal to 1/300 (0.003333333333333333), the measurements will be displayed
in inches in the Measurement window and on the image. Or you can measure
a 1 inch object in the image and tell BIM that it is 300 pixel long, so
BIM can calculate the Conversion
Factor for you.
Click here to see another examples.
Disregarding image resolution in dots per inch and it's zoom
value, when measuring, BIM measures the real pixels in the image.
Indeed the only physically fixed dimensions that a digital image has are
the number of pixels wide and high in the image (e.g. 2000 x 1000 pixels).
Some measurement tools make easy to normalize the way pictures are taken. Scanners, microscopes and other scientific measurement tools always take pictures from samples placed at the same distance. With knowing the DPI value or the microscope amplification factor, you can easily calculate the Conversion Factor, no matter if there is no known length object in the image.
Other tools, like digital cameras, produce images taken under
far more variable conditions. The distance to the object may change from
image to image, as well as the zoom or the camera lens. That makes more
difficult calculating the Conversion
Factor unless there is a known length object in the image that
can be used to get the Conversion Factor.
Also, not all objects in the image may be placed at the same distance,
so if the known length object is not placed near to the object the to
measure you can lose accuracy. Learn
More.
By default, the Conversion Factor is set to 1, so BIM will show the measurements in pixels unless you define a Conversion Factor.
When the image is saved, the measurements are saved along with it, recorded as pixels, but also the measurement factor for that image will be recorded. When the image is reopened the measurements will be automatically displayed using the previously specified conversion factor.
Use the Set
Conversion Factor window either to calculate the
conversion factor, by calibrating it against an object of known length
or to Load/Save/Edit directly the conversion factor.
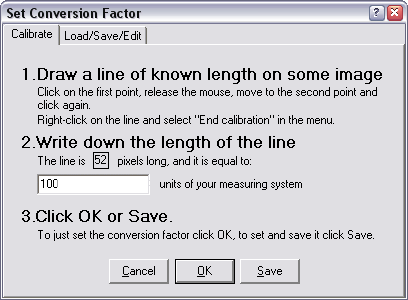
This window is divided in two tabs. The Calibrate
tab allows to set a conversion value by drawing
a line of known length on an image, as the image below shows.
When the Conversion Factor window
is opened, the cursor always changes to measurement mode and the line
measurement tool (![]() )is automatically selected in the Tools
Palette (do not use directly the
)is automatically selected in the Tools
Palette (do not use directly the ![]() tool for calibration, but open the Set Conversion Factor window
and follow the instructions there).
tool for calibration, but open the Set Conversion Factor window
and follow the instructions there).
Some measurements devices may include the scale in the image, providing then a reference point for calibrating the conversion factor.
Also, when measuring macroscopic objects, sometimes is useful to include a ruler in the image, to get a proper reference point to calibrate the conversion factor.
These are the steps to set the conversion factor by drawing a line of known length over the image.
Open the image.
Click
the ![]() button.
button.
Click twice to mark both ends of the line on the image.
If you want to you can click and drag to adjust the line ends.
Click with the right button to open the contextual menu and then click End Calibration. You can click on any part of the image, not only the line.
Write down the length of the line.
Load/Save/Edit
The Load/Save/Edit tab allows entering the conversion factor by hand and also loading/saving it from/to conversion factor files.
Conversion factors are saved as files with .CNV filename extension. Several conversion values files, calculated for images taken at 72, 75, 96, 100, 150, 300 and 600 DPI are provided in the program directory, for converting measurements to kilometers, millimeters and inches.
The Decimal positions settings affects how many decimals will be used to display the measurements. When you save or load the conversion factor to/from a file, the decimal positions will be saved or loaded as well.

Scope: Global and Local conversion factors
Each image can have a different Local
conversion factor, which is saved along with the measurements for
that image and will be used again each time the image is reopened.
Also a Global conversion factor
can be specified, to by used as default value for all new images to measure.
When the Set Conversion
Factor window is opened, it will display the Global conversion factor is no
images are opened, otherwise, it will display the Local
conversion factor corresponding to the active image.
It is possible to switch between the Local
and Global conversion
factors by clicking the Show
Global Conversion factor button.
After you click the OK button to set up a new conversion
factor, if at least one image is opened the program will ask you to select
if you want to modify just the Local
Conversion factor value or the Global
one.
If more than one image is opened, you also should select if you want to
apply the Conversion factor to all images or only to the active one.
Notes:
If the images are scaled down or up or the scanning resolution is modified, any previous Conversion Factor set for the images will become invalid.
The conversion factor doesn't influence how Statistics, Pixel Profile, Array/Band Analyzer or the Results window work. It only affect values written into the Measurements and Find Objects windows.