 Find Objects Window
 Find Objects Window
Main Menu: View >
Find Objects
Shortcut: F10
Toolbar button: ![]()
Bersoft Image Measurements uses a semi-automatic method to find isolated regions of a particular color in an image.
The operation would be as follows:
Open the image where you want
to find the objects and use the ![]() Automatic Area
measurement tool, to select either the objects you want to measure or
the background surrounding them. In case you clicked on the background,
select Invert . If you are selecting
the objects clear Contiguous.
Automatic Area
measurement tool, to select either the objects you want to measure or
the background surrounding them. In case you clicked on the background,
select Invert . If you are selecting
the objects clear Contiguous.
The objects should be completely separated from each other. Take care
of adjusting precisely the selected objects area before proceeding to
the next step.
Learn more about the Automatic Area measurement tool in order
to be able to select precisely the objects.
After the objects are correctly
selected open the Find Objects
window by clicking ![]() in
the toolbar.
in
the toolbar.
Notice that Find Objects will not appear unless you previously selected
an image area with the ![]() tool.
tool.
Optionally you can clear or add
image areas to the selection, before finding the objects. To do so select
the ![]() or
or ![]() in the Selection
Settings Palette and click on the area you want to add or subtract
from the selection..
in the Selection
Settings Palette and click on the area you want to add or subtract
from the selection..
Click ![]() (see
the image below). Both the selected objects and its numerical values will
appear.
(see
the image below). Both the selected objects and its numerical values will
appear.
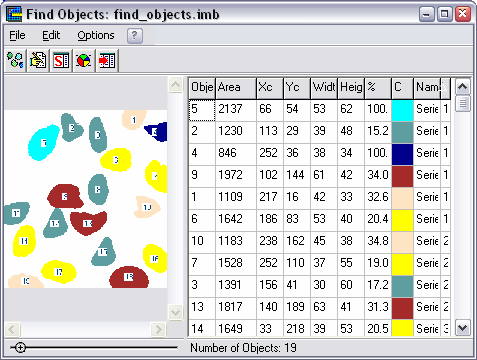
Click on any column header to sort the table on that column.
The columns, from left to right, are:
|
Object # |
Objects are assigned consecutive numbers when they are found in the image, which is scanned from left to right and top to bottom. |
|
Area |
Optionally adjusted by the Conversion factor. |
|
Xc |
Xc
and Yc are
the center of the object coordinates. |
|
Yc |
|
|
Width |
Optionally adjusted by the Conversion factor. |
|
Height |
|
| % | Shows the area percentage with relation to the sum of the total area in the same series, or in all series, depending on if Calculate % for each series menu option is selected or not. |
|
Color |
This column has no title and shows the color of the Series to which the object belongs. |
|
Name |
The name of the Series to which the object belongs. |
|
Obj . Series # |
If there is one single series, the Obj . Series # will be the same than the Object #. |
The table values may be exported or copied to the clipboard. See The Menus below for more details.
By default the objects and the background
are painted with the colors specified in the Tools
Palette. If more than one series is used, each series will be assigned
random different colors.
Optionally click ![]() to set objects series and colors. Learn more.
to set objects series and colors. Learn more.
| Menu/Toolbar Commands |
|
Shortcut |
Description
|
| File Menu |
|
|
|
|
Save image as... |
|
|
Images can be saved in any of the image formats supported
by Bersoft Image Measurement. |
|
Save data as... |
|
|
The data can be saved as CSV, ASCII or HTML files. Learn more. |
|
Send Data to |
|
|
The Results Window is meant to consolidate data from more than one image in a single database. |
|
Statistics |
|
|
Opens a statistics window with the statistics for all found objects. |
|
Charts |
|
|
Displays different kinds of charts. Learn more. |
| Edit Menu |
|
|
|
| Find Objects |
|
|
Copies the data to the Windows Clipboard. |
| Edit Series |
|
|
Opens the Edit Series window. Learn more. |
| Copy Image |
|
|
Copies the image to the Windows Clipboard. |
|
Copy Data |
|
|
Copies the data to the Windows Clipboard. |
|
Copy and Paste data to Excel |
|
|
Starts Excel, creates a Worksheet and copies and pastes the data there. |
|
Clear last selected object frame |
|
|
After objects are found in the image, by clicking any object in the object datasheet, it will be selected on the image. Clear last selected object frame clears the dotted frame drawn around the last selected object. |
|
Options Menu |
|
|
|
|
Use conversion factor
|
|
|
If selected, all values (area, coordinates, size, etc.) will be converted,
by applying the conversion factor,
if not they will be shown in pixels. |
| Include objects at edge of image |
|
|
If this option is not selected, objects which touch any edge of the image will not be found. |
| Print General Object # on image |
|
|
Objects are searched for from left to right and top to bottom and assigned sequential numbers. If this option is selected the object number will be printed on each object. |
| Print Series Object # on image |
|
|
Instead printing the general object number the series
object number will be printed. Learn more about series.. |
| Calculate % for each series |
|
|
This options only works if more than one series is set by using the
Edit Series window |
|
|
|
Opens this Help page. |