|
|
|
|
Exploring the work area
The Bryce Window
Bryce's default environment consists of the Working window, the Control palette, and the Tool palettes.
By default, the Bryce environment replaces your screen whenever you launch the application. However, your operating system's standard menus and windows are still available from within Bryce.
The Working Window
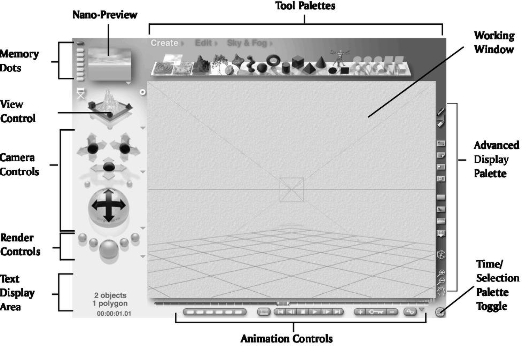
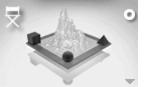
The Working window displays all the objects in your Bryce scene. It's the work area where you'll arrange the objects and lights to create your environment.
The view of your scene shown in the Working window is taken from a "camera" that you can move around for different views of your scene. The Working window also has several display modes that let you view a scene as a wireframe, a rendered object, or a combination of both. Refer to "Display Modes" for more information.
Nano-Preview
The Nano-Preview displays a rendered preview of your scene. As you update your scene, Nano-Preview shows your changes. You can immediately see how your adjustments to object position or other properties affect the final look of the scene.
You can use the preset viewing positions to see your scene from different angles, or you can use the Memory Dots to store and retrieve your favorite camera positions. Refer to "Using the Nano-Preview" for more on working with the Nano-Preview.
View Control
View Control lets you adjust the view of your scene without moving the camera. Using this control you can see your scene from the top, bottom, left, right, front, or back. You can also set your scene to continuously rotate so you can see it from any angle. Refer to "Using the View Control" for more on using the View Control
Camera Controls
Camera Controls change the position of the camera specifically along the X, Y, and Z axes. The Camera Trackball lets you move the camera in any direction, and along any axis.
Refer to "Using the Camera" for more on moving the camera.
Render Controls
Render Controls let you render your scene to see all the materials and lighting effects you added. The center button starts the rendering process and the other buttons control rendering options. Refer to "Rendering" for more on rendering.
Text Display Area
The area just below the Render Controls is reserved for momentary display of text information. When you pass your pointer over interface elements, this area displays the name of the interface element, and in some cases, it also displays the element's current settings. The Text Display Area also displays information about the total number of polygons in an object or a scene, and information about current control settings.
To display information about the interface:
The name of the element is displayed. In some cases, the element's current settings are also displayed.
To display statistics about the objects in your scene:
1 Switch to Wireframe display using the Display Mode tool.
2 Pass the pointer over the Working window.
To display information about rendered images:
1 Switch to Bitmap display using the Display Mode tool.
If you have not rendered your image, the Working window is blank.
2 Pass the pointer over the Working window.
The Text Display area shows the file size.
The Palettes
Bryce uses a series of palettes to manage tools and controls-the Create palette, Edit palette, Sky & Fog palette, Advanced Display palette, Selection palette, and Animation controls. These palettes let you create objects, edit objects, create skies and fog, control the display of your scene, select objects, and animate objects.
Beside the title of each of the three tool palettes (the Create palette, Edit palette, and Sky & Fog palette) is a small triangle that opens the different Preset Libraries available in Bryce. Refer to "The Bryce Preset Libraries" for more on Preset Libraries.
The Create Palette
The Create palette contains tools for creating infinite planes, terrains, stones, primitive shapes, derivative primitives, 2D picture objects, and lights. Refer to "The Create Palette" for more on the Create palette.
The Create palette contains tools for creating all the types of objects you can use in a Bryce scene.
The Edit Palette
The Edit palette contains tools for editing object materials and resizing, rotating, repositioning, aligning, and randomizing objects. Refer to "Transforming Objects" for more on the Edit palette.
The Edit palette contains tools for transforming objects and accessing the Editors.
The Sky & Fog Palette
The controls available on the Sky & Fog palette let you add shadows, fog, and haze, and let you set the altitude, frequency, and amplitude of clouds. The Sky & Fog palette also lets you control the color of clouds in your sky and the position of the sun and moon. Refer to "The Sky & Fog Palette" for more on the Sky & Fog palette.
The Sky & Fog palette contains tools for creating the atmosphere of your Bryce scene.
Advanced Display Palette
The Advanced Display palette contains tools for controlling the display of the interface and enabling/disabling the Nano-Preview and Plop Render features. The Advanced Display appears on the right side of the Working window. Refer to "Setting Up the Bryce Window" for more on using the Advanced Display palette tools.
The Advanced Display palette contains tools for changing the Working window display.
Selection Palette
The Selection palette contains tools for selecting specific types of objects in your scene. You do not see this palette in the default Working window. To view it, you must use the Time/Selection Palette toggle at the far bottom right of your Working window to replace the Animation controls with the Selection palette. Refer to "The Selection Palette" for more on selecting objects.
The Selection palette contains tools that let you select objects in your scene
The Animation Controls
The Animation controls let you set up key frames and edit the timeline of your animation. These controls also let you preview your animation, add and delete key frames, and access the Advanced Motion Lab. Refer to "Setting Up an Animation" for more on using the Animation controls.
The Animation controls display the timeline of your animation.
Displaying/Hiding Palettes
To keep the interface uncluttered, many of Bryce palettes and toolbars are hidden when you first launch the application. Some palettes are hidden behind other palettes.
To display palettes:
- Either click on a text button above the Working window, or press the key combination for the desired palette:
To display or hide all palettes:
Displaying Submenus and Pop-up Dialogs
Wherever you see an inverted or sideways triangle icon in the interface, it indicates that there is a menu or other item available that contains options pertinent to the item closest to it. For example, in the Create palette, there are triangle icons next to each tool in the palette. These triangles access the additional options for the tools.
The triangle icon next to a tool or text button indicates that there are more options available for the element.
To display a submenu:
The Menu Bar
The Bryce menu bar contains five menus: the File menu, the Edit menu, the Objects menu, the Links menu, and the Help menu. These menus provide access to several Bryce functions and editors.
The display of the menu bar depends on the state of the application. When the application interface snaps to the edges of your Working window, the menu bar is hidden until you pass the pointer over the menu bar area at the top of the Bryce window.
The Editors
Bryce has several editors that let you do everything from creating terrains to editing the speed of animation. Each editor is like a separate room in Bryce. When active, the editor takes over the interface, completely replacing the Working window.
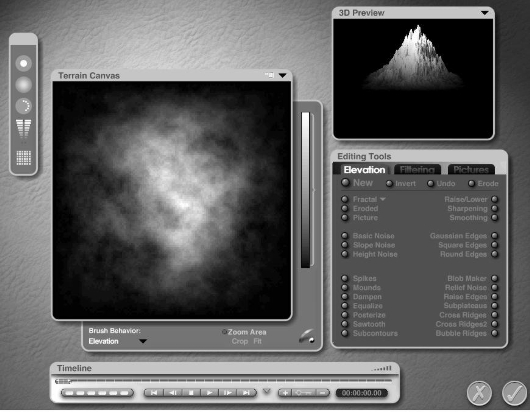
The Terrain Editor
The Terrain Editor is where you'll create all the terrain objects in your scene. The editor contains tools for painting and refining terrain objects. The Terrain Editor also has a real-time preview so you can see the effects of your changes instantly. Refer to "Creating Terrains" for more on the Terrain Editor.
The Terrain Editor lets you create any type of landscape using the preset tools and paint brush.
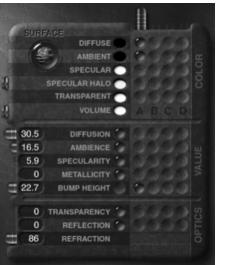
The Materials Lab
The Materials Lab is where you'll create the materials to apply to your objects. By combining up to four texture components on the materials grid, you can create incredibly complex surfaces that can bring your scene to life.
There are two types of materials you can create: Surface materials, which define the surface properties of an object, and Volume materials, which define the properties of an object's volume as well as its surface. When you're creating volume materials, the settings in the Materials Lab change. Some of the surface material settings are replaced by volume effects settings. Refer to "The Materials Lab" for more on the Materials Lab, and "Understanding Volume Material Channels" for more on Volume materials.
The Materials Lab lets you create different types of materials by combining texture components on the materials grid.
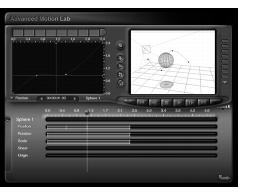
The Advanced Motion Lab
The Advanced Motion Lab lets you fine-tune your animations. After you've created your key frames using the Animation controls, you can use the tools available in this lab to control the speed at which objects move along a motion path, adjust the position of key frames, and preview your changes. Refer to "The Advanced Motion Lab" for more on animating scenes and using the Advanced Motion Lab.
The Advanced Motion Lab lets you refine the action in your animations. Use the Velocity Curve editor to create different velocity effects and the Hierarchy area to control when object transformations occur.Adjusting editor settings
The editors have unique interfaces that let you adjust individual settings by using a variety of tools, including controls, fields, knobs, and component indicators. To get the most out of each editor, it is important to know how these elements work.
Using controls
Controls let you set a value for an element within an editor. For example, in the Sky Lab, the Cloud Cover control lets you set the amount of clouds in your scene.
Controls are comprised of a slider and a field. Controls are used to set values.
To adjust the value of a control using the slider:
Using fields
Fields can be found in dialogs and in controls. A field lets you enter a precise numerical value.
To adjust the value of a field:
To adjust the value of a control using a field:
1 Click the numerical value to the right of the control's slider. The field will appear.
2 Click in the field and type a value.
Using knobs
Some of the editors in Bryce contain knobs. Knobs can perform many different functions, such as randomizing or saving elements. To activate the knob's function, click the knob.
Knobs can perform many different functions. To activate a knob's function, click the knob.
Using component indicators
Some of the editors contain component indicators. When you are combining several components to create a composite element, such as a texture, the component indicator lets you know which component you are currently manipulating.
Component indicators let you know which component you are currently editing. In the image above, the first component is active.
When working with materials, you can blend material components by turning on multiple component indicators simultaneously. Refer to "Combining Components" for more on using the component indicators to blend material components.
To turn a component indicator on or off:
The Bryce Preset Libraries
Bryce has several libraries of presets that can make creating scenes easier. There are three main preset Libraries available in Bryce: the Preset Objects Library, the Preset Materials Library, and the Preset Skies Library.
You can use the Preset Objects Library to add ready-made objects to your scene. Refer to "Using the Presets Object Library" for more on the Preset Objects Library.
The Preset Materials Library lets you add a wide variety of materials to your objects. Refer to "Using the Materials Presets Library" for more on the Preset Materials Library.
The Sky & Fog Preset library contains pre-made skies that you can add to your scene to quickly create an environment. Refer to "Using the Preset Skies Library" for more on the Preset Skies Library.
 Corel Corporation http://www.corel.com Voice: (800) 772-6735 Fax: (716) 447-7366 www.corel.com/support |