|
|
|
|
Using the Pictures Editor
The Pictures Editor in Bryce, also known as the Picture Library, has three square previews at the top of the window. These three previews represent one image three different ways. The left image is the RGB information of the image, the middle one is the alpha channel, the right one is the combined image. You can apply filters to each of the three parts independently.
How to select a plug-in folder:
If a plug-ins folder has been previously selected, a pull-down menu appears that displays the available Photoshop filters.
- If, for some reason, the Photoshop filters cannot be found, or you wish to select a new plug-ins folder, select Select Plug-ins Folder at the bottom of the menu.
Select a folder for the plug-in.
How to add blank images into the library:
1 Load an image into the library and click on the New button at the upper right of the Pictures Editor.
2 Enter a name for the image as well as the image size and default color.
3 Click the checkmark to return to the Pictures Editor.
The Pictures Editor will contain the new image in one of the tiles.
Once the picture is available in your library, you can load different alpha channels or different RGB information. You can also run any Photoshop filter on either of the two components of this image or on the entire image.
How to apply filters to pictures:
1 Select a picture from the picture tiles.
The picture appears in the top preview frames of the picture editor.
2 Select a plug-in from the currently selected plug-in folder.
3 The filter is applied to your image.
Texture Mapping Modes
Once you've decided on a texture to use as a component, you need to decide how the texture is mapped onto your object. The appearance of the texture can change dramatically depending on how it's applied to the object.
Each texture you apply can have a different mapping mode. When you're mixing textures (Mode AB or Mode ABC), you can choose which portions of your textures you want to combine.
To select a mapping mode for a texture:
1 In the Materials Composer, click a channel.
2 Select a mode for the channel.
3 Click the title of the Component window and choose either 2D Texture or 3D Texture.
4 Click the current Mapping Mode title and choose a mapping mode from the menu.
Object Space
In this mapping mode, textures are scaled proportionally to the size of your object. If you change the size of your object, the texture scale changes with it. The texture also rotates along with the object. This means that the texture does not appear to move as you reposition or rotate the object.
In Object Space mode, textures are applied to the object so the texture will not move as you move the object.
World Space
In this mode, the texture is applied throughout infinitely large 3D space, and only a small portion is applied to your object. This means that the texture appears to change as you move your object, since the object is moving through the texture in 3D space.
In World Space mode, the texture is applied to the entire world, so the texture appears to move as you move the object.
Parametric
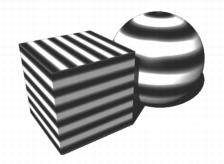
In this mode, the texture is applied onto the object as if it were a decal. For example, if you use this mapping mode on a cube, one iteration of the texture is placed on each face.
Parametric mode applies the texture as a 2D decal.
The texture is mapped onto the object so it rotates and scales as the object is scaled or rotated.
This mode works best with 2D Pict textures.
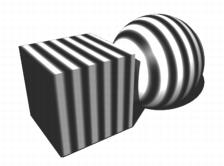
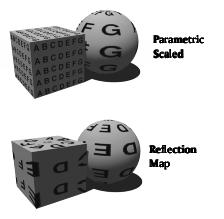
Parametric Scaled
This mode works like the World Space mode, only in 2D. Textures mapped using this mode are not scaled with the object.
Parametric Scaled mode applies the texture as a decal, but does not scale the texture as you scale the object.
Use this mode when you want to map a 2D picture onto constructed objects like buildings.
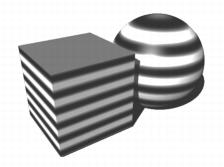
World Top
In this mode a 2D projection of the texture is applied to the object from directly above it. If you move your object or rotate it, the texture does not move with the object; it remains constant while the object moves through it.
World Top mode applies the texture to the top of the world. The texture appears as a projection on top of the object and streaks down its sides.
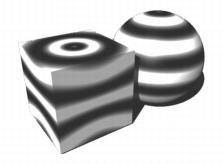
Spherical
In this mode, a 2D projection of your texture is mapped onto a virtual sphere that surrounds your object. It is then projected from the sphere onto your object.
Spherical mode applies the texture to a virtual sphere and then projects it onto your object.
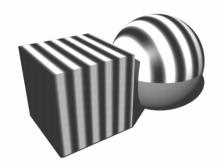
Cylindrical
In this mode, your texture is mapped onto the front of your object, wrapping around the right and left sides all the way to the back. Edge pixels going to the center appear on the top and bottom of your object.
Cylindrical mode wraps a texture around the object starting from the front.
Reflection Map
In this mode, a 2D projection of your texture is applied to a virtual sphere that surrounds your scene. The texture is then reflected off of the sphere and onto your object.
Reflection Map mode applies a reverse image of your texture to your object.
This mode works best on objects with irregular surfaces. It also works well with terrains.
Random
This mode randomly applies a 2D projection of the texture all over the surface of your object.
Random mode applies the texture all over the object in a random pattern.
Object Top
This mode applies a 2D projection of the texture to the top of your object. The texture rotates and scales along with the object.
Object Top mode applies the texture to the top of the object.
Object Front
This mode applies a 2D projection of the texture to the front of your object. The texture rotates and scales along with the object.
Object Front mode applies the texture to the front of the object.
Mapping Mode Modifiers
You can modify the mapping modes in the following ways.
Symmetric Tiling
When you tile a texture onto an object in symmetrical tiling mode, each repeated instance of your texture is tiled horizontally and vertically. as needed to seamlessly produce a symmetrical pattern over the surface of the object.
In Symmetrical Tiling mode, textures are seamlessly tiled across the object.
Repeat Tiling
Unlike symmetrical tiling, in which a seamless tiled pattern is achieved by flipping the texture horizontally and vertically, Repeat Tiling repeats your texture across the surface of your object without any alteration in orientation. The number of instances of the texture depends on the scale applied to the texture.
Scale Pict Size
This mode modifier only affects picture textures. When selected, the image behaves like a sticker placed on the surface of the textured object. Unless Scale Pict Size is selected, the picture will repeat itself across the surface in a similar way to Repeat Tiling.
Centered Transforms
Centered transforms works with parametric mapping modes to force the transformation of the textures to be applied around the center of the object surface.
Decal Colors
Decal colors blends the color of a texture with the affected component's base color. It uses the texture's alpha channel to control the amount of blending. This can make decalcomania effects easier to achieve.
Alpha Scaling
Normally, if you drive a component's value with a texture, the texture's alpha channel will set the value without regard to the amount that was set using the component's slider. With alpha scaling turned on, the amount set with the slider will "scale" the amount provided by the texture's alpha channel. This gives you more subtle control over the influence of the texture on the material component's value.
Pict Interpolation
This mode modifier is enabled by default. It interpolates the pict file you are using, allowing the pict file to be applied smoothly to an object. With Pict Interpolation disabled, the image may appear to be pixelated or jagged.
Transforming Textures
Since a 3D texture exists in three-dimensional space, it can be transformed along the X, Y, or Z axis-just like a 3D object. Using the texture transformation tools, you can scale, position, or rotate your texture.
The final look of the transformation depends on the mapping mode you use to apply the texture to the object. In some modes, texture transformations may not be very noticeable, while in others, like Parametric, transforms can have a large impact on the look of the material.
You may find it necessary to experiment with different settings to get the results you want. If you find that the texture isn't reacting the way you want it to, try changing the mapping mode. Refer to "Texture Mapping Modes" for more on mapping modes.
The transformation tools give you very fine control over the final appearance of the texture.
Scale
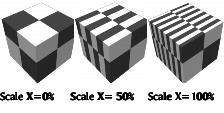
Using the Scale control, you can control the frequency of the texture. Increasing the scale of a texture decreases the frequency of the pattern, since it doesn't have to be repeated as many times to cover the surface of the object.
Since a 3D texture exists in 3D space, you can change its size in all three axes. Adjusting the scale in X changes the size of the texture along the X axis.
Adjusting the scale in Y changes the size of the texture along the Y axis.
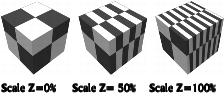
Adjusting the scale in Z changes the size of the texture along the Z axis.
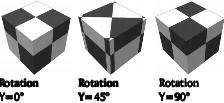
Rotation
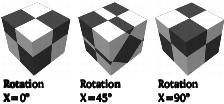
Using the Rotation control, you can control the angle of the texture on the object's surface. You can create very different texture effects depending on the texture's orientation.
Since a 3D texture exists in 3D space you can change its orientation in all three axes. Adjusting the rotation in X changes the angle of the texture along the X axis.
Adjusting the orientation in Y changes the angle of the texture along the Y axis.
Adjusting the orientation in Z changes the angle of the texture along the Z axis.
You can transform a texture numerically by adjusting the X, Y, and Z coordinates or interactively using the transformation tools.
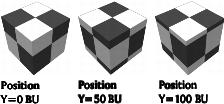
Position
Using the Offset controls, you can control where the texture appears on the object's surface. When you're using a picture as a component, placement can be vital to the look of the material. For example, if you're placing a decal on an object, use the Position controls to precisely place the image in the center of the object or on the correct face.
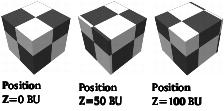
Since a 3D texture exists in 3D space, you can change its position in all three axes. Adjusting the position in X changes the placement of the texture along the X axis.
Adjusting the position in Y changes the placement of the texture along the Y axis.
Adjusting the position in Z changes the placement of the texture along the Z axis.
To transform a texture numerically:
1 In the Texture Component window, click the first button on the left at the top of the window.
The Transformation palette appears.
2 Move your cursor over the control for the transformation you want to apply.
3 Drag the cursor over the X, Y, or Z value you want to adjust.
Drag left to increase the value or right to decrease it.
As you adjust the value, the material preview updates to show the results of your changes.
4 Click the OK icon to apply your changes.
To transform a texture interactively:
1 In the Texture Component window, click the first button on the left at the top of the window.
The Transformation tools appear.
2 Move the cursor over the tool you want to use until the mode you want is active.
3 As you pass the cursor over the tool, the tool changes to display the different modes available.
4 Drag the mouse in the direction you want to move, scale, or rotate the texture.
5 Click the OK icon to apply your changes.
Editing Textures
You can edit the makeup of an existing texture or create a completely new texture using the Deep Texture Editor. This editor uses some rather complex texture-generation concepts to create textures for Bryce. You can either choose to learn all these concepts to create your textures precisely, or use the editor as a type of lab where you combine random settings and see the results.
Refer to "Creating and Editing Textures" for more information about learning texture-generation concepts.
Combining Components
You can combine material components using one of three blending modes:
Mode A
In Mode A, only one component is used to set the value of a channel. The component can be a value, a picture, or a 3D texture.
Mode AB
In Mode AB, two textures are blended together based on altitudes. At the lowest altitudes, the values from texture A are used; at higher altitudes, texture B is used to set the value of the channel.
Altitude is based on the distance between the ground level and the highest object in your scene.
When you use this mode, an object's surface material is a blend between two texture components. Texture B appears at the bottom of the object and Texture A appears at the top. In between is a blend between texture B and texture A. Bryce creates the blend by interpolating between the two textures.
For example, if you use Mode AB in the Diffuse Color channel, the color in texture A appears at the bottom of an object's surface, and the color from texture B appears at the top. A color gradient between color A and color B appears in the middle of the object
Mode AB can be used to create snow covered peaks on terrains or murky depths in infinite water slabs.
To use mode AB to blend textures:
Component indicators appear in both the A and B columns of the channel.
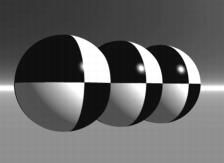
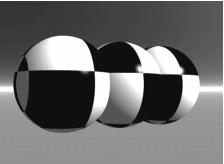
Mode ABC
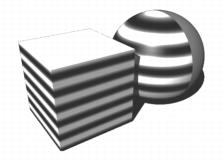
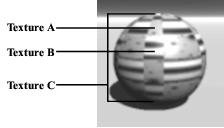
In Mode ABC, two textures, texture A and texture B, are blended based on the alpha channel of texture C. In this mode, the alpha channel from texture C acts like a map that tells Bryce where to apply the values from texture A and texture B. All the white areas of the alpha channel use values from texture A; black areas in the alpha channel use values from texture B. Gray areas in the alpha channel use a combination of both textures.
In the example that follows, three textures were combined using Mode ABC in the Diffuse Color channel.
When Mode ABC is used to combine the three textures, the spot texture (A) appears in the white areas of the checker texture's alpha channel (C) and the lines texture (B) appears in the black areas of the alpha channel.
To use Mode ABC to blend textures:
1 In the Materials Lab, Control/Ctrl- click the C column of a channel.
Component indicators appear in the A, B and C columns of the channel.
 Corel Corporation http://www.corel.com Voice: (800) 772-6735 Fax: (716) 447-7366 www.corel.com/support |