|
|
|
|
Motion Paths
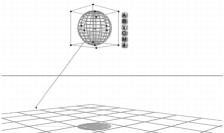
A motion path is a visual representation of an object's trajectory as it moves through time.
An object's motion path is automatically generated as you create key events. Each new key event adds a new point to the path.
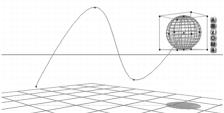
The shape of the curve is determined by the interpolation performed by Bryce. In most cases Bryce tries to create smooth motion so the path is drawn as a curve.
An object's motion path is automatically generated as you create key events. As you move the object at a specific point in time, the motion path line extends out from the object's wireframe.
As you add key events, the curve is adjusted to include the new motion.
As you add more key events to your animation, the path changes shape to include the new motion. Bryce always keeps the motion smooth, so each new point is added as a curve.
Motion paths exist in 3D space so they can be viewed from any angle. If you move the camera, you can see how the object moves along the X, Y and Z axes.
If you move the camera to different views, you'll be able to see the object's trajectory along all three axes.
The default state of the motion path can be difficult to see in a complex scene. You can give your motion path some extra depth by displaying it as a ribbon.
The ribbon lets you see the motion path as a flat track running through the scene.
By default, the motion path for an object only appears when the object is selected. Otherwise the path is invisible. As well, it does not render in the final animation.
You can change the display mode of the motion path in the Animation tab of the Object Attributes dialog.
To show the motion path as a ribbon:
2 Click the A icon that appears next to its bounding box. The Object Attributes dialog appears.
4 Enable the Show as Ribbon option and click the OK icon.
To display the path only when the object is selected:
2 Click the A icon that appears next to its bounding box. The Object Attributes dialog appears.
4 Enable the Show Only when Selected option and click the OK icon.
To display the path at all times:
2 Click the A icon that appears next to its bounding box. The Object Attributes dialog appears.
4 Enable the Show Always option and click the OK icon.
Editing Motion Paths
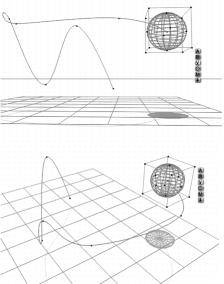
Changing the shape of the motion path changes the trajectory of the object. The path acts like a Bezier curve. You can change its shape by dragging its control points.
You don't have to be in Auto-Record mode to edit the path. The changes you make to the path's shape are applied directly to the path in real time.
Changing the shape of a path does not affect when key events occur. A key event that occurs at 00:00:01.00 will still occur at the same time regardless of where it is.

The events on the path above occur at 00:00:00.01, 00:00:01.00 and 00:00:02.00. When you change the shape of the path, the direction in which the object travels changes, but all the events still occur at the same time they did in the original path.
Since Bryce treats the motion path as a Bezier curve, you can edit it just as you would any curve in any 2D illustration application. You can also display the curves tangents which indicate the angle of the curve.
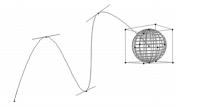
When you display a path's tangents you can see the angles of its curve points.
Motion Path Modifiers
There are a number of modifiers you can apply to the path change the way motion occurs along the path.
Normally an object moves from the first key event on the path to the last over the course of the animation. If you want the object to move backwards along the path, or repeat its action, you would have to reposition the object and set up new key events. The modifiers let you create these types of effects automatically.
For example, if you wanted to animate the motion of a grandfather clock pendulum, you have to set up the forward motion, and then the backward motion.
However, using the Pendulum modifier you just have to set up the forward motion path since the modifier changes the object's behavior so that it moves forward then back along the same path during the course of the animation. All you have to do to see the new motion is extend the duration of the animation.
There are four modifiers available:
- Make One Shot restores the motion of the path to its original configuration, meaning the action along the path only occurs once.
- Make Repeat creates a loop in the action. The motion on the path repeats continuously.
- Make Pendulum creates a repeating cycle in the action along a path. The object will move forward on the path, then back and then forward continuously.
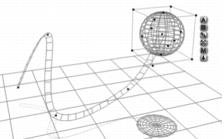
- Make Circular closes the path to create a circular path. The object will move along the path and when it reaches the end, it'll swing around to the front of the path and start all over.
To apply a modifier to a motion path:
2 Click the A icon that appears next to its bounding box. The Object Attributes dialog appears.
5 Extend the duration of the animation so you can see the change in motion.
Moving the Path
You can also move the path, by dragging it to a new location. When you drag the path, all the events on the path shift position. Changes in motion path position are not recorded as key events.
To move a motion path:
- Click on a section of the path that does not contain any control points and drag it to new location.
You have to click on a part of the path without control points, otherwise you'll change its shape.
Aligning Objects to the Path
Normally, the orientation of an object remains fixed relative to world space as it moves from point to point. Using the aligning option, you can have the object's orientation remain parallel to the path so that it reorients itself as moves from point to point
You can use this option to create more realistic motion for objects that have a distinct front and back.
There are two align options available:
- Do Not Align disables aligning. The shape of the curve has no effect on the object's orientation.
- Align adjusts the object so that its orientation matches the shape of the path.
To align an object to a motion path:
2 Click the A icon that appears next to its bounding box. The Object Attributes dialog appears.
4 Enable an alignment option and click the OK icon.
Advanced Motion Lab Button
The Advanced Motion Lab button opens the Advanced Motion Lab.
Use the Advanced Motion Lab button to enter the Advanced Motion Lab.
The Advanced Motion Lab
The Advanced Motion Lab contains tools that let you control the detailed properties of your animation.
- view the hierarchical structure of your scene
- rearrange the sequence of key events for individual object properties
- remap the time it takes to move from one key event to another
- preview your animation
The Advanced Motion Lab lets you control the speed of objects along a motion path and the placement of key frames on the timeline.
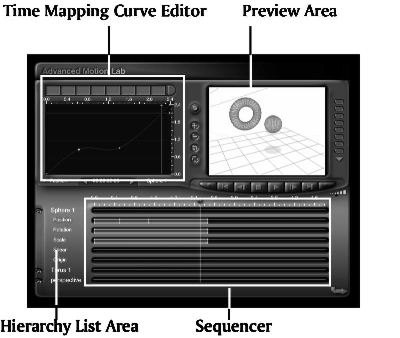
The Advanced Motion Lab is divided into four areas:
- The Hierarchy List area, located in the bottom-left corner of the window.
- The Sequencer area, in the bottom-center of the window.
- The Time Mapping Curve Editor, located at the top-left of the window.
- The Preview Area, located at the top right of the window.
Hierarchy List Area
The Hierarchy List Area displays the scene's hierarchical structure, including links, and groups. You can view all the hierarchies expanded or just the parent objects in the scene. You can also expand an object's listing to show all of its properties.
The Hierarchy List area is used to control the display of both the object hierarchies and object property timelines. If you want to view only your scene's object hierarchies you'll have to hide all the properties for all objects. You can hide each object individually or select from the menu to the right of the Preview Area to display or not display the hierarchy.
Refer to "Object Hierarchies" for more on object hierarchies.
To hide an object's property timelines:
- To hide an individual object's property timelines, click the name of the object whose properties you want to hide.
- To hide all the property timelines in the Hierarchy List area, either hold down Option/Alt while you click,
select Collapse All Timelines from the menu to the right of the Preview Area.
When all the object timelines are hidden, the only thing displayed in the Hierarchy Area is the hierarchical structure of your scene.
The Hierarchy List can be viewed in two ways: collapsed or expanded. You can use the arrow icons to expand or collapse the Hierarchy. When the Hierarchy List is collapsed you can only see the Parent objects in the object hierarchies.
When it's expanded, you can see all child objects in the hierarchy.
The indents indicate Parent-child links or groups. The parent is aligned to the left, and its children are indented from there.
To display or hide the hierarchical relationship:
- To display the hierarchical relationship in the Hierarchy List area, select Display Hierarchy from the menu to the right of the Preview Area.
- To hide the hierarchical relationship in the Hierarchy List area, deselect Display Hierarchy from the menu to the right of the Preview Area
To expand/ collapse the Hierarchy List:
- To expand or collapse individual items in the Hierarchy List, click the Arrow icon beside an object's listing.
- To expand the entire hierarchy, hold down Option/Alt and click an arrow, or select Expand All Hierarchies from the menu to the right of the Preview Area.
- To collapse all hierarchies, select Collapse All Hierarchies from the menu to the right of the Preview Area.
A right facing arrow indicates a collapsed hierarchy, and a down-facing arrow indicates an expanded listing.
The Sequencer
The Sequencer lets you see the key frames recorded for each property within an object. Each property has its own timeline track. Key frames are displayed as white marks on the timeline. The current time is indicated by the Current Time bar.
The Sequencer lets you see where in time a change in an object's property occurred and edit the position of that event. Different types of objects have different properties.
A scene contains more than just objects. You can expand the Hierarchy List to also display the properties for your scene's sky and the camera.
The display buttons along the left side of the hierarchy area let you hide or display an object in the animation preview. This can help you isolate objects in a complex scene.
Editing Property Timelines in the Sequencer
Each object in the Hierarchy List has a number of timelines associated with it. When you display an object's properties you can see the timelines associated with each object.
To display an object's property timelines:
- To display an individual object's property timelines, click the name of the object whose properties you want to display.
- To display all the property timelines in the Hierarchy List area, either hold down Option/Alt while you click, or select Expand All Timelines from the menu to the right of the Preview Area.
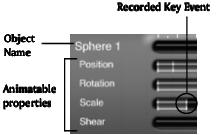
These timelines represent the various animatable properties for an object type. Different types of objects have different animatable properties.
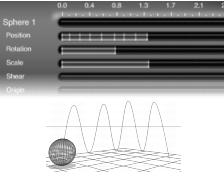
For example, this is the listing for a sphere object. When the object 's property timelines are displayed, you can see the key events recorded for each property.
The white tick on a property timeline indicates that a key event has been recorded for the property.
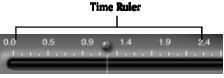
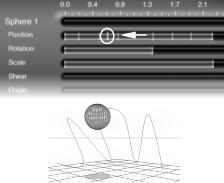
The ruler at the top of the Sequencer lets you see the exact point in time when the key event was recorded.
You can tell exactly when an event was recorded by lining the key event marker up with the ruler at the top of the Sequencer area.
In this example, a position key event was recorded at time 00:00:01.25 (or 1 second and 25 frames)
By moving these key events you can control precisely when events occur.
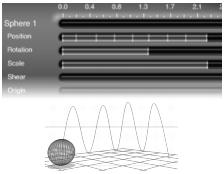
This sequence represents an animation where a ball moves up and down four times, rotates as it makes its third jump and shrinks when its done bouncing.
If you move the position key events closer together the bounces occur faster, but the timeline remains the same.
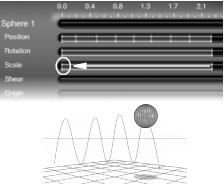
If you move the fourth position key event in front of the third event, you're changing the shape of the motion path, because the ball bounces up before it bounces down.
Position is not the only key event you can arrange. Here both the rotation and scale key events have been repositioned. Now, the ball grows larger as it bounces and it rotates only at the end of the animation.
It's a good idea to activate the continuous preview while editing the timeline, so you can quickly see the effects of your changes. Refer to "Previewing Animations" for more on previewing.
The amount of time available in the Sequencer area is not limited by the current Animation Range. If you position a key event past the current limit of your animation, the Animation Range is automatically extended.
To move a key event on a timeline:
1 Expand the listing you want to edit.
2 Click the white tick mark on the listing's timeline.
3 Drag the key event to a new position.
To move a group of key events:
1 Drag a marquee around all the key events you want to select or hold down Shift and click each of the key events you want to move.
You can select key events on different timelines.
2 Drag one of the selected key events. All the other selected key events move also.
To delete a key event from a timeline:
1 Select the key event, or group of events you want to delete.
2 Press Backspace (on some Macintosh keyboards, the backspace key may be labelled "Delete"). The key event is removed from the timeline.
To copy a key event on a timeline:
Hold down Command/Ctrl and drag a key event. The original remains in place, but the copy moves as you drag.
Time Mapping Curve Editor
The Time Mapping Curve editor lets you control the length of time between key events. Each property listing in the Hierarchy List has its own time mapping curve.
The curve acts like a time filter which remaps the time in your animation. Depending on the shape of the curve, the events in your animation may take longer to complete, or may occur very rapidly.
A time mapping curve can speed up events while slowing down others. You can even reverse the action in your animation. Refer to "Time Mapping Curves" for more on working with Time Mapping Curves.
Preview Area
The Preview Area in the Advanced Motion Lab contains tools that let you preview your animation.
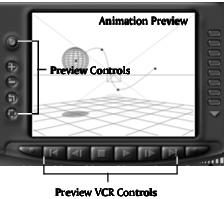
The Animation Preview area lets you see any changes you make to the timing and velocity of objects.
The Preview Area has three parts:
- The Animation Preview area displays a wireframe preview of your scene. Any changes you make in the Time Mapping Curve editor or the Sequencer are updated to this area.
- The Preview VCR controls let you play the animation like a movie. You can stop, play, move forward one key frame, or back one. The far right button renders the scene.
- The Preview Display Controls let you zoom in/out of the preview, switch between Camera View and Director View, pan the preview and reset the preview.
Once you start the animation, it will run continuously until you press the Stop button. Running the preview also moves the Current Time Bar in the Sequencer area and the cross-hairs in the Time Mapping editor. As well, the counter at the bottom of the Time Mapping editor displays the current time of the animation as it plays.
To preview an animation:
The animation starts running. It will continue playing until you press the Stop button.
Click the Stop button to stop the preview.
The controls along the left side of the Preview Area control several options for your animation preview.
To switch between Camera View and Director's View in the preview:
When you first open the Advanced Motion Lab, the Preview Area displays the current camera view.
In Director's View you'll be able to see the camera in the scene.
To render your preview:
- To render your preview, click the last VCR button under the Preview Area in the Advanced Motion Lab.
To change the view in the Preview Area:
- To orbit around your scene, drag the preview in the direction you want to move the view of your scene.
To zoom in and out of the preview:
To reset the view in the preview area:
The view returns to the view displayed when you first entered the Advanced Motion Lab.
To pan the Preview Area:
Hiding and Displaying Objects
The Hierarchy List area displays all the objects in your scene. The icons on the left side of the listing indicates whether or not the object is displayed in the preview area.
The eye icon indicates whether or not an object is hidden.
When you hide an object it does not appear in the Preview Area at the top of the Advanced Motion Lab. This setting has no effect outside the lab. Objects that are hidden in the lab will be visible in the Working window and will still render normally.
You can use this feature to isolate objects that you're editing in the Sequencer or Time Mapping areas.
To hide/display an object:
Click the icon again to display the object.
Saving Preview Positions
The Memory dots next to the Preview Area let you save specific camera positions in the preview for later use.
To save a position:
1 Play the animation and then stop it at the point you want to save.
Move the Current Time bar in the Hierarchy area to the position you want to save.
2 Click on an empty Memory dot on the right side of the Preview Area.
A dot is empty when it appears gray.
To move to saved position:
To delete a saved position:
Using Presets
Above the Time Mapping Curve Editor are eight time mapping curve presets.
You can create a preset of the current curve then apply it to a different attribute of the same object or to another object.
To add, apply, or remove a preset:
- To add a preset, click in one of the blank squares.
- To apply a preset, click in the square that displays the present you want to apply.
- To remove a preset, press Option/Alt and click on the square that displays the preset you want to delete.
When all the preset slots are filled, a new one is automatically generated when you click on the right arrow.
 Corel Corporation http://www.corel.com Voice: (800) 772-6735 Fax: (716) 447-7366 www.corel.com/support |