|
|
|
|
The Materials Lab
The Materials Lab is where you create and edit your materials in Bryce. This unique editor lets you combine a wide variety of components and channels to create an infinite number of different surfaces and volumes.
To display the Materials Lab:
2 Select the object in the Working window. A number of object attribute icons appear to the right of the object.
3 Click the M icon. Alternatively, you can choose Objects menu> Edit Material or display the Edit palette and click the Edit Material tool.
The contents of the composer depend on the material currently applied to the object. If there is no material, the default material's settings appear.
A Quick Tour of the Materials Lab
The Materials Lab is set up like a visual chart that lets you see all the different channels that make up your material. At a glance, you can see all the settings for each material channel and the texture components used to drive channel values.
In the top left corner is the mode toggle button. This button lets you switch between surface material and volume material. The buttons also indicates what type of material you're creating. Surface is enabled by default. When you toggle to Volume, the channels in the lab change to display the volume channels.
Material Preview Window
On the left side of the Materials Lab is the Material Preview. This little window shows you what your material will look like when it is applied to an object. The preview updates as you adjust the channels.
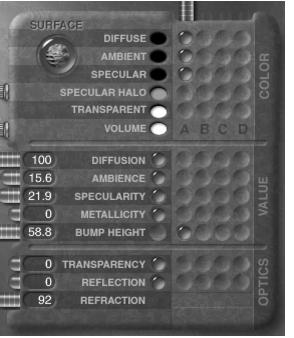
The Materials Grid
The center of the Materials Lab is called the Materials Grid. This is where you combine values, colors and textures to set channel values. The Materials Grid is divided into three sections each containing logical groups of channels.
The Material Grid gives you a one-glance view of all the channels that make up your material.
The Color channels group contains all the material channels that define the colors that appear on the object surface when it's struck by light.
Each channel in the Color group has a color oval next to its title. This oval lets you quickly set a color for the channel.
The Value group contains all the channels that define how the object's surface or volume reacts to light. In other words, they control whether the object is shiny, metallic, bright or dark.
The Optics group contains all the channels that define any optical effects associated with the object.
When you're creating volume materials, the Optics group is replaced by the Volume group. This group contains all the channels that define the appearance of an object's volume.
All of the channels in these three groups have sliders on the left side of each row. The sliders let you quickly set the value of each channel. Values can be used in conjunction with textures or on their own. In the case of the Refraction channel, you must use a value.
Each channel is divided into four columns: A, B, C, and D. These columns represent texture components you can use to set the value of the channel. At the top of each column is a Frequency slider. This slider lets you quickly set the frequency of a texture component. Setting the frequency is the same as scaling the texture.
When a texture component indicator appears in a column, it means that a component is being used to drive the value of the channel. The column in which the indicator appears indicates which texture component is being used. For example, if a texture component indicator appears in column A of the Ambience channel, component A is being used to drive the Ambience value.
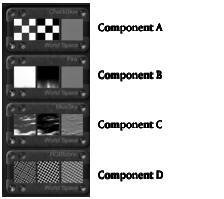
Texture Component Windows
Along the right side of the lab are the Texture Component windows. These four windows are labeled A, B, C, and D. When a texture component is active, these windows display a preview of the texture and provide access to texture editing tools.
The four Texture Component windows correspond to the four columns in each channel in the Materials Grid
Along the bottom of the Materials Lab are the Animation controls. These controls let you animate between textures or animate the properties of a single texture over time.
 Corel Corporation http://www.corel.com Voice: (800) 772-6735 Fax: (716) 447-7366 www.corel.com/support |