|
|
|
|
Setting Application Preferences
By setting application Preferences, you can customize Bryce to suit the way you work. You do not have to restart Bryce to make these changes take effect.
Application Preferences are set in the Preferences dialog.
To set the application's launch state:
1 Choose Edit menu> Preferences. The Preferences dialog appears.
2 Enable either Launch to Previous State or Launch to Default State.
Launch to Previous State launches Bryce using the settings from your last session.
Launch to Default State launches Bryce using the default settings.
To save Images used in a scene with a file:
1 Choose Edit menu> Preferences. The Preferences dialog appears.
2 Enable Image with Scene Open/Save.
With this option enabled, Bryce will automatically open or save a PICT or BMP file (PICT/BMP files are automatically appended with the extension), along with your scene file, every time you open or save. In most cases, this option should always be selected.
To control new object placement:
1 Choose Edit menu> Preferences. The Preferences dialog appears.
2 Enable either Create Objects Within View or Create Objects at World Center.
Create Objects Within View places newly created objects within the camera view, rather than at world center.
Create Objects at World Center places newly created objects at world center, regardless of whether they will be visible in your current camera view.
Setting Up the Bryce Window
When you first launch Bryce, the interface snaps to the edges of your Working window. The menu bar is hidden until you pass your cursor over it, and other applications are hidden behind Bryce. This setup lets you work with an uncluttered desktop.
To maximize the Bryce window:
1 Pass the cursor over the right side of the Working window. The Advanced Display palette appears.
2 Click the Interface Max/Min tool.
3 Click the tool again to switch to a standard window.
Setting Up the Working Window
Before you start working in Bryce, you can change the display mode to determine how objects are displayed in the Working window. These display modes can help you when you're arranging objects and can also speed up your redraw time.
Display Modes
The Display Mode tool, at the bottom-right corner of your Working window, toggles through the three possible display modes.
To switch between display modes:
1 Click on the Display Mode tool in the corner of the Working window.
This button is only visible when you pass your pointer over it.
2 Click the button until you're in the desired mode.
There are three modes available:
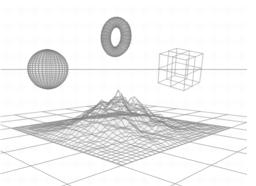
In Wireframe Display all objects are shown as wireframes.
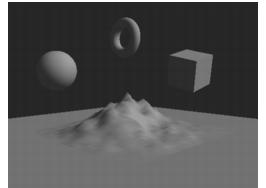
In Bitmap Display all objects are displayed as rendered objects.
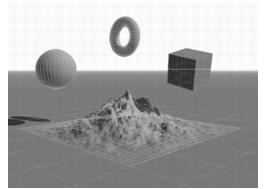
In Wireframe/Bitmap display, all objects are displayed as wireframes, but with the rendered image in the background.
This mode is most useful when you have a partially-rendered image and want to improve the results. If you switch to this mode, you can move your wireframe objects relative to the rendered image behind them in order to accurately judge the results of your change.
To toggle between modes:
The Esc key will toggle between the last Wireframe mode you selected (Wireframe or Wireframe/Bitmap) and Bitmap mode.
Flat Shaded Preview Mode
This preview mode is only available if your system contains hardware that supports OpenGL®, Sree3D, or Direct 3D®.
In Flat Shaded Preview display, all objects are displayed as flat shaded solids.
When this mode is active your objects appear as flat shaded solids, without materials, instead of wireframes, and you can see the effects of light sources on object surfaces.
To display objects in Flat Shaded Preview:
- Hold down the mouse button over the Display Mode button and choose SGI OpenGL, Sree3D, or Direct3D from the menu.
Wireframe attributes
When you're in Wireframe mode, there are several options you can set to make the display more helpful. Disabling some of these options may speed up drawing time.
To set Wireframe attributes:
1 Make sure you're in Wireframe mode. Click the Display Mode tool until the display switches to Wireframe.
2 Drag the Depth Cue control up or down. Drag up to increase the intensity of the depth cueing effect and drag down to decrease it.
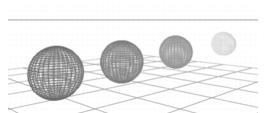
When depth cueing is active, the wireframe appears lighter the farther it is from the camera.
When depth cueing is active, objects appear lighter the farther they are from the camera.
If you hold down the Control key/Ctrl+Alt keys and click on the Depth Cue icon, Bryce will turn both anti-aliased wireframes and depth cueing on or off simultaneously.
3 Click the Wireframe Shadows button to turn shadows on or off.
Shadows are designed to help you determine object placement in your scene. For this reason, shadows appear even when there is no ground plane or when the object is below the ground plane.
You can use wireframe shadows to help you determine the placement of objects in the scene.
This feature may slow down your system when working with a complex scene on slower machines.
4 Click the Underground On/Off button to hide or show underground lines.
When underground lines are hidden, any portion of a terrain or object that is positioned below ground level will not be visible in your wireframe scene. This is useful for easy visualization and composition. However, you might overlook an object that is hidden underground.
When underground is enabled, objects that are positioned below the ground plane are not visible in the scene.
5 Click the Resolution tool and choose Static, Selected, or Motion. Then choose a resolution for the wireframe mode.
Static lets you define the resolution of the wireframe when the object is not moving and not selected.
Selected lets you define the resolution of the wireframe when the object is selected.
Motion lets you define the resolution of the wireframe when the object is being moved.
Window Backgrounds
The background texture of the working window can add a great deal to the overall look of the interface. It makes it easier to see wireframes and selected objects.
To select a background texture:
Adding a background texture may slow down some machines. If you need more speed for any reason, select No Texture, and you will get a simple, clean background with no texture.
To select a background color:
1 Click the Background Paper button and choose Select Color from the menu.
 Corel Corporation http://www.corel.com Voice: (800) 772-6735 Fax: (716) 447-7366 www.corel.com/support |