|
|
|
|
Working in a Scene
When working in Bryce, you position objects in three-dimensional space while looking at a two-dimensional display. You may find that your scenes become rather large, and you might not be able to see the entire landscape in the Working Window.
Displaying Your Scene
Bryce has several tools that can help you position elements and see every inch of your new world from all angles. You can also control how individual objects are displayed in the Working Window, and how your scene is displayed in the Nano-Preview.
Using the Nano-Preview
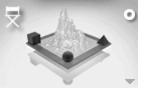
The Nano-Preview is where your object is displayed before you render it. Nano-preview can display your scene from a number of different angles without affecting the position of the camera.
To display your scene from different angles in the Nano-Preview:
- Click the triangle icon below the Nano-Preview and choose a preset display angle.
The view of your scene does not change in the Working window.To set Nano-Preview options:
- Click the triangle icon below the Nano-Preview and choose a display option:
- Sky Only previews only your sky settings.
- Full Scene previews your actual scene. This is the default setting for the Nano-Preview.
- Wireframe Only previews your wireframes only, as opposed to a rendered preview.
- Auto Update will automatically update the preview render with every single change you make during your session. In most cases, this gives you almost immediate feedback after any action. On slower machines, or when working with highly complex scenes, you can deselect this option.
With this option deselected, you'll need to click in the Nano-Preview window to update the render.- Select either Fast Preview or Full Rendering to adjust the quality of the rendered preview. With Full Render selected, every pixel is raytraced and anti-aliased. Fast preview mode skips pixels to achieve faster updates. This can cause small objects to be partially or completely missing.
Using the View Control
Bryce lets you view your scene from several preset positions: Main, Top, Front, Side, Bottom, Right, Left, and Back. All these views, with the exception of the Main View, are special Orthogonal projections which allow perspective-free views well-suited for alignment operations. Refer to "Orthogonality and Views" for an explanation of how and why Bryce uses Orthogonal projections.
The View control is an interactive way of cycling through the various preset views. The current position of the View control indicates the view you're seeing in the Working window.
To switch views using the View control:
Every time you click the control Bryce displays a different preset view.
To switch views using the View control menu:
- Click the triangle icon next to the View control and select a view option:
- Director's View: select this option to view your scene from the perspective of a director sitting outside the scene.
- Camera View: select this option to view your scene as the Camera sees it, based on the Camera's current location and orientation.
- From Top: select this option to view a perspective-free orthogonal projection of your scene as seen from above (based on absolute world coordinates).
- From Right: select this option to view a perspective-free orthogonal projection of your scene as seen from the right (based on absolute world coordinates).
- From Front: select this option to view a perspective-free orthogonal projection of your scene as seen from the front (based on absolute world coordinates).
- From Left: select this option to view a perspective-free orthogonal projection of your scene as seen from the left (based on absolute world coordinates).
- From Back: select this option to view a perspective-free orthogonal projection of your scene as seen from behind (based on absolute world coordinates).
- From Bottom: select this option to view a perspective-free orthogonal projection of your scene as seen from below (based on absolute world coordinates).
To switch views using the keyboard:
To reset the view of your scene:
- Click the triangle icon next to the View control and choose Reset Views, or
- Press the Option/Alt key and click on the Views icon.
This option resets your View to the default setting.
Orthogonality and Views
When you view a scene from the side, front, top, or bottom using the Camera, you'll see certain amounts of perspective distortions. These distortions can make precise visual alignments difficult.
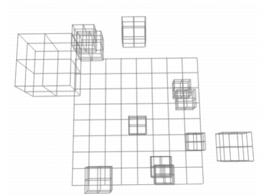
For instance, if you have a dozen cubes in different locations and you place the camera so that it looks down on the scene from above, you will find it very difficult to place the cubes on top of one another. Cubes further from the camera would be slightly smaller than cubes close to the camera, resulting in a confusing array of lines. The more complex the scene, the more confusing and difficult this kind of alignment becomes.
If you viewed objects from above through a real-world camera, the perspective distortions would make alignment or placement difficult.
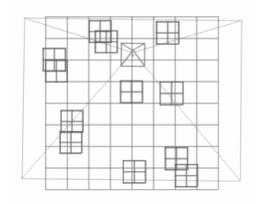
To solve this problem, Bryce uses a perspective-free, drafting board kind of view in which like-sized objects far away appear exactly the same as those up close.
Bryce uses an "orthogonal projection" of your objects to eliminate perspective distortion.
This perspective-free view is called an orthogonal projection. In Bryce, all views other than your Main View (that is, Top, Bottom, Right, Left, Front, and Back) are orthogonal projections. They are not generated by the camera, and so do not contain the perspective distortion that would necessarily come with a camera view.
As a result, Camera controls do not work in these views. You can navigate within the orthogonal views using the Zoom and Pan tools.
If you press the Render button while in an orthogonal view, Bryce will quickly set up the camera position you need and render your image. There may be slight differences between what you see in the wireframe projection and what you see in the rendered image, as a result of the added perspective distortion in the rendered image.
Zooming In and Out
In Bryce, there is a difference between moving the camera and using the zoom tools.
When you move the Camera, you're moving in 3D space. When you use the pan and zoom controls, you're transforming a 2D projection of your 3D scene-your camera position does not change.
When you use the Zoom tool, you are essentially making the 2D projection larger or smaller. Your camera position in 3D space does not change.
To zoom in:
Bryce scales the 2D projection of your scene larger, creating the illusion of zooming into your 3D scene; your camera position remains unchanged.
To zoom out:
Bryce scales the 2D projection of your scene smaller, creating the illusion of zooming out of your 3D scene. Your camera position remains unchanged.
To zoom into a specific area:
Your cursor changes to a Zoom tool, and Bryce centers and scales up the area in the marquee to fit your window.
To zoom using the mouse:
- Hold down Command-Option-Spacebar/Ctrl+Alt+Spacebar and drag the mouse left or right in your scene. Dragging left zooms in and dragging right zooms out.
To zoom numerically:
1 Double-click the Trackball in the Control palette. The Camera & 2D Projection dialog appears.
2 Enter a value in the Scale field.
You can only zoom numerically when you are working in either Director View or Camera View.
To reset the zoom value:
The view of your scene resets to 100%.
Panning
Panning works the same way as zooming. When you use the Panning tool, you are moving a 2D projection of your scene right and left, up and down, in front of the camera. Your camera position in 3D space does not change.
To pan your scene using the Pan tool:
To pan your scene using the Spacebar:
To pan numerically:
1 Double-click the Trackball in the Control palette. The Camera & 2D Projection dialog appears.
2 Enter a value in the Horizontal field.
3 Enter a value in the Vertical field.
You can only pan numerically when you are working in either Director View or Camera View.
Changing Object Display
You can change how your objects are displayed using the Object menu commands. Changing the object preview can greatly reduce redraw time in a complex scene. The Object's preview does not affect how the object renders.
To display objects as boxes:
1 Choose Object menu> Show Object as Box.
This command displays any selected object, objects, or group as box(es). This is useful when you just want to work with the object's position but don't need more details.
Keyboard Shortcut: Command/Ctrl+B.
To display objects as wireframes:
Use this command to change objects shown as boxes back to wireframes.
Keyboard Shortcut: Command/Ctrl+L.
Using Fly-around View
You may have noticed a tiny circular icon above and to the right of the Views icon. If you click here, you will change from your current View to a special motion view, or Fly-around View.This view gives you a sense of context in your Bryce world. If you're working close to the ground, or stuck in the midst of a clump of trees, or you've lost a cube you know you created a half an hour ago, you can use the Fly-around view to see your entire scene all at once.
In Fly-around view, Bryce positions the Camera on an imaginary monorail track above and away from your scene so that you can see the whole scene from all sides as the camera moves around it.
To switch to Fly-around view:
- Click the Fly-around view icon next to the View control. The View control changes to the Fly-around control.
To switch back to Camera view:
To change the angle of your scene in Fly-around view:
To zoom in and out in Fly-around view:
- Hold down the Command/Ctrl key and drag up or down. Dragging up zooms in and dragging down zooms out.
To slow the Fly-around:
To pause the Fly-around:
To end the Fly-around and save the Fly-around position:
- Press Return/Enter. The view switches back to Camera view and the last Fly-around position becomes the new Camera View.
Keyboard Shortcut: Command-Y/Ctrl+Y.
Positioning the Camera
The Camera View is produced by the Camera which exists in 3D space, meaning that you can view your scene from anywhere within your Bryce environment - even underneath it. The Camera View can be positioned using the positioning tools or by repositioning the Camera in the scene. Refer to "Positioning the View of Your Scene" for more on positioning the camera.
Using the Movie Preview
In addition to viewing still images in the nano-preview window, you can use the same window to see a small version of your animation, without leaving Bryce.
Refer to "Previewing Animations" for more on using the movie preview.
Undoing Operations
The Undo and Revert to Saved commands let you erase the effects of changes you made to your scene.
To undo the last operation:
To redo the last operation:
To revert to the last saved version of your scene:
All unsaved changes are discarded.
The Marker Pen
The Marker Pen adds the functionality of a white board to your scene. When you're using the Marker Pen, you can draw anywhere in the Bryce environment without affecting your scene. One key click erases all the marker pen lines.
To draw with the marker tool:
1 Click the Marker Pen tool or press the M key.
2 Drag it anywhere on your screen.
To erase marker pen lines:
 Corel Corporation http://www.corel.com Voice: (800) 772-6735 Fax: (716) 447-7366 www.corel.com/support |