10
|
|
|
User Manual for - «QCad» |


Click this button to show the transforming tools of QCad.
For some transforming functions you must select the objects which you want to transform. QCad offers various different methods for selecting objects. If a transforming function needs selected object, you have the possibility to change the current selection as a first step of the transforming function. After selecting the objects, click this button to proceed with the transforming function:

However, you can always change the selection without calling a transforming function but by choosing the according menu button. Please refer to chapter Selecting Objects for further information.

Select the objects which you want to move. Set the reference point and afterwards the target point. The following dialog appears:
|
|
|
|
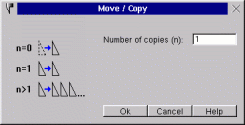
Type the number of copies or type "0" for moving the objects.
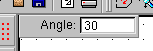
Hint: You can rotate the object which are moving directly around the reference point by typing the rotation angle in the appearing box at the top left of the graphic:

Select the objects which you want to rotate. Set the center point of the rotation. The following dialog appears:
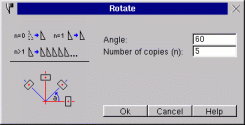 |
Type the rotating angle and the number of copies or type "0" for moving the objects.

Select the objects which you want to scale. Set the reference point. The following dialog appears:
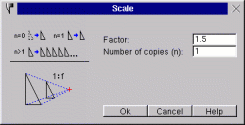 |
Type the number of copies or type "0" for moving the objects.

Select the objects which you want to mirror. Set the startpoint and the endpoint of the mirroring line. The following dialog appears:
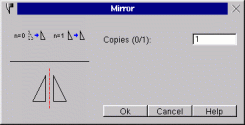 |
Type "1" for copying the objects to the number of copies or type "0" for moving the objects.

This tool allows you to move and rotate objects in one step. The objects get moved by a given amount and rotated by a given angle. For example, if you move an object 50mm to the right and give an angle of 30 degrees, the first copy at the position 50mm at the right of the original object gets rotated by an angle of 30 degrees while the second gets rotated by 60 degrees and so on.
Select the objects which you want to move and rotate. Set the reference point for the movement. Click the reference point for the rotation. This point moves with the movement of the objects. It is relative. Set the target point for the movement. The following dialog appears:
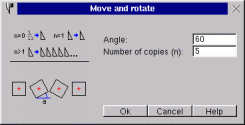 |
Type the angle for the rotation and the number of copies in the dialog box.
 |
|
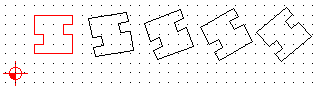
Fig. 12: For this example, the center of the contour was taken as reference point for the moving and the rotation. The rotating angle is 10� and the number of copies 4. |

This tool allows you to rotate objects around two centers in one step. The objects get rotated by a given angle and the result of this rotation gets rotated around another center. For example: If you rotate an object by 60 degrees counter-clockwise around an absolute center and rotate it by -60 degrees around a relative center, the result is an object which moves around the absolute center but holds its direction.
Select the objects which you want to rotate. Set the reference point for the absolute rotation. Click the reference point for the relative rotation. This point rotates with the rotation of the objects around the absolute reference point. The following dialog appears:
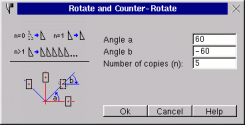 |
Type the angle for the two rotations and the number of copies.
 |
|
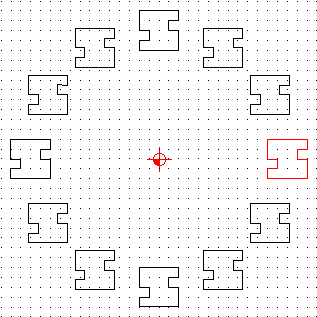
Fig. 13: For this example, the absolute zero was taken as reference point of the absolute rotation. The center of the contour was taken as reference point for the relative rotation. The rotating angle a is 30�, the rotating angle b -30� and the number of copies is 11. |

Click the object which you want to trim on the part which should be still visible after trimming. Click the object where you want the other object to trim to. If there are more than one possibilities, the one which has its intersection next to the current position of the mouse cursor is taken.

Click the first object which you want to trim. Click it on the part which should be still visible after trimming. Click the second object which you want to trim. The first object gets trimmed to the second and vice versa. If there are more than one possibilities, the one which has its intersection next to the current position of the mouse cursor is taken.

Click the object which you want to cut into two parts. Click the cutting point. It must be on the chosen object.

Stretching means moving all endpoints in a given range. This can be very useful if a length of a contour should be changed.
Click the two edges of the range in a way that all endpoints of the stretching part are inside the range. Click the reference point for the moving and afterwards the target point.
 |
|
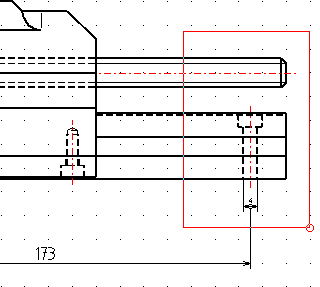
Fig. 14: Here, we want to shorten the part by 30mm. This screenshot was taken during choosing the range. |
 |
|
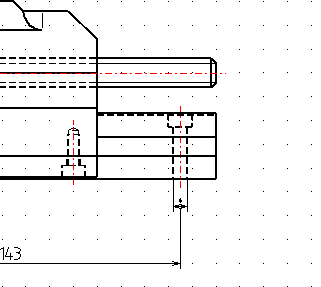
Fig. 15: The same part after stretching. The dimensioning was adjusted automatically. |

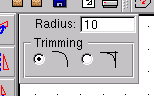
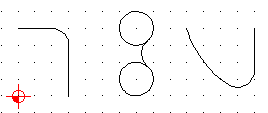
Type the radius of the rounding in the box shown at the top left of the drawing view and chose if you want to trim the corner objects or not:
Click the first object of the corner at the part which should stay after trimming. This may be a line or an arc. Click the second object of the corner. As there are more than one possibilities to do the rounding now, you must choose the rounding by clicking a position next to the one you need.
Note: Circles can be rounded to other objects but they don't get trimmed.
 |
|
Fig. 16: Some different rounding possibilities. |

Type the two beveling distances in the box shown at the top left of the drawing view and chose if you want to trim the corner objects or not:

Click the first object of the corner at the part which should stay after trimming. This may be a line or an arc. Click the second object of the corner.

This function is provided for a better compatibility of the DXF file format. If you have troubles importing texts in DXF files produced with QCad into an other program, try to convert the texts in your drawing to single objects with this function. Note: Texts which are converted to objects can't get changed in the text editor anymore. After the conversion they appear like they were constructed using lines and arcs.
To use the function, simply select the text objects which you want to convert. Selected objects which are no texts don't get changed.

Use this tool to change existing texts in the graphic. You can change the contents as well as the shape, the attributes and the alignment.
Click the texts you want to change.

Select the objects which you want to delete.

Select the objects to move to an other layer. A dialog box appears with a combo box. Choose an existing layer or type a name for a new layer.

Click the new position of the zero point.

This function changes the attributes of objects. Attributes are the line width, color and style.
Choose the objects. The following dialog box appears:
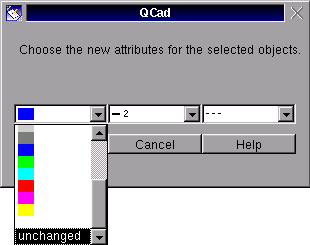 |
Choose the new attributes or choose "unchanged" if you won't change a specific attribute.
![]()
[
Contents |
First Page |
Previous Page |
Home
| Next Page |
Last Page
]
[ 1 | 2 | 3 | 4 | 5 | 6 | 7 | 8 | 9 | 10 | 11 | 12 | 13 | 14 ]
Copyright © by Andrew Mustun 1999. All rights reserved.
This Manual was created with ManStyle.