|
ToolBox v2.00 Copyright ⌐1998-2003 CyLog Software |
| Introduction | |||
| Quick Guide | |||
| How To Control Panel ToolBox Properties Icon Properties Administration Tasks Troubleshooting |
|||
| Registration | |||
| License Agreement | |||
| Contact Us | |||
How to use ToolBox - Control Panel

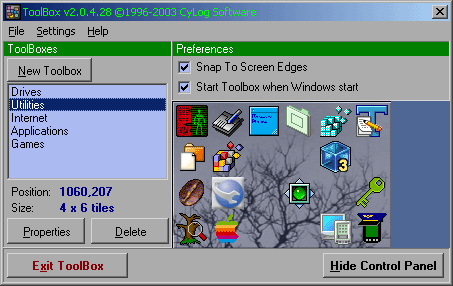
At the bottom of the window there are two buttons. Use 'Exit ToolBox' to terminate the application, and 'Hide Control Panel' to hide this window (the application is still running and all ToolBoxes are visible).
Working with Toolboxes
On the left there is a list of the active Toolboxes. The buttons on the form and the File menu options, which
are used to maintain toolboxes are explained below:
- New. Use the 'New Toolbox' button or 'File/New Toolbox' from the menu to create a new one. A new toolbox will appear at a random screen position and a new entry will appear in the list.
- Properties. Use the 'Properties' button or the 'File/Toolbox Properties...' menu option to change the properties of a ToolBox (see Toolbox Properties for details). Note that you can also access each ToolBox's properties by right-clicking on a toolbox and selecting 'ToolBox properties...' from the pop-up menu.
- Delete. Use the 'Delete' button or 'File/Delete Toolbox' from the menu to delete the current selected toolbox from the list. Toolboxes are not removed from the disk, their filenames are just renamed. You can undelete a toolbox that has been accidentally deleted. See the Administration Tasks section for more details.
- Clone. You can also clone toolboxes! This is extremely useful when you want to split a toolbox to two for example. You can clone first and then remove the icons from the toolboxes that should no longer be there.
- Convert old ToolBox v1.* DAT file. You can create a new ToolBox from a v1.* DAT file (old configuration file). This new version of ToolBox (v2 and onwards) uses new XML configuration files that are easy to debug, easy to read and even easy to re-configure by hand. The old versions used to save the configuration in binary files. If you want to migrate from a previous version of ToolBox please use the migration guide in the Administration Tasks section.
Global Settings
These settings are common to on all ToolBoxes:
Snap to Screen Edges. By checking this option ToolBox will force window to stick to the
screen edges as you move windows
Start ToolBox when Windows start. Checking this option will create a Windows shortcut to
ToolBox at:
c:\Documents and Settings\your user name\Start Menu\Programs\Startup
Uncheck this check-box and the shortcut will be removed. ToolBox does NOT create any files in any other
folder than the installation folder automatically.
Save all toolbox settings
Although ToolBox saves changes (new properties, new shortcuts, etc.) at the time they are modified or
created, the 'Settings/Save all toolbox settings' menu option from the Control Panel forces all Toolbox
windows to persist themselves by revising all configuration files.
