|
ToolBox v2.00 Copyright ⌐1998-2003 CyLog Software |
| Introduction | |||
| Quick Guide | |||
| How To | |||
| Registration | |||
| License Agreement | |||
| Contact Us | |||
Quick Guide

Install ToolBox by unzipping the contents of the archive to an empty directory on your disk (e.g.
c:\MyPrograms\ToolBox). This will create the neccessary folders and files. Double-click on TOOLBOX.EXE and
you are ready.
Un-Installation
ToolBox will create more files and folders at the installed location, but nowhere else on
your disk. If you need to uninstall it simply delete all the files from the location you put the executable
originally.
Make ToolBox start at Windows start-up
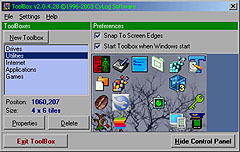
On the ToolBox Control Panel window check the "Start ToolBox when Windows start" button. This
will create a shortcut at:
C:\Documents and Settings\your user name\Start Menu\Programs\Startup
folder on your disk.
Uncheck this check-box and the Shortcut will be removed.
Create you first ToolBox
The first time you run ToolBox, the Control Panel application will be shown. The list of 'ToolBoxes'
will be empty. To start Click on the 'New ToolBox' button. This will create your first ToolBox window. Now
click on the 'Hide Control Panel' button to hide the main window. You can perform almost every operation
on the ToolBox window without using the Control Panel.
Create your first Drive Shortcut
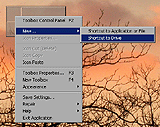
Right click on an empty tile on your ToolBox window. Select 'New../Shortcut to Drive' from the popup menu (see picture on the right).
The Icon Properties dialog will open (see Icon Properties Dialog picture).

Clicking on a Drive icon, executes Windows Explorer with the correct parameter, so a window with the contents
of that drive is displayed.
Create your first Shortcut

Arrange your toolboxes
Moving toolboxes is very easy. Left-click on an empty area of the toolbox and move your mouse. If
however your toolbox is covered with icons and you can't find an empty spot, hold down the Ctrl
button while you left-click on toolbox, then use your mouse to move the window to a new place.
Become a Power User
By completing the above steps you managed to create a shortcut to a drive and an application. You can now
see how easy it is to start putting all your applications onto ToolBox. You can create many ToolBox
windows to group your shortcuts. You can use different background colors, transparency effects etc. You
can make ToolBox the most essential application on your disk. But don't worry. Even if you re-install
windows you can just copy your settings by copying ToolBox's settings folder, or you can even share
the settings with ToolBox on your laptop! There are unlimited ways to use and benefit from the use of
ToolBox. To discover them make sure you read our How To detailed guide.
