Most of objects in ConceptDraw (except guide lines, pictures and OLE objects) may
contain text.
ConceptDraw offers you extensive formatting possibilities, and various implements for
working with text.
Adding Text to a Document
Editing Text
Formatting Text
In ConceptDraw, you can assign text to objects, and also create special Text
objects which contain text only.
ConceptDraw lets you manipulate the text box to reposition the text with respect
to object.
Adding Text to an Object
Text AutoExpand Mode
Creating a "Text" Object
Manipulating the Text Box
Adding Text to an Object
To add text to an object, just this object and start typing text in it. The text editing mode turns on immediately to let you enter and edit the text. (You can also use the F2 key to activate the text editing mode.)

If the text appears too small, the editing mode will zoom in
automatically for better visibility.
Such behaviour is set by default. You can customize it in the Preferences
dialog (Edit / Preferences), on the Miscellaneous tab.
Here you can set the minimal font size in points for the visible text. For smaller values,
autozooming will be activated when you edit text. This tab also lets you disable
autozooming if necessary.
When you finish editing, press Esc or F2, or just click outside the text box to quit the text editing mode.
Note: If a hyperlink (an Internet or e-mail address) is found in the text, it will be automatically assigned to the object when you finish editing. To learn more about this feature (URL autoparsing) and about hyperlinks of different types, see the section for "Using Hyperlinks".
Text AutoExpand Mode
You can use the Text Auto Expand mode ![]() if you want the object to be resized automatically
when you add text to it.
if you want the object to be resized automatically
when you add text to it.
When this mode is on, the object's width is extended to embrace the longest line of the
text, and the height will rise according to the number of lines in the text. Resizing only
takes place when you edit the text.
Once activated, this mode works for all the open documents during the entire work session. It is reset when you quit ConceptDraw.
Note: If the Text Box does not coincide with the object's alignment box, only the text box is resized. For 1D objects, it is only the text box that is resized. The actual object won't change its size.
Creating a "Text" Object
A Text object is an object which contains text only.
To create a Text object:
The Text object can be considered as a transparent rectangle with invisible sides. It behaves like any other object - you can select, resize and move it, assign fill and shadow, add line contour, glue connectors to it, etc.
To select a Text object, just click on the text.
You can also use the Text object to add text to the objects which normally do not have text editing mode: pictures and (in Windows) OLE objects. You just put the text in a separate Text object, and then group it with the picture (select both objects and apply the Figure / Group command).
Manipulating the Text Box
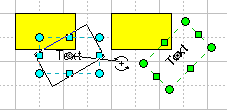
You can reposition the text with respect to the object by manipulating its Text Box.
When a new object is created, the dimensions of its Text Box initially coincide with those of the Alignment Box. When you move or resize the object itself, you move and resize its text box as well.
The Text Box tool ![]() lets you select, resize, rotate and move the Text Box, changing its
appearance and position independently of the object to which the text belongs.
lets you select, resize, rotate and move the Text Box, changing its
appearance and position independently of the object to which the text belongs.
Note: To activate the Text Box mode, you can also use the Tools / Draw / Text Box menu.

To select the object's text box, switch to the Text Box tool and click on the text or on the object itself.
Moving a Text Box
To reposition the selected Text Box, grab it by its side or
center (or by the text itself), so that the pointer turns into a double box ![]() , and
drag it to the needed location.
, and
drag it to the needed location.

You can also use the Arrow keys to move the selected Text Box by one pixel at each keystroke for precise positioning. If more precision needed, increase the magnification (see "Zooming a Page").
Rotating a Text Box
To rotate the selected Text Box, drag any of its rotation
handles: these are small round handles in the corners.
The Text Box rotates around its rotation centre (a gray circle in the center of the box).

For more information, please see the section for "Using Handles to Change the Appearance of Objects".
Resizing a Text Box
You can resize the selected Text Box by repositioning its resize handles: these are small square handles in the middle of each side. The mouse pointer will change into a double-headed arrow over a resize handle.

Note: The Text Box is part of the object, and
though you can move it independently, it still cannot be separated from the object. If you
select and delete the text box, the whole object is deleted.
If you just need to empty the Text Box (delete the text contained in it), press F2
first (the text appears selected), and then delete the text.
See related topics: