QUICK START
VERY BASIC DETAIL- for more detail click on the examples which have much more information
On the DEMO you can only have 6 external walls and four design rooms
FAST PLANS DRAWING
Click FILE / NEW, and in the dialogue box input the drawing name (up to 24 letters - NO file extension )
and select either option 'layout design rooms' or 'draw external walls' (described below), and select your preferred measuring system
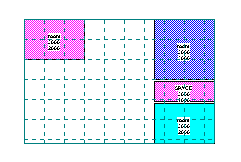
LAYOUT DESIGN ROOMS OPTION
|
useful when you do not know your rooms layout, floor plan shape or size. Move some rooms
around, auto align them, rotate, change room sizes...
|
 |
|
when satisfied, mark the external wall corners... and the basic plan appears, ready to finish, add
upper floors, site plan etc., |
 |
Complete the design room dialogue box that appears.
MOVE the room from the bottom left corner of the screen by placing the cursor on the room
(NOT on the text area), hold down the left mouse button and move the room towards the
centre of the screen and release the button.
ADD more rooms using the 'new design room' icon or from 'design rooms/new design room '
on the menu bar.
ALIGN with other rooms by moving the room within the merging range
( you can customise that distance to suit yourself ) of another room ( providing the rooms are within the merging distance, the rooms will
self align with each other or with a boundary (using the right mouse button)
formed by the extents of all the rooms) - other functions available from 'design rooms' on the menu bar are: move, rotate,
shrink, expand. click for more detail
When satisfied with the layout, mark the inside corners of the EXTERNAL WALLS, by pressing
enter, and work in a CLOCKWISE direction and FINISH by returning to the FIRST MARK ( starting point ) again and pressing enter - so the programme knows you have finished
(check the cursor position box and the guide line to get this accurately, and the real PLAN view will appear, centred
with dimensions. centred on screen( use 'view / layout' or view / ground floor' when re visiting
these drawings, click for more detail
HINTS
If your layout will be larger than the screen, either
use 'ZOOM / FIT on SCREEN', 'ZOOM / SHRINK by HALF' or auto scroll to place rooms and the wall marking cursor off screen, by holding
down the left button and moving the cursor to the edge of the screen
There are other ways to adjust rooms - see moving design rooms
A grid is available, and boundary sizes and area show at all times,
when marking the external walls this grid ( the layout grid icon toggles on/off )
will cover the entire screen to aid in marking
The merging ( self aligning ) distance can be CUSTOMised
Click for greater detail
NOTE
'Layout design rooms' is a design aid only, you
cannot add windows, doors, etc., until you have formed a plan view by marking the external wall corners as above.
DRAW EXTERNAL WALLS OPTION
when you know your basic floor plan shape
|
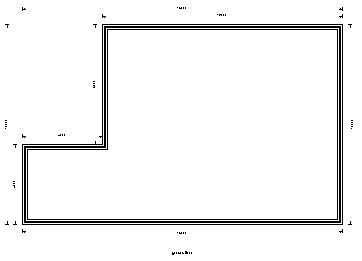 |
Select main wall details and position of the inner wall lines from the dialogues boxes as they appear,
STARTING POINT press enter on the start point - that is the OUTER corner of an external wall (usually you can leave the cursor at the top
left corner ( the programme will centre the drawing later) and work CLOCKWISE> by selecting the
RIGHT ARROW key and input the wall length and OK the input box , now press the
DOWN ARROW key input length , and continue back to the orignal
STARTING POINT. and press enter. watch the cursor position box and the guide line
at the bottom of the screen to give you the figures back to the starting point
( you must return to the starting point so the programme knows you have finished )
click < A href="extwall.htm">for more detail and for drawing angled external walls
click < A href="extwall.htm#extangle">for angled external wall detail
HINTS
Try the drawing external walls example
or click the drawing angled wall example
FINISHING
Once you have the basic floor plan , you can SHRINK and EXPAND the floor plan base,
use DESIGN ROOMS inside the walls, or use the FIXED ROOM function to add complete rooms,
draw internal walls, add windows & many types of doors to existing walls, alter and add cupboards
to rooms and other internal walls.
You can also change or split the external walls, if you need different wall styles
in the base floor plan
HINT
For more information on finishing, display, drawing assistance, etc., see the
individual functions FUNCTION LIST
or click FINISHING - EXAMPLE 3
ALWAYS watch the GUIDE LINE at the bottom of the screen for help on all functions
and use the F1 key for more context help on the selected function
Use the ARROW KEYS to finetune the cursor position in most functions
NOTE When you start any floor you MUST draw each floor
plan's external walls, consecutively (clockwise ) and finish back exactly on your starting point,
BEFORE you do anything else.
QUICK HINTS
If you want, add design rooms AFTER you have the external walls drawn - when
finally positioned how you want them within the external walls
you can shrink and expand the base using 'base / shrink' or 'base / expand', then select 'design rooms / finish' to draw the rooms
fixed in position.
Windows & doors must always be drawn on existing walls - the opening is cut automatically.
For cupboards and room wall alterations use the' internal wall' icon
If you used the 'LAYOUT DESIGN ROOM option you can return at any time by selecting
'view / layout' - any previous plan drawing made from the layout will be kept only until you re select
the external walls and remark them
Of course there is a far more to check out on the help system than this brief introduction
click one of the underlined headings with the left mouse button
If all else failsà.try
EXAMPLES
three short tutorials - on layout design rooms and drawing external walls
HOW TO.... solve your queries and customise
the programmes to suit you
THE SCREEN LAYOUT getting to know
the layout,
DIALOGUE BOXES speedy ways to answer the
dialogue boxes,
FUNCTION LIST have a look - you may be missing
out n some functions
HINTS & REMINDERS
ORDER how to order this programme