DESIGN ROOMS
USING 'LAYOUT DESIGN ROOMS'
Design Rooms are normally grouped to form the layout view, marking the external
wall base afterwards (select FILE / NEW and in the first dialogue box
select the ôlayout design roomö option ),
The NEW ROOM DIALOGUE will now appear
The first input is for the room name, The next two input boxes are the dimensions of the room - if possible,
incorporate the sizes of any wardrobes or cupboards in these sizes, as it saves continually
moving them when moving the room. The next part is for selecting the room colour, if wanted. Nominate a colour type if you want
e.g. for plumbing economics, wet areas are sometimes grouped together, this is easier to see
if those rooms are all of the same colour.
The first design room dialogue is followed by the internal walls dialogue box,
to get the room wall thickness - all subsequent design rooms on that floor will use that wall thickness.
NOTE
Select the way you want the finished room to show dimensions.
The dimensions will only show correctly when you mark the external wall corners using the EXTERNAL
WALL icon and the real plan drawing appears
Press Enter and the room will appear in the bottom left corner, move the room towards the middle of the screen
To add more design rooms click the NEW DESIGN ROOM icon or select DESIGN ROOMS / NEW DESIGN ROOM from the menu bar
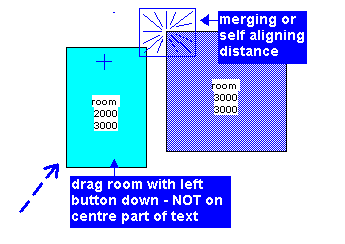
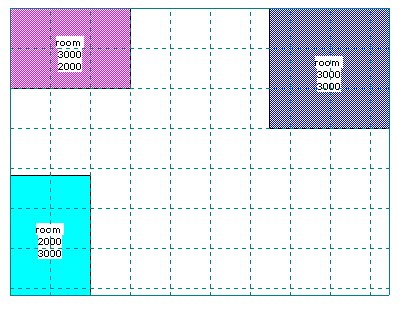
ALIGNING with OTHER ROOMS
move the cursor into the room,
for auto aligning hold down the left mouse button away from the centre text of the room,
move to approximate position for the room and release the mouse button - if any edge of your
room is within the merging distance of another design room or wall, the room will
auto align with it -
|  |
|
aligned and spaced wall thickness apart
| 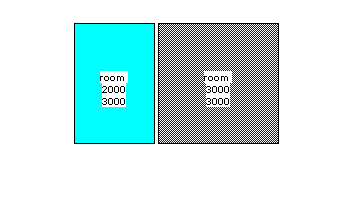 |
MOVING ROOMS WITHOUT ALIGNING
if instead, you hold the button down on the centre of the room text the
room move will ignore the merging ( auto aligning ) feature.
| 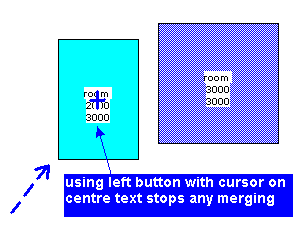 |
|
room moved but not aligned with any existing rooms
| 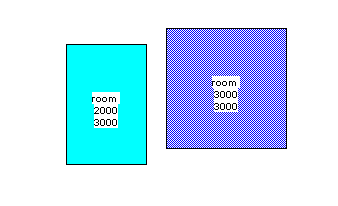 |
ALIGNING WITH THE BOUNDARIES
once you have two rooms placed on screen a boundary grid appears,
and sizes and area show on the guide line at the bottom of the screen.
|
to align with the layout grid boundary, ( if the layout grid is not showing, click the LAYOUT GRID icon - it toggles on / off )
then move the room close to the boundary with the right button held down.
| 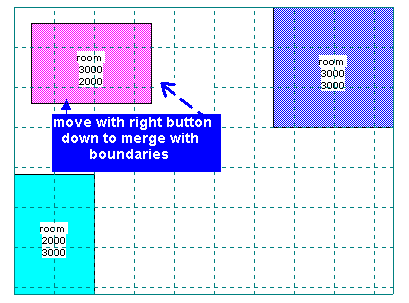 |
|
aligned with the overall rectangle boundaries
|  |
OTHER FUNCTIONS FOR DESIGN ROOMS
MOVE TO
select DESIGN ROOMS / MOVE on the menu bar
to move a set distance :-
identify the room by placing the cursor in it and clicking the left mouse button, press the
arrow key in the direction you wish to move, an input box will appear, type in your distance
to move and press enter.
to fine tune the room position :-
identify the room by clicking with the right mouse button, and use the arrow keys to move
the room.
MAXIMUM ROOM AVAILABLE
select DESIGN ROOMS / MAX DESIGN ROOM from the menu bar
click left button in the area for a room, the dialogue box will
come up with the maximum size (already deducting wall thickness), available for a room
this function senses the distance horizontally and vertically - so the position you click can in
some cases be important.
ROTATE
select DESIGN ROOMS / ROTATE from the menu bar
clicking on the room causes it to rotate 90 degrees
DELETE
select DESIGN ROOMS / DELETE from the menu bar
now just click on the design room to delete
EXPAND/SHRINK
select DESIGN ROOMS / EXPAND or SHRINK from the menu bar
click on the room, then use arrow key of direction to expand/shrink,
and input distance
FINISHING THE DESIGN ROOM LAYOUTS
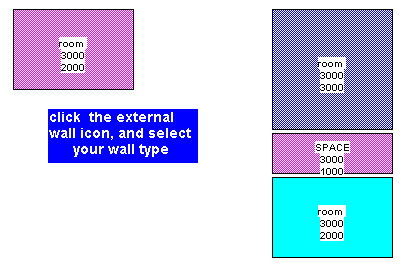
MARKING THE EXTERNAL WALLS
When you are ready to finish the rooms layout, click the external wall icon,
the cursor changes to full size in the top left corner, the colour disappears from the
rooms for ease of marking - if you want, click the layout grid icon to get a full screen
grid to aid in marking the walls
|  |
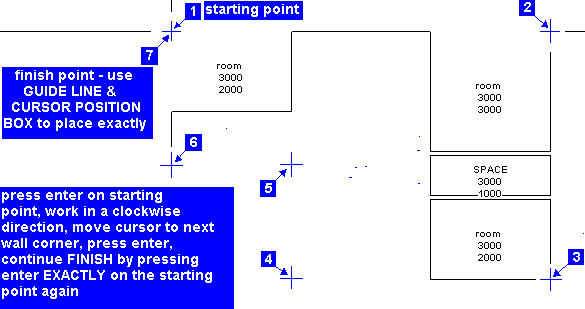
Unlike the normal 'draw external walls' option, for the 'layout design rooms' option you mark the inside line of the external walls - so some of your
room corners will probably be corner marks
Move the cursor to your starting point ( it does not have to be a room corner ) use the
arrow keys to fine tune the cursor position (the cursor position box will show the distance
from the top left corner of the old boundary rectangle, and press enter when correct,
move clockwise (the cursor position box will show the distance )and press enter on all
building corners (when the cursor is precisely on a room corner you will see the cursor
lines alter ) and finish back at your starting point - follow the guide line and cursor
position box to get that correct and press enter.
Now the drawing will change to a .PLN plan view, centre itself, add dimensions, show the
area and draw the rooms out with measurements shown as you directed in the design room
dialogue.
All rooms drawn will allow for any external walls they butt to, in the case of a room drawing
over part of an the external walls, the room may not have been correctly aligned with the
boundary rectangle. To over come that, select view / layout and your room layout will
reappear, just use the right button to move the offending room in to the centre of the
boundary rectangle very slightly and release the button, select the external wall icon and
re mark the external walls
Mark the inside corner of your external walls,
clockwise, finish back exactly at the original starting point and press enter
( watch the guide line and cursor position box figures to get this accurately )
otherwise the programme will not know you have finished marking the wall corners
Use the arrow keys to finetune the cursor position.
When the cursor is exactly over a room corner the room wall lines disappear.
If a wall is to be square to the previous wall
the cursor position box MUST have an angle of 0.00, 90.00, 180.00 or 270.00 and '0' for one distance
Mark the inside line of your external
walls, clockwise, return to the start point and press enter to finish.
Use the arrow keys to finetune the cursor position
|  |
NOTE
When an external wall is square to the previous wall, the cursor position box will have a '0' for
one distance when the cursor is correctly positioned for a corner.
You MUST finish back exactly at the original starting point and press enter
( watch the guide line and cursor position box figures to get this accurately )
otherwise the programme will not know you have finished marking the wall corners
HINT
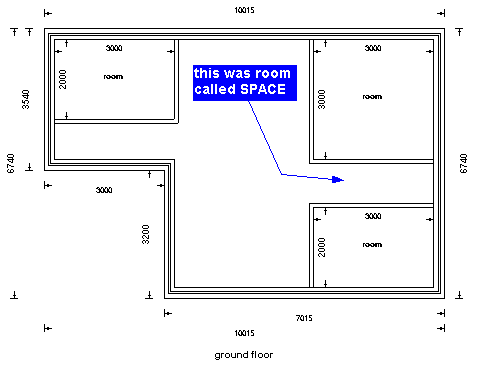
if you just want a room as a spacer, type æSPACEÆ
this will show on the room layout as in the above drawing, but when you get the Plan view ( drawing below ), it will just be a vacant area
- useful for passageways and for keeping rooms always a specific distance apart.
The layout view now changes to a plan
view - ready for doors, windows etc.,
|  |
HINT
If your layout is going to be larger than the screen, hold down the left mouse and
move to the edge of the screen to auto scroll either a room or the wall marking cursor.
You can also use ZOOM / FIT ON SCREEN, or ZOOM / SHRINK BY HALF before marking the external walls if you prefer.
NOTE
When using the 'layout design rooms' option, the title at the top of the screen will have a '.LYT'
extension, but once you mark the external walls the plan view is drawn, and the title extension
will be '.PLN' and then you can add doors windows etc.,.
To return to the layout view, to make any alterations to the layout or change the external wall
corners, just select VIEW / LAYOUT from the menu bar
WARNING
When you click the external wall icon any previous plan views in the same
drawing name will be deleted
USING DESIGN ROOMS / FINISH
Select DESIGN ROOMS / FINISH from the menu bar
You use also add design rooms to a plan view ( has the external walls drawn ) and move them
around witihin the external walls and when satisfied select DESIGN ROOMS / FINISH from the menu bar
FINISH is NOT used with the layout design rooms method
when you click this, any design rooms on screen will be drawn and locked in as normal plans,
the room colours will disappear and the dimensions will show asyou originally selected
HINT
The design rooms merging has a bias towards any external walls - when
design rooms are used in plan views - , so if your room does not align how you expect,
slightly overshoot the room to align to.
CUSTOMISE
CHANGE THE MERGING DISTANCE or START UP ROOM COLOURS
click CUSTOMISE
NOTE
If you make the merging distance too large it may align a room to the wrong wall
The dimension offset distance (internal offset) and the text size can be changed permanently
in CONFIGURE DIMENSIONS