|
|
|
|
Setting Up the View of Your Scene
There are eight different views of your scene available in Bryce: Camera View, Director's View, and the six orthogonal views. The Camera View and Director's View let you see the scene from any perspective, while the orthogonal views let you see projections of the scene from the top, bottom, left, right, front and back.
To choose a view:
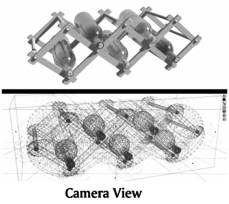
Camera View
This view of your scene in the Working window is seen through the lens of the Camera object in your scene.
Since your scene exists in 3D, you can view it from any vantage point: above, below, or even from inside an object. To see from these different perspectives, you change the position of the Camera. The positioning tools available in the Control palette let you position the Camera along specific axes and change its orientation.
As you create and position the objects in your scene, you can use the position and orientation of the camera (called Camera Space) as a reference for several transformation operations. You can rotate, position and resize objects using Camera Space. Refer to "Camera Space" for more information.
When you've completed your scene, the Camera View can be used to create the final rendered image or animation. You can reposition the camera and render the scene from several different viewpoints.
The camera can also be animated just like any other object. You can record changes in its position at different points along the timeline. When you run the animation, the view from your camera appears to change like the view seen from an airplane as it flies through a landscape. Refer to "Animating the Camera" for more on animating the camera.
When you're in Camera View, a small camera icon appears in the View control.
The camera icon in the View control indicates that you're in Camera View.
To switch to Camera View:
Setting Camera Object Properties
Since the Camera acts as an object, there are several object properties you can use to set how it's displayed, linked, or animated. Refer to "Editing Link Attributes" for more on linking properties and "Editing Animation Attributes" for more on Animation properties.
You can hide the camera wireframe to get a better view of objects in your scene. When you want to change the camera properties, you can display the hidden camera wireframe. Also, you can lock the position of the camera.
To hide the camera wireframe:
1 Switch to Director's View or an orthogonal view so you can see the camera's wireframe.
2 Select the camera in the Working window.
3 Click the A icon that appears next to it. The Camera & 2D Projection dialog appears.
4 Enable the Invisible option.
To display the hidden camera wireframe:
1 Click the Time\Selection Palette toggle at the bottom-right corner of the Working window to display the Selection palette.
2 Click the triangle icon on the Selection palette, and choose Select camera.
To lock the camera position:
1 Switch to Director's View or an orthogonal view so you can see the camera's wireframe.
2 Select the camera in the Working window.
3 Click the A icon that appears next to its bounding box. The Camera & 2D Projection dialog appears.
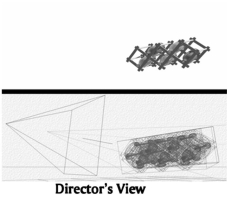
Director's View
Director's View lets you view your Bryce environment through the eyes of a director sitting outside the scene and directing the action of all the objects-including the camera. The camera that generates the Director's View cannot be seen or positioned like an object. You have to use the positioning controls to move this view. Unlike the Camera View, the motion of this view cannot recorded as part of an animation.
When you're working on a still image, you can use Director's View to get a second perspective on your scene. You can also render the Director's View of your image.
The real power of the Director's View becomes obvious when you're working on camera animations. Animating camera motions while in Camera View can be tricky. However, in Director's View you can see the camera as an object, which means that you can set up camera motion just as you would any other object.
To switch to Director's View:
Swapping Director's View for Camera View
The Director's View and the Camera View are interchangeable. So you can move the Camera View to the position of the Director's View, or vice versa.
Even though you can't directly position the camera that produces the Director's View in the Working window, you can set up a Director's camera position by dragging the Camera to a position in the scene and then swapping the Camera position with the Director's View position.
To swap the Director's View position for the Camera View position:
- Click the triangle icon next to the Camera Axes controls and choose either Camera to Director or Director to Camera from the menu.
Orthogonal Views
There are six other views available through the View controls, but these views are not generated by any camera. The views (Top, Bottom, Left, Right, Back and Front) are perspective-free views of your scene called orthogonal projections. When you're using one of these views, you cannot use the Camera controls.
Refer to "Orthogonality and Views" more on orthogonal views.
The orthogonal views are another way of seeing the camera as an object in the scene. This can be invaluable when you're animating the camera, or setting up a complex scene.
 Corel Corporation http://www.corel.com Voice: (800) 772-6735 Fax: (716) 447-7366 www.corel.com/support |