|
|
|
|
Animating the Camera
When you animate the camera, you're changing the view of your scene over the course of the animation. Since you're in 3D space you can move the camera to any position in the scene. You can have your camera circle around the scene, zoom into it or even fly under it.
There are two ways of animating the camera in Bryce: using the Camera Position controls, or by moving the camera as an object.
The easiest way of animating the camera is to use the Trackball, (or other Camera Position controls) in Camera View while Auto-Key mode is enabled. Any changes you make to the position of the camera are automatically recorded as part of a key event. When you play the animation, your camera changes are added to all the other changes in scene properties to create the action in your animation.
While working in Camera View may be the easiest way of animating the camera, it's not the most precise. Because of the view's first person perspective, it can be hard to see the exact path of the camera as it moves. This can make creating a precise motion difficult.
However, if you switch views, to an orthogonal view or the Director's View, you'll be able to see the camera as an object in the scene. Then you can select the camera and set up key events for its position, just as you would for any other object. Also, you can display the camera's motion path so you can make precise adjustments to its movements.
After you're done setting up the key events for the camera, you can see the changes in the Sequencer in the Advanced Motion Lab. There you can rearrange the order of events or change how long it takes to move between camera positions. Refer to "Object Hierarchies" for more on working in the Hierarchy, or "Time Mapping Curves" for more on remapping time.
Camera Motion and Skies
The motion of sky elements can affect how fast the action in your animation appears. For example, in time-elapsed movies, the clouds and sun fly by quickly as the objects stay in the same position. You could inadvertently create this type of action in your scene if you move only the camera in the scene without considering the static nature of the sky elements. Since the clouds stay in exactly the same position as you move the camera, they'll appear to be moving much faster than the objects in the scene.
To avoid this problem, Bryce lets you link the clouds to the camera. This way, whenever the camera moves, the cloud positions also move, so they look like they're staying in the same position.
Although you can also link the sun to the camera, it's not a very good idea to link the two during an animation since any change in the camera position will change the time of day.
To link clouds to the camera:
1 Display the Sky & Fog palette.
2 Click the triangle icon in the bottom right corner of the palette and choose Sky Lab from the menu. The Sky Lab dialog appears.
4 Click the Link Clouds to View button at the bottom of the palette.
5 Click the OK icon to exit the palette.
Using the Orthogonal Views
In Camera View you can't see the physical position of the camera in the scene since you're looking through it, but using one of the Orthogonal views (Top, Bottom, Left, Right, Front and Back) you'll be able to see the camera as an object.
In these views you can animate the camera by changing its position at different points in time. When you run the animation, Bryce fills in the gaps between positions to create smooth camera motion.
To animate the camera in an orthogonal view:
1 In the Working window, click the triangle icon next to the View Control and choose an orthogonal view from the menu: Top, Left, Right, Bottom, Front or Back.
2 Move the Current Time Indicator in the Timeline to the point where you want to start changing the Camera View.
3 Click the triangle icon in the Animation controls and make sure Auto-Key is enabled.
4 Drag the Camera wireframe in the Working window to a new position.
5 If you want to see the results of your changes, choose Camera View from the View Control menu and click the Play button in the Animation controls.
Using Director's View
Director's View is similar to Camera View, except that in this view, you can see the camera as an object in the scene and the movements of the Director's camera are not recorded as key events.
In Director's View, you can move the view of the scene using the Trackball or the Camera Position tools. The view of the scene changes in the Working window, but no new key events are created.
You can also preview the animation while in Director's View. In the Working window you can see all the objects moving along their motion paths- including the camera.
To animate the camera using Director's View:
1 In the Working window, click the triangle icon next to the View Control and choose Director's View from the menu.
2 Move the Current Time Indicator in the Timeline to the point where you want to start changing the position of the camera.
3 Click the triangle icon in the Animation controls and make sure Auto-Key is enabled.
4 Drag the Camera wireframe in the Working window to a new position.
5 If you want to see the results of your changes, click the Play button in the Animation controls.
Displaying the Camera's Trajectory
If you're setting up a precise path for the camera, you may want to display its motion path. Just like with other motion paths, you adjust the trajectory of the camera by adjusting the shape of the path. Refer to "Editing Motion Paths" for more on working with motion paths.
To display the camera's trajectory:
1 In the Working window, click the triangle icon next to the View Control and choose: Top, Left, Right, Bottom, Front or Back from the menu.
2 Select the Camera in the Working window.
3 Click the A icon that appears next to the camera's bounding box. The Camera & 2D Projection dialog appears.
5 Click the Show Trajectory option and click the OK icon.
Linking and Tracking with the Camera
Since Bryce lets you treat the camera as an object, you can also link the camera to an object, or you can have it track an object.
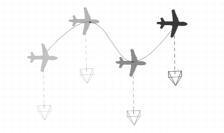
When you link the camera to an object, the view of the scene changes as the position of the parent object changes.
If you link the camera to an airplane, the view of the scene will follow the airplane's trajectory as it moves long its motion path.
When the camera is linked to an object, both its aim and position change as the object changes.
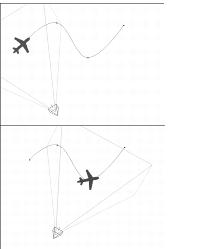
When you set the camera to track an object, the camera remains pointed at the target object no matter where the object moves in the scene. This means the Trackball is disabled because the orientation of the camera is controlled by the position of the target object. Also, you can't change the aim of the camera because it always aims at the target object.
However, you can position the camera using the Camera controls as these controls change the position of the camera not its orientation.
If you have the camera track an airplane, the view of the scene will follow the airplane's trajectory.
Linking the camera can cause unpredictable movements when you're in Camera View. If you change the position of the target object, the view of the scene will also shift.
To link the camera to an object using the Camera & 2D Projection dialog:
1 Switch to an orthogonal view or Director's View.
3 Click the A icon that appears next to the camera's bounding box. The Camera & 2D Projection dialog appears.
5 Click the Object Parent Name menu and choose the name of the object you want to use as the parent object.
6 Click the OK icon to link the two objects.
You can also access the Camera & 2D Projection dialog by double-clicking the Trackball, or by clicking the triangle icon beside the Camera controls and choosing Edit Current Camera from the drop down menu. Only the Camera & 2D Projection tab will be available when you access the dialog using one of these methods.
To link the camera to an object interactively:
1 Switch to an orthogonal view or Director's View.
3 Move the cursor over the Link icon that appears next to the camera's bounding box.
4 Drag the linking handle from the icon to the object you want to use as the parent object.
To force the camera to track an object using the Camera & 2D Projection dialog:
1 Switch to an orthogonal view or Director's View.
3 Click the A icon that appears next to the camera's bounding box. The Camera & 2D Projection dialog appears.
5 Click the Track Object Name menu and choose the name of the target object.
To force the camera to track an object interactively:
1 Switch to an orthogonal view or Director's View.
3 Move the cursor over the Tracking icon that appears next to the camera's bounding box.
4 Drag the tracking handle from the icon to the object you want to use as the target object.
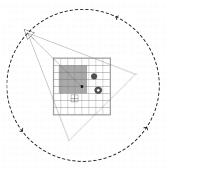
Creating Camera Orbits
The camera's origin point controls its center of rotation. When the origin point is at the camera's center, it rotates around in place. When the origin is positioned somewhere in the scene, it will orbit around the origin point. During an animation, the view of your scene will orbit around a specific point in the scene.
In this example, the camera's origin point was positioned in the center of the scene. During the course of the animation, the camera appears to orbit around the entire scene.
To create a camera orbit:
1 Switch to Director's View or one of the orthogonal views.
2 Click the triangle icon in the Animation controls and make sure Auto-Key is enabled.
3 Click the Camera wireframe in the Working window.
4 Click the A icon that appears next to the camera wireframe. The Camera & 2D Projection dialog appears.
6 Click the Show Origin Handle button and click the OK icon.
7 Drag the origin handle to a position in the scene.
8 Rotate the object using the Rotation tool in the Edit palette or the Trackball.
 Corel Corporation http://www.corel.com Voice: (800) 772-6735 Fax: (716) 447-7366 www.corel.com/support |