|
|
|
|
Positioning the View of Your Scene
When you position a view, you're affecting the location and orientation of a camera, not the scene itself. The scale and position of objects remains constant; only your view of the scene changes.
The controls described in this section can be used to position either the Camera View or the Director's View. However, some controls, like the Trackball, are limited when you're in Camera View.
Bryce has two sets of controls for positioning your view of the scene: the Trackball and the Camera controls.
The Trackball lets you adjust the position of the camera, as well as its orientation.
Use the Trackball to adjust the camera's position.
The Camera controls change the position of the camera along the X, Y, and Z axes.
The Camera controls let you adjust the position of the camera along the X, Y and Z axes.
Camera Modes
The cameras in Bryce have four modes that affect the behavior of the Trackball. Three of the modes are available only when you're in Director's View. The only mode available in Camera View is Free Camera.
Trackball Mode
In this mode the camera orbits around your scene. The center of the orbit, or origin, is the center point of a box that encompasses all the objects in your scene.
As the size of your scene changes, so does the size of the box, which changes the box's center point. As a result, the center of rotation for the camera also changes as you change the size of your scene. In fact, in this mode the camera's center of rotation is constantly updated, so that it always remains in the center of the scene.
Center to Selection Mode
In this mode the camera also orbits around the scene. The center of the orbit, in this mode, is a selected object. As the object moves, so does the camera's center of rotation. This mode is the best way of making sure that specific objects always remain in view.
Tripod Mode
In this mode the center of rotation is fixed at the center of the camera, so it actually pivots in place. As the name suggests, the camera acts as though it's on a tripod. It can rotate around, or tilt up and down, but it always remains in place.
Use the Tripod mode in conjunction with the Eye Level Camera command to get a sense of height. Refer to "Camera Axes Control Options" for more on this command.
Free Camera Mode
In this mode the camera is completely unconstrained. Its center of rotation can exist anywhere, from its center to a point somewhere in the scene. Since the placement of the camera's center of rotation is not limited, this mode can simulate any of the other modes. For example, if you place the camera's origin point in its center, it acts as though it's on a tripod.
Refer to "Manually Positioning the Camera" for more on positioning the camera's origin point.
To choose a camera mode:
1 Double-click either the Trackball or one of the Camera controls. The Camera & 2D Projection dialog appears.
2 Make sure the General tab is visible.
3 Click one of the mode buttons at the top of the dialog.
You can also switch between modes by clicking the triangle icon next to the Trackball and choosing a mode from the menu.
Using the Trackball
The Trackball lets you rotate the camera around its origin point. The position of the origin depends on the Camera mode you select. Refer to "Camera Modes" for more on these modes.
The Trackball doesn't rotate the scene, it only changes the camera's location (Offset) and orientation (Rotation) relative to your scene.
To move the camera using the Camera Trackball:
- Drag the mouse over the Camera Trackball control. The view of your scene moves in the direction you drag.
Using the Camera Axes Controls
Camera Axes controls let you move the view of your scene along specific axes. When you're using these controls, the view does not tilt or rotate from its original position. It only moves up, down, back or forward.
The Camera Axes controls affect your camera's location (Offset) only, not its orientation (Rotation).
Camera Axes controls are not available if you are in any Orthogonal View. When unavailable, these controls turn dark grey. If you are in an Orthogonal View, you must use the Zoom and Pan tools for navigation. Refer to "Orthogonality and Views" for more on these views.
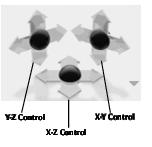
There are three Camera Axes controls available:
X-Y Camera Control
The X-Y Camera control provides control for horizontal and vertical motion. The sphere at the center of the camera control lets you move the camera along both the X and Y axes. The arrows let you constrain movement either horizontally or vertically.
X-Z Camera Control
The X-Z Camera control provides control for horizontal and depth motion. The sphere at the center of the camera control lets you move the camera in both the X and Z axes.
Y-Z Camera Control
The Y-Z Camera control provides control for vertical and depth motion. The sphere at the center of the camera control lets you move the camera in both the Y and Z axis.
To move the camera along two axes at once:
The motion of your mouse determines the direction of the camera movement:
X-Y Camera control: moving up, down, left and to the right, moves the camera up, down, left and right.
X-Z Camera control: moving up, down, left and right moves the camera backward, forward, left, and right.
Y-Z Camera control: moving up, down, left and right, moves the camera up, down, forward, and backward.
To move the camera along a single axis:
When you move the cursor over an arrow point, it changes to a letter to identify the axis of constraint.
Camera Axes Control Options
The Camera Axes controls have options that let you move the camera to create specific views.
To choose a Camera Axes control option:
Center Scene rotates the camera so that all items in your scene are centered in the Working window. This option affects only the camera's rotation, not its offset. If you can't see all the objects in your scene after using this option, try pulling your camera back a bit with one of the Z controls.
Center Selection rotates your camera so that any selected object or objects will be centered in your view. This option does not reposition the object itself, only the camera's rotation relative to the selected object.
Eye Level Camera repositions the camera to just above ground level. Use this command (especially in conjunction with the Trackball's Tripod mode) to create the feeling of large, looming mountains or other objects. This is also effective in concert with the Field of View control.
Choose Camera to Director or Director to Camera to select either the Director or Camera View.
Edit Current Camera brings up a dialog that allows you to enter current camera information. Refer to "Positioning the Camera Numerically" for more information.
Banking Controls
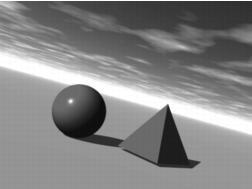
The Banking control sphere tilts your Camera (actually rotating the camera on the Z axis), creating the effect of a tilted horizon. This control is great for creating tilted airplane cockpit views. Banking simulates a Roll action.
This scene was created by banking the camera.
To bank the camera:
- Drag the Banking control, which is located to the top left of the Camera Trackball. Drag right to bank to the right and left to bank to the left.
Press Option/Alt-click in this control to reset to normal. The normal (default) setting is zero.
Field of View
The Field of View control sphere acts like a zoom lens control. The higher the setting, the wider the field of view for your lens.
Because you are admitting more information into your lens, it will create the illusion that objects are receding from view, or getting smaller. That is not the case. Since you're admitting more information, existing objects necessarily occupy a smaller percentage of space within your field of view.
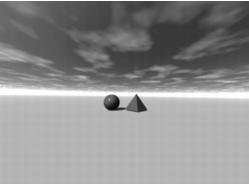
This scene was created by increasing the camera's field of view.
If you drag the Camera Z control to bring your "receding" objects back up to a larger area in your view, perspective distortion effects appear. This is particularly effective for creating broad, swooping cloud scenes.
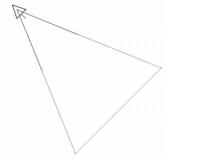
When you view the camera in Director's View or one of the orthogonal views, you'll be able to see the camera's Field of View displayed as a 3D pyramid that extends from the camera wireframe.
The large triangle that extends from the camera's wireframe represents its field of view. As the field of view changes, so does the shape of the triangle.
To display the camera's field of view:
1 Switch to Director's View or an orthogonal view so you can see the camera's wireframe.
2 Select the camera in the Working window.
3 Click the A icon that appears next to the camera object. The Camera & 2D Projection dialog appears.
To increase/decrease the camera's field of view:
Option/Alt-click on this control to reset to normal. The normal, or default, setting is 60°.
Positioning the Camera Numerically
The most precise way of positioning the view of your scene is by using the Camera & 2D Projection dialog. This dialog lets you enter values to set the camera position, the position of the camera's origin point, rotation, and field of view. The dialog can be used to adjust either the Camera View or the Director's View.
When you display the dialog, you can see the numerical position of the camera and the position of its origin point. You can also see the active Camera Mode.
There are different options available in the dialog depending on whether you're in Camera View or Director's View. When you're in Camera View, the only Camera Mode available is Free Camera. As well, the Origin fields are only available if you're using Free Mode.
Since the camera is an object, there are several more controls available when you're in Camera View. These controls let you set linking and animation options. Refer to "Camera Modes" for more.
To position the camera's origin point numerically:
1 Double-click either the Trackball or one of the Camera controls. The Camera & 2D Projection dialog appears.
2 With the Camera View active, make sure the General tab is visible.
4 Enter values in the Origin X, Y, and Z fields.
To set the position of the camera numerically:
1 Double-click either the Trackball or one of the Camera controls. The Camera & 2D Projection dialog appears.
2 With the Camera View active, make sure the General tab is visible.
3 Enter values in the Position X, Y, and Z fields.
You can enter negative values here. Technically, since the Bryce environment is infinite, the range is infinite as well, but higher values can create unpredictable results. The default values are 102.40, 30.72, and 102.40, respectively.
To rotate the camera numerically:
1 Double-click either the Trackball or one of the Camera controls. The Camera & 2D Projection dialog appears.
2 With the Camera View active, make sure the General tab is visible.
3 Enter values in the Rotate X, Y and Z fields. Values are expressed in degrees.
X, Y, and Z rotations are also known as Yaw, Pitch and Roll. The Z rotation, or Rollfield, displays the current value for the Banking control.
You can enter negative values in these fields. The effective range is +/- 999. Default values are 0, 135, and 0°, respectively.
To set the Field of View numerically:
1 Double-click either the Trackball or one of the Camera controls. The Camera & 2D Projection dialog appears.
2 With the Camera View active, make sure the General tab is visible.
3 Enter a value in the Field of View field (FOV).
The value in this field, expressed in degrees, describes current settings for the Field of View control. The effective range is 1 to 180°, and the default value is 60°.
Manually Positioning the Camera
You can manually position the camera by adjusting the position of the camera wireframe in the Working window. The camera wireframe is visible only when you're in Director's View or one of the orthogonal views.
In the Director's View, or an orthogonal view, you will see a blue Camera wireframe, which represents the location of your Camera. You can then drag the Camera wireframe to change the Camera position. The Nano-Preview updates to reflect your changes.
Camera Origin Point
In its default state, the Camera's origin point is not visible and is located at its center.
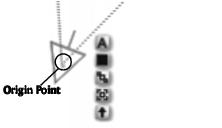
When the Camera's origin point is visible, it appears as a green dot in the center of the camera's wireframe.
The green dot in the center of the camera wireframe represents its origin point.
You can simulate any of the camera modes by dragging the camera's origin point to different locations in the scene:
- If you position the origin point in the center of the scene, the camera acts as though it's in Trackball mode. When you rotate the camera, it moves around the origin point.
- If you position the origin point over an object in the scene, it acts as though it's in Center to Selection mode. When you rotate the camera object, it will pivot around the object under the origin point.
- If you leave the origin point positioned at the center of the camera object, it acts as though it's in Tripod mode.
Once you offset the origin point, all the camera's movements will be altered. If you, then, switch to Camera View, the camera may not move as expected.
To position the camera manually:
1 Switch to Director's View or an orthogonal view.
2 Drag the camera wireframe to a location in the scene.
To display the camera's origin point:
1 Switch to one of the orthogonal views or Director's View.
3 Click the A icon that appears next to the camera's wireframe. The Camera & 2D Projection dialog appears.
4 Click the General tab and enable the Show Origin Handle option.
To position the camera's origin point manually:
1 In the Camera & 2D Projection dialog, display the camera's origin point.
2 Drag the green point to a location in the scene.
Hold down Shift and click the origin point to reset it to the center of the camera object.
Aiming the Camera
The only problem with positioning the Camera using the Orthogonal or Director's View is that the view from the Camera remains fixed as you adjust its location, so you may inadvertently lose the objects you were looking at when the position of the Camera changes.
To solve this problem, Bryce lets you adjust the aim of the camera as you adjust its position.
When you look at the Camera as an object, you'll see that there is a control handle extending from the front of the object. This handle represents the Camera's current aim. By dragging this handle to a point in your scene, you can change the Camera's aim.
When you change the aim of the Camera, it rotates to face the new target, but remains in the same position.
To change the Camera's aim in an orthogonal view:
1 In the Working window, click the triangle icon next to the View Control and choose top, left, right, bottom, front or back from the menu.
2 Drag the end of the control handle to the point in you scene where you want the camera to aim.
As you drag, the end of the handle changes to a red dot so you can see the aiming point better.
Saving Camera Positions
You can save your favorite camera positions using the Memory dots. The dots let you store up to seven different views of your scene.
The uppermost dot, slightly separated from the rest, is a quick way to return to the default Bryce camera position. There is no way to clear this dot. It will always contain the default Camera settings.
Dot settings are saved with your scene file, so if you open a previously saved scene, your dot settings from the previous session remain in place.
When you click on a full dot to activate it, the saved position becomes the current Camera View. When you no longer need a saved camera position, you can delete it by clearing the dot it is saved to.
To save a camera position to a memory dot:
To return to the default camera position:
The view returns to the default, regardless of how many changes you've made.
To switch between saved positions:
Active dots appear blue with a white dot in the middle.
To clear a full dot:
 Corel Corporation http://www.corel.com Voice: (800) 772-6735 Fax: (716) 447-7366 www.corel.com/support |