Each ConceptDraw object is determined by dozens of parameters, such as numbers, text or
formulas.
All the parameters are brought together in the object parameter table
where you can modify any of them. The table thus gives you full control over the
appearance and behavior of the object.
Object Parameter Table
Table Sections
Functions
What Elements You Can Use
Input Field
Cells
Formulas
What Elements You Can Use
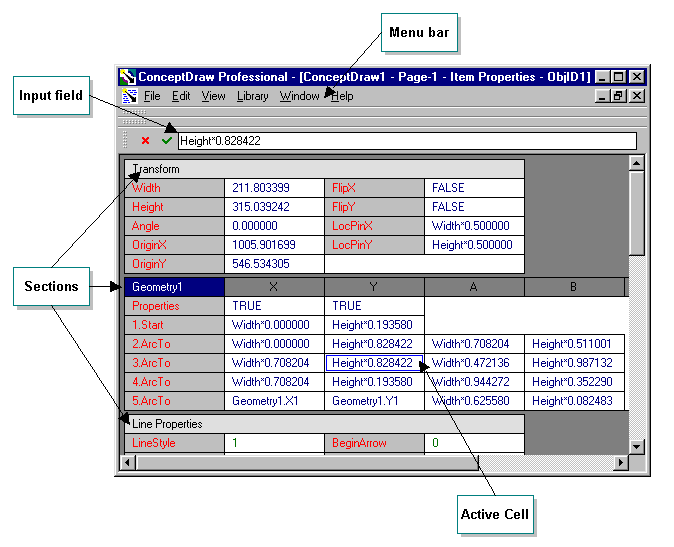
To call the Parameter Table of an object, select it and use the Show Table command from the Figure menu, or just press the F3 key. This will open the object's table in a new window.

You can use the following elements of the table:
- the input field lets you edit the content of the selected cell
(enter the value or formula);
- the sections present groups of parameters: transform characteristics,
geometries, line properties, fill format, text format, protection, etc.;
- the cells show the value or formula for each parameter of the object;
you can select a cell and modify its content in the input field;
- the menu bar holds the commands which you can apply to the table (save
the table, regulate the table view, manipulate sections, etc.).
Input Field
The input field is at the top of the window. When you select a cell in
the table, its content appears in the input field where it can be edited.
You can double-click a cell, and its content becomes selected and appears in the input
field. You can edit it as necessary.
To finish editing and save the changes, press the Enter key.
To return to the initial values, press the Esc key.
You can also use the corresponding icons to the left of the input field.
Cells
A cell is the place where the application stores a certain parameter
of the object.
To select (activate) a cell, just click it with the mouse. Once
the cell is active, you can edit its content in the input field at the
top of the table window. You can use the Arrow keys to activate another
cell.
To quickly start editing, double-click the needed cell, and its
content appears selected in the input field.
What you see in the cell depends on the viewing mode set for the table: Values
or Formulas.
When in the Values mode, all cells show the values in the current units
of measure set for the document.
When the Formulas mode is on, all cells that contain formulas display the
formulas instead of mere values. The cells which have no formulas, show the values in the tenths
of millimeter.
To switch to the needed view mode, just check the corresponding option in the View
menu.
Note that if a cell contains a formula, the input field will always show a formula
when you select the cell, regardless of the viewing mode.
Not every cell allows to input a formula in it. Some cells support only numeric values. The cells that allow using formulas display their contents in blue, the rest display the values in green.

You can input values in the units of measure other than default, e.g. 12 in, 3.5 ft, 0.66 m.
When editing the content of a cell, you can use the data stored in another cell, by clicking that cell with the mouse:
| Single click on another cell | Inserts the formula from the cell you clicked into the input field |
| Inserts the numeric value of the cell into the input field | |
| Alt + click on another cell | Inserts the cell title into the input field (to refer to it in formulas) |
Formulas
By using formulas, you can make one parameter of an object dependent upon other parameters, or upon the actions of the user. Here are some examples of formulas:
| Variables.X1+(Variables.X2-Variables.X1)*0.293 | |
| _min(0;Geometry1.X2-Variables.X2) | |
| =_IF(Variables.X1=1;_Setf("Variables.X1";0);_Setf("Variables.X1";1)) |
If you want to address the content of a cell in a formula, indicate the
| <cell name> |
(The name of the cell is placed to the left of the cell and displayed in red).
![]() For
example: Width, TextAngle, etc.
For
example: Width, TextAngle, etc.
The sections to which you can add cells (sections as Geometry, Controls, Connect, Variables, Font Format, Paragraph Format, Actions) are addressed in a different way:
| <section name>.<cell name> |
The cell name is composed of the column name and the
line number.
![]() For
example: "Controls.YDyn1"; "Variables.Y2";
"Connect.X1".
For
example: "Controls.YDyn1"; "Variables.Y2";
"Connect.X1".
For the Geometry section, the section name also
includes the section number - because a figure may have more than one geometry.
![]() For
example: "Geometry1.Y1", "Geometry2.C2".
For
example: "Geometry1.Y1", "Geometry2.C2".
So, for the first two cells the names look like this: "Geometry1.Visible" and
"Geometry1.Filled".
Formulas often include functions. The full list of functions and their specifics can be found in the "Functions" section.
Addressing Other Object's Parameters
You may need to address cells describing other objects.
Every object has its identification number: you can see it in the title bar
of the table window, or in the Information
dialog (ID section).
This ID is used when you address the parameters of the object:
| <object ID>.<section name>.<cell name> |
![]() For
example: "ObjID13.Geometry2.X1", "ObjID2.Width".
For
example: "ObjID13.Geometry2.X1", "ObjID2.Width".
If the object belongs to a group, you should use the Parent prefix to address the parameters of the group:
| Parent.<section name>.<cell name> |
![]() For
example: "Parent.Height".
For
example: "Parent.Height".
If you address objects within a group, it looks like this:
| Child<Number>.<section name>.<cell name> |
![]() For
example: "Child2.Angle".
For
example: "Child2.Angle".
The number after the name corresponds to the order of the object within the group. You can
see this number in the Information dialog (SubID
field).
Default Formulas
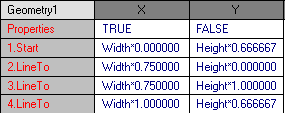
The application creates some formulas automatically. Such formulas are called default formulas. For instance, when you create a line, the program will describe one of its parts as follows:

Here, "Width*0.75000" and "Height*0.666667" are default
formulas.
Owing to the formulas, the vertices maintain their positions with respect to the alignment
box of the object when the object is resized. This formulas are changed automatically when
you reposition the object's vertices or the object itself.
If a formula has the "=" sign near it, it means that
the formula can not be changed in any way other than by editing its cell.
If the formula hasn't the "=" sign before it, it may be altered
automatically when you modify the object and apply actions which change this parameter.
See also:
Table Sections
Functions