
Working with handles.
Handles are small square or round controls, which appear when
you select an object. By dragging handles, you can alter some
properties of an object like its size, proportions and other.
There are a few handle types, which differ by their functionalities.
Resize handles.
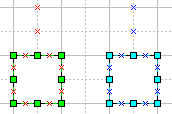
Resize handles look like small square boxes, usually green or blue. To resize an object saving its proportions, drag any of its four corner handles. To resize a side of the object, drag the appropriate side handle.
More information about resizing objects can be found in the Resizing Objects section.
Rotation handles.
Rotation handles look like round corner handles, usually green or blue. When you drag them, the object rotates around its rotation centre:
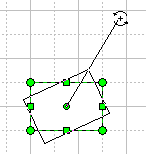
The rotation centre is also a handle, and can be repositioned
by dragging it and moving in whatever direction.
More information about resizing objects can be found in the Rotating objects section.
Endpoints.
All 1D objects have the begin point and the end point, called endpoints.

By dragging an endpoint, you resize and rotate the object at a time. Besides, endpoints have ability of the gluing to connection points of other objects, so all 1D objects can be regarded as connectors as well.
To learn more about connectors, see the Connectors section.
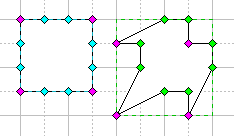
Vertices and adjustment handles.
A vertex is a small diamond-shaped handle, that appears in the point where two segments meet. By dragging a vertex, you change the form of the object.

Adjustment handles have a different effect, depending on the
type of segment on which they appear.
A linear segment can be transformed in a sector of a
circle by dragging its adjustment handles with the Sector ![]() or Arc
or Arc ![]() tool.
tool.
For a segment of a circle, the adjustment handles change
its curve.
For an elliptical arc segment, they adjust the angle and
the magnitude of arc's eccentricity.
For a spline segment, adjustment handles come associated
with vertices. By dragging these handles, you alter the curvature
of spline sections near the appropriate vertices.
For the first three segments, you can transform one into another by manipulating the handles, for instance, by dragging the adjustment handle of a line with the Sector or Arc tool, you change it into a sector of a circle, then resize it in an elliptical arc segment, and vice versa.
For more information about elementary segments, refer to the Creating Figures section.
Unlike other handles, vertices and adjustment handles allow some additional operations on them, besides simply moving. Both vertices and adjustment handles can be selected and deleted. You can also add new vertices.
To select/unselect a vertex or an adjustment handle, click on it. To select more than one , hold the Shift key down as you point and click on each additional handle. The selected handles turn magenta.
Now any operation on handles will affect all selected handles simultaneously.
To delete selected handles, use the Del key. Deleting a handle deletes the segment with which the handle is associated.
Adding a vertex can be regarded as adding a new
segment, or even a new geometry in some cases.
For more information refer to Inserting
vertices.
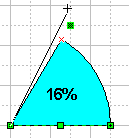
Control handles.
Control handles are property of library objects. You cannot create or delete them other than from the table. To move them, use the mouse exactly as you do with regular handles.
As a rule, each control handle is responsible for a certain characteristic of the object on which it appears. For example, on the picture below dragging the control point adjusts the size of the circle's sector:
Control handles can glue to other objects, the way the endpoints of connectors can:
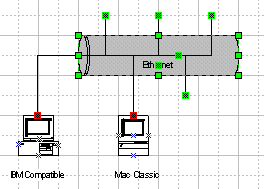
Connection points.
Connection points indicate locations on objects, where endpoints of connectors can be glued. They look like blue x signs that appear on an object, or near it.
Connection points can be created, moved and deleted with the Connection Point tool. For more information, see the Connection Points section.