|
|
|
|
Lighting Lab
Use the Lighting Lab to set the attributes of your light sources.
You can edit the attributes of a light using the Lighting Lab. For example, you can control the intensity and sharpness of a light source, and change its color and falloff pattern.
To access the Lighting Lab:
1 Select a light. The Object Controls appear next to the light's bounding box.
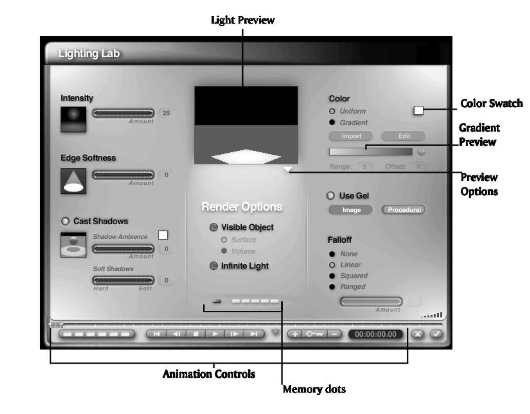
Light Preview
The Light Preview area displays the effects of any changes you make to the attributes of a light source.
This preview can display the light against a neutral background or show the light in the scene. You can also choose between a faster, low-quality preview, and a slower, high-quality preview.
To set the preview options:
- In the Lighting Lab, click the triangle icon at the bottom right corner of the preview area, and choose a preview option:
Render in Scene displays your scene in the Preview area. This lets you see how the changes you make to the selected light will impact your entire scene.
Render Against Neutral displays the light against a flat background. This lets you isolate the light so you can clearly see subtle changes.
Fast Preview lets you achieve faster updates.
Full Rendering displays a high-quality rendered scene or light.
Light Attributes
You can change the intensity of a light source, set its color, and adjust a light's edge softness. When your light source is a spotlight, you can also control the spread of the light.
To adjust light intensity:
Drag right to increase light intensity, and left to decrease intensity.
To set a light's color:
1 In the Lighting Lab, enable the Uniform option in the Color area.
2 Click the Color swatch, and choose a color from the color picker.
By applying a gradient, you can also make a light change color as it travels. Refer to "Gradient Lights" for more on gradients.
The Edge Softness attribute lets you set the sharpness/softness of the edges of the spot projected by a light.
To adjust a light's edge softness:
Drag left to sharpen the edges, and right to soften the edges.
The spread of the spotlight (also called the Half Angle) controls the size of the projected light cone. The size of the light's wireframe determines the spread of the light. The bigger the wireframe, the larger the spread.
To adjust the spread of a spotlight:
1 Select a spotlight in the Working window.
2 Drag one of its bounding box control points to set the wireframe's size.
Increase the size to increase the spread and decrease the size to decrease the spread.
Shadow Ambience and Softness
By default, any light source in Bryce causes objects in its way to cast shadows. You can control the ambience and softness of a shadow to produce realistic-looking shadows or surrealistic effects.
When you change a shadow's ambience, you add a color to the shadow and adjust the amount of the new color in the shadow. When you adjust the softness of a shadow, you blur or sharpen the shadow's edges. Soft shadows blend more smoothly with the background.
You can disable the shadow casting of a light source. This results in a light that illuminates surfaces but does not create shadows.
To change a shadow's ambience:
1 In the Lighting Lab, ensure the Cast Shadows option is enabled.
2 In the Shadow Ambience area, click the Shadow Color swatch, and choose a color from the color picker.
3 Drag the Amount control right to increase the amount of the new color, or left to decrease the amount.
To adjust the softness of a shadow
1 In the Lighting Lab, ensure the Cast Shadows option is enabled.
2 Drag the Soft Shadows control right to soften the shadow's edges, or left to sharpen them.
To disable shadow casting for a light source:
Light Falloff
Light falloff lets you control the relationship between the intensity of a light and the distance from the light. In the real world, the farther you are from a light source, the less influence it has on the illumination of your surroundings. In other words, the greater the distance, the weaker the light.
In Bryce there are four falloff types you can apply to a light:
- None (No Falloff) causes the intensity of the light to stay the same regardless of the distance.
- Linear Falloff causes the light's intensity to fall off at a constant rate. When you use this type of falloff, the light's range is rather large. This type of falloff is useful for creating outdoor lights like searchlights.
- Squared Falloff causes the light's intensity to fall off rapidly. When you use this type of falloff, the light's range is quite limited. This is useful for creating indoor lights, like lamps.
- Ranged Falloff causes the light to change abruptly from full intensity to zero (no illumination) after a distance range you define.
To set a light's falloff:
1 In the Lighting Lab, enable one of the following options: None, Linear, Squared, or Ranged.
To define the range of a light's ranged falloff:
1 In the Lighting Lab, enable the Ranged option in the Falloff area.
2 Drag the Amount control right to define a greater range, or left to define a smaller range.
Gradient Lights
Gradient lights change color as they get further away from the light source, thus coloring surfaces along the way differently. For example, when you apply a red-to-yellow gradient to a light, the resulting gradient light colors nearby surfaces red and distant surfaces yellow. The mid-range surfaces will reflect blends of red and yellow light. This feature is useful for creating custom light falloff patterns.
You can create a gradient in Bryce, or you can import a gradient created with another application. When you create or import a gradient, it is automatically applied to the active light.
To create a gradient:
To import a gradient:
1 In the Lighting Lab, enable the Gradient option in the Color area.
3 Locate the drive and folder where the gradient file is stored.
Editing Gradients
The Lighting Lab lets you control the range and offset of gradients. You can also change a gradient's colors and transparency.
Gradient Range and Offset
The range of a gradient is the distance in Bryce units that the gradient spans. When a gradient light is this distance from its source, the gradient's end color is applied to the light (provided you've accepted the default offset value of zero).
The offset of a gradient determines how the gradient colors will be applied to the light source. By default, the offset value is zero, which means that the light will start with the start colors of the gradient. When you increase the offset, intermediary gradient colors will be applied to the light at its source. The maximum offset value of 100 results in a light source which begins with the end color of the gradient.
To change a gradient's range:
To change a gradient's offset:
- In the Lighting Lab, click the Offset control in the Color area, and type a value in the field.
You can also change a gradient's offset by dragging the Offset button next to the Gradient preview.
Using the Edit Gradient Dialog
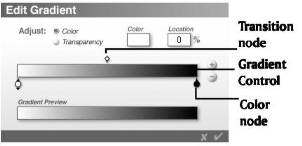
The Edit Gradient dialog lets you edit gradients added to lights. You can change a gradient's colors and transition points, add colors to a gradient, or remove unwanted colors. You can also change the transparency of a gradient to create various light patterns.
The Gradient Preview is automatically updated as you edit a gradient.
You can modify a gradient light using the controls in the Edit Gradient dialog.
To modify a gradient's colors:
1 In the Lighting Lab, click the Edit button. The Edit Gradient dialog appears.
2 In the Adjust area, enable the Color option.
3 Click a color node below the Gradient Control. A black arrow displays below the node indicating that the color node is selected.
4 Click the Color swatch, and choose a color from the color picker.
5 Repeat steps 3 and 4 to modify other colors in the gradient.
A transition point is an imaginary line between two colors in a gradient. Changing the transition point lets you change the ratio between the two colors and produce color blends dominated by one of the two colors.
To change a transition point in a gradient:
1 In the Lighting Lab, click the Edit button.
2 In the Adjust area, enable the Color option.
3 Drag a transition node left to make the end color dominant, or right to make the start color dominant.
You can also change the transition point by typing values in the Location field.
To add colors to a gradient:
1 Click the Add (+) button next to the Gradient control. A new color node appears below the center of the Gradient control.
2 Click the Color swatch, and choose a color from the color picker.
When you no longer need a color, you can remove it by selecting the corresponding color node below the Gradient box and clicking the Delete (-) button.
By default, all gradients created in Bryce are fully opaque. You can change the transparency of a gradient to create light sources that fade in or out. You can also create complex transparency patterns by adding transparency nodes with various opacity values.
To change the transparency of a gradient:
1 In the Lighting Lab, click the Edit button.
2 In the Adjust area, enable the Transparency option.
3 Click a transparency node below the Transparency control. A triangle appears below the transparency mode indicating that the mode is selected.
4 Type a value in the Opacity field.
If you want to adjust the transparency between two transparency nodes in a gradient, drag the transition node above the Transparency control to the left or right.
You can also use the above procedure to change the transparency of imported gradients.
To add transparency nodes:
1 In the Lighting Lab, click the Edit button.
2 In the Adjust area, enable the Transparency option.
3 Click the Add (+) button next to the Transparency box. A new transparency node appears below the center of the Transparency control.
4 Type a value in the Opacity field.
5 Drag the new transparency node to where you want to change the transparency.
To remove an unwanted transparency change, select the corresponding transparency node and click the Delete (-) button.
Creating Visible Lights
Visible lights make your light source visible in the scene, like the ball of light that appears around a lamppost on a foggy night.
There are two types of visible lights:
When you create a surface visible light, the light from the object appears as a semitransparent shape extending from the light source.
Surface Visible lights have the same attributes as non-visible lights, so you can use the Edge Softness control to make the shape that extends from the light fuzzier at the edges, to give it a more realistic feel, or the Falloff options to adjust the range of the light.
The properties within the light are controlled by the default Surface Material applied to the light object. The material can be edited in the Materials Lab. By changing the material, you can change the color of the light, the intensity of the light's color, and many other properties.
When you create a Volume Visible light source, a preset Light-sensitive Volume Material is applied to the light source. This makes the light coming from the light source appear visible in the scene, so in the case of a spotlight, the light would appear as a cone. The light also becomes volumetric and reacts to other lights around it. Objects within the cone interact with the light. They can block it, reflect it, etc. Any textures applied to the light also have volume.
The material applied to the object is pre-defined for you, but you can edit its properties in the Materials Lab. By editing the material you can change the light's intensity, color and transparency.
The real difference between the two types of lights becomes apparent when you apply a gel to the light. In Surface Visible lights, the gel texture is wrapped around the light cone like a skin. Making it semitransparent makes it look more real, but it doesn't make it interact fully with objects inside the cone.
On the other hand, volume visible lights create a real illuminated volume. The texture gel exists everywhere inside the cone, and the objects within the cone are directly affected by the texture. The light also interacts with the surrounding light sources.
It's a good idea to choose to apply the Infinite Light option to both types of visible lights, as this option extends the light's range. This gives the light a more realistic look.
To create a surface visible light:
2 Select the light in the Working window.
3 Click the E button that appears next to the light's bounding box. The Lighting Lab appears.
4 In the Render options area, enable the Visible object and Surface options. A number of preset Surface material properties are applied to the light, creating a visible cone of light.
If you want to extend the light's range, enable the Infinite option.
To create a volume visible light:
2 Select the light in the Working window.
3 Click the E button that appears next to the light's bounding box. The Lighting Lab appears.
4 In the Render options area, enable the Visible object and Volume options. A number of default Volume material settings are applied to the light source, creating a softer visible cone of light.
If you want to extend the light's range, enable the Infinite option.
Editing Visible Light Materials
The materials applied to a visible light control many of its properties. Although these materials can be edited, just like any other object's material, you should keep in mind that when you're editing a light's material in the Materials Lab, you're changing how the light source will appear in the scene.
Any texture components you apply to the light's material will appear as gels.
For Surface Visible lights, the light's material is a Surface material. For a Volume Visible light the material is a Volume Material.
Refer to "Surface Material Channels" for more on editing Surface materials, and "Volume Material Channels" for more on editing Volume materials.
Applying Gels
Gels are filters placed directly in front of lights to change the colors cast by the light, or to cast specific kinds of shadows.
In Bryce, you can use any image or procedural texture as a gel. Once you've assigned a gel to a light source, you'll be able to see the pattern of the gel on any object it shines on. For example, if you apply an image to a Square Spotlight, you can create a slide projector. You can apply an unusual texture across your entire scene by assigning a Texture gel to a Radial Light.
When you apply a gel to a visible light, the texture's pattern is visible throughout the visible light.
To use an image as a gel:
1 In the Lighting Lab, enable the Use Gel option.
2 Click the Image button. The Picture dialog appears.
3 Choose an image from the preset library, or click the Load button and load an image.
Refer to "Working with Pictures" for more on the Picture dialog.
4 Click the check mark. The picture is applied as a gel.
To use a texture as a gel:
1 In the Lighting Lab, enable the Use Gel option.
2 Click the Procedural button.
3 The Preset Materials Library appears.
4 Select a material from one of the categories available.
Refer to "Using the Materials Presets Library" for more on the Preset Materials Library.
5 Click the check mark. The texture in the material is applied as a gel.
To use a texture as a Gel, you must select a preset that contains a texture. Preset materials that contain only color or optic information (such as many found in the Simple & Fast category) will have no effect.
If you selected a color other than white in the Lighting Lab, that color overrides colors from Texture gels. However, the luminance patterns are still used.
Saving Light Settings
You can save up to five light settings using Memory dots. This feature lets you experiment safely with various light attributes without losing your favorite light effects.
You can switch between different saved light settings to compare them. Also, you can reset the light settings to default at any time. When you no longer need a configuration of light settings, you can delete it.
To save light settings to a memory dot:
To switch between saved light settings:
To reset light settings to default:
To delete saved light settings:
Positioning Lights
Light wireframes can be edited exactly like any other object, either directly in the scene using its bounding box, or indirectly using the tools in the Edit palette.
Refer to "Positioning Objects" for more on positioning objects.
Linking and Tracking with Lights
Since lights act just like other objects, you can link them to other objects, or have them track other objects in the scene.
In an animation, lights that track an object can create some very complex lighting effects.
Refer to "Linking Objects" for more on linking, and "Tracking Objects" for more on tracking.
Animating Lights
You can animate lights by using the animation controls in the Lighting Lab. For example, you can animate a light's edge softness and intensity.
Refer to "Animating" for more on animation controls.
 Corel Corporation http://www.corel.com Voice: (800) 772-6735 Fax: (716) 447-7366 www.corel.com/support |