|
|
|
|
Surface Material Channels
This section provides details on each of the surface material channels.
Diffusion
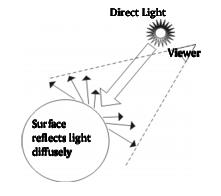
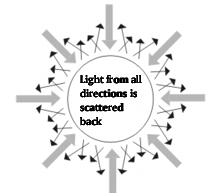
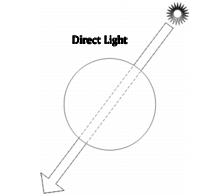
Diffusion determines how much direct light is reflected diffusely, or scattered, in all directions.
The small arrows projecting off the surface of the object illustrate how diffusion works.
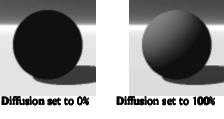
When light hits an object with diffusion set to 100%, all the light that hits it is reflected back scattered in all directions. This gives the object a flatly lit appearance. If the object's diffusion is set to 0%, no light is reflected off its surface, so the object appears black.
Diffusion controls how much light is diffusely reflected off the object's surface.
Setting Diffusion Using a Texture
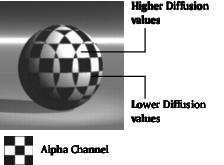
When you assign a texture to the Diffusion channel, the texture's alpha channel determines which areas of the surface have high diffusion and which have low diffusion. Bright areas in the alpha channel have a high diffusion value, and darker areas have low diffusion values.
When you use a texture to set the Diffusion channel, the grayscale values in the texture's alpha channel determine the diffusion of the objects.
Diffuse Color
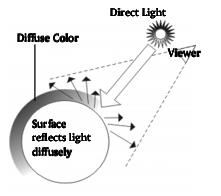
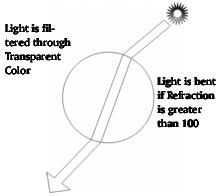
Diffuse Color acts like a filter through which all diffuse light passes. When light hits the object, the amount of light that's reflected diffusely is determined by the Diffusion channel setting, and the color of that light is set by the Diffuse Color channel.
This graphic shows how diffuse light passes through the Diffuse Color.
When Diffusion is set to a value greater than zero, the Diffuse Color appears wherever the object is hit by direct light.
Be careful when using pure constant colors as the Diffuse Color because you may not get the results you're expecting. If you use a pure color, only that color is reflected off the object. So if you're using 100% green, only green light is reflected off the surface. This doesn't cause a problem when the object is hit by white light because there is green in white. However, if you use 100% red light on the object, it will appear black, since there is no green in 100% red, so no light is reflected off the object.
Ambience
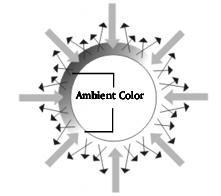
Ambience simulates the effects of light hitting the object from all directions. The Ambience value controls the amount of light that is reflected off the surface uniformly.
The large arrows represent ambient light hitting the object's surface. The smaller arrows represent the light reflected off the object's surface.
When Ambience is set to a value higher than zero, the object will reflect light from all over its surface, not only from the area hit by light. This makes the object look brighter.
The higher the Ambience value, the brighter an object appears. At 100%, the object appears unnaturally bright, regardless of the light source. If you want to create a realistic effect, the sum of the Ambience and Diffusion values should add up to 100.
Ambience controls the general brightness of an object.
An object's ambience is directly related to the general ambience of the environment. So, the ambient value you set for the object is directly affected by the Ambient Color you set in the Sky & Fog palette.
The Ambient Color in the Sky & Fog palette controls how much ambient light is available in the environment. The Ambience channel controls how much of the available ambient light is reflected off the object's surface.
So, if you set the Ambient Color in the Sky & Fog palette to black, or 0% ambience, then the Ambience channel value has no effect. If you set the Ambient Color to white, or 100% ambience, the Ambience channel value will control how much of the available light is reflected off the object's surface.
Setting Ambience Using a Texture
When you assign a texture to the Ambience channel, the grayscale values from the texture's alpha channel determine which areas of the surface have high ambience and which have low ambience. Bright areas in the alpha channel have high ambience values, and darker areas have low ambience values.
Generally, it's best to set Ambience using a value. However, you can get some interesting effects using textures instead. For example, if you use a splotchy texture, you'll get, mixed in with normal surface areas, areas that appear to glow regardless of external light.
Ambient Color
Ambient Color is the color that is reflected off the surface of an object regardless of where the light source hits the object. The Ambient Color is directly linked to the Ambience channel setting. If the Ambience is set to zero, the Ambient Color is invisible.
Ambient Color is the color that reflects off the entire surface of the object and is directly related to Ambience.
The Ambient Color tints the entire surface of the image.
The Ambient Color channel is also related to the ambient color you set in the Sky & Fog palette. The ambient color of the environment is added to the ambient color of the object, so if your environment is blue and your object's ambient color is yellow, your object appears green.
Setting Ambient Color Using a Texture
When you assign a texture to the Ambient Color channel, the color channel in the texture is used as the Ambient Color. In other words, the texture's color is applied to any area of the object that's in shadow.
Specularity
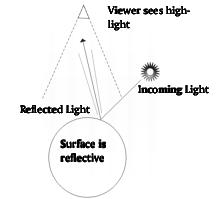
Specularity controls how much light is reflected back from the surface of the object directly at the viewer.
Specularity is the highlight reflected directly back at the viewer.
Since the direct reflection creates a highlight on the object, you can think of Specularity as the channel that determines the intensity of the highlight that appears on the object, or the "shininess" of the object.
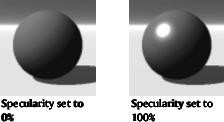
The higher you set the Specularity, the shinier the object appears. When the Specularity is set to zero, the object appears dull.
Specularity controls the intensity of the highlight of an object.
Setting Specularity Using a Texture
When you assign a texture to the Specularity channel, the grayscale values in a texture's alpha channel are applied to the object's highlight. Bright areas of the alpha channel increase the intensity of the highlight, and darker areas decrease the intensity. The alpha channel may also create patterns in the highlight.
Specular Color
Normally, the color of an object's highlight would reflect the color of the light source. However, using Specular Color you can set a specific color for your highlight.
Specular Color is directly linked to the Specularity channel. If the Specularity is set to zero, the Specular Color is invisible.
By adding Specular Color, you can make it appear as though a colored light is shining on the object.
Setting Specular Color Using a Texture
When you assign a texture to the Specular Color channel, the texture's color channel is used as the Specular Color. In other words, the texture's color is applied to the object's highlight.
Specular Halo
The Specular Halo channel lets you control the size of the Specular highlight.
The size is controlled by the luminance value of the component you select. Brighter colors create larger highlights and darker colors create smaller highlights.
Colors are expressed as RGB (Red, Green, and Blue) values. Specular Halo channels use the values from each of these channels to set the size of the highlight. If the values are all in balance (that is, all the same), the highlight appears uniform. However, if one value is higher that the rest (for example, R=200, G=100, B=100), you'll get a highlight with a slightly colored ring (for example, a red ring).
Depending on the component you use in this channel, you may be able to set each color value differently to create different highlight effects. The easiest way to use this channel is with a color.
When using a color, try picking more desaturated colors. These colors produce more predictable results because the difference between RGB values is less.
Check out the Specularity Lesson series in the Fast & Simple category in the Preset Materials Library to see Specular Halo in action.
Setting Specular Halo Using a Texture
When you assign a texture to the Specular Halo channel, the RGB value of the texture's color channel is used for the Specular Halo.
Metallicity
The Metallicity channel value acts as a filter for reflected light. This value controls how much of the reflected light is filtered through the Diffuse Color.
At 50%, half the reflected light is tinted with the Diffuse Color; at 100%, all the light that's reflected is tinted.
Metallicity is linked to Reflection. If Reflection is set to zero, the Metallicity channel has no effect.
Metallicity makes objects look metallic because it tints the color of reflections. If you want to create specific types of metals, you need to adjust the Diffuse Color. For example, to create gold use a yellow Diffuse color.
Setting Metallicity Using a Texture
When you apply a texture to the Metallicity channel, the texture's alpha channel is used to determine the intensity of the Diffuse Color. Lighter areas of the alpha channel increase the intensity of the color, and darker areas decrease the intensity.
Bump Height
The Bump Height controls the height of bumps in an object's surface. The bumps on an object's surface are determined by the texture's Bump channel. The Bump Height channel is linked to the Bump channel in the texture. If you use a texture without a Bump channel, the Bump Height channel has no effect. You can enter negative values in this channel, which turns bumps into dents.
Transparency
The Transparency channel controls how much light can pass through the object's surface.
The amount of light that can pass through an object's surface is set with the Transparency channel.
The higher the Transparency value, the more of the surrounding environment is visible through the object's surface. If there is no other light being reflected, an object set at 100% Transparency appears invisible.
To create a realistic transparent object, you need to pay attention to details. You'll need to combine the effects of the other channels to simulate a realistic object. For example, transparent bubbles all have highlights, so you'll need to add Specularity. Balloons have a flatter surface so you'll need to add more Diffusion to the surface. Glass has a refraction effect associated to it, so you'll need to add Refraction to the surface.
Setting Transparency Using a Texture
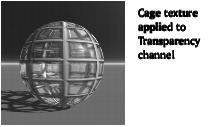
When you apply a texture to the Transparency channel, the texture's alpha channel is used to determine which areas of the object are transparent. Lighter areas of the alpha channel are not transparent while darker areas are.
You can create some interesting effects using textures. For instance, a checkerboard texture will result in an object that's alternately transparent and solid.
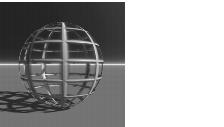
The final look of the Transparency channel is determined by the Shading mode. When the material is applied using normal shading, Transparency creates an optical effect.
When the material is applied using Blend Transparency mode, Transparency creates a punch-out effect. The areas of the surface that are 100% transparent are completely ignored during shading so that they appear as gaps or holes it the surface. Any areas that are less than a 100% result in a normal transparency effect.
Refer to "Shading Modes" for more on Shading modes.
You can create some interesting effects using textures in the Transparency channel, like this checkerboard object. This example was created using regular shading.
This is what the same material looks like when you use Blend Transparency.
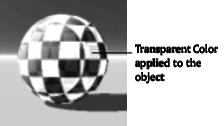
Transparent Color
The Transparent Color channel determines the color of the transparent areas of your object. Light is filtered through this color as it passes through the object's surface. As a result, anything you can see through your object is tinted with the Transparent Color you select.
Keep in mind that the Transparent Color interacts with the other colors in the material. If the Diffuse Color is white, then the Transparent Color takes precedence. If the Diffuse color is yellow, and the Transparent color is red, the object appears orange. However, when you're using Refraction, the Transparent Color blends with the Diffuse Color.
The Transparent color tints everything you see through the surface of your object.
Transparent Color is linked to the Transparency channel. If the Transparency is set to zero, the Transparent Color is invisible.
Setting Transparent Color Using a Texture
When you assign a texture to the Transparent Color channel, the texture's color channel is applied to the transparent areas of your object.
Refraction
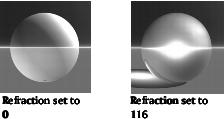
The Refraction channel determines whether light bends when it passes through the surface of an object.
Light may bend as it passes through an object, depending on the Refraction value.
Higher Refraction settings produce slight reflections as some of the light is bent directly back at its source. Higher Refraction settings also change the color of the object's surface as the colors reflected from the environment affect the object's color.
Refraction controls how much light bends as it passes through a transparent surface.
The Refraction value is what makes transparent surfaces look like glass.
As you increase the Refraction value, the edges of the object will become reflective. This simulates the effect of light being refracted so sharply that it does not penetrate the object's surface.
The higher you increase the Refraction value, the more the Diffuse Color is blended with the Transparent Color. The higher the value, the more Diffuse Color is visible in the object's surface. Any light that's visible through the surface of the object is then tinted through both the Diffuse Color and the Transparent Color.
Refraction values are expressed as 100 x Refraction Index value. The Refraction Index contains refraction values for specific types of surfaces. For example, the Refraction Index of water is 1.3; this value is expressed as 130 in the Materials Lab.
Refraction is linked to Transparency. If Transparency is set to zero, this channel has no effect.
Reflection
The Reflection channel controls how much light, direct or indirect, is reflected off the object's surface. Unlike diffusion, which scatters light, reflection directs light back at its source, giving the object a mirrorlike appearance.
Reflection determines how much light is reflected off the surface of the object.
The higher the Reflection setting, the more reflective the surface. At 50%, half the light that hits the object's surface is reflected; at 100% all light is reflected.
As you increase the Reflection value, the color of the object changes, since you can see more of the environment in the object's surface.
Setting Reflection Using a Texture
When you apply a texture to the Reflection channel, the texture's alpha channel is used to determine which areas of the object are reflective. Lighter areas of the alpha channel are reflective, while darker areas are not.
 Corel Corporation http://www.corel.com Voice: (800) 772-6735 Fax: (716) 447-7366 www.corel.com/support |