|
|
|
|
Animation Tools
Bryce 3D's animation tools are designed to help you animate the properties of your scene.
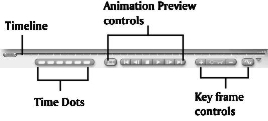
Animation Controls
The animation controls let you record an animation and preview it in the Working window. You can also use the controls to change the current time or move to different points in time.
Use the animation controls to record and preview your animation.
The Timeline appears in four places in Bryce: the Working window, the Terrain Editor, the Sky Lab, and the Materials Lab.
All four timelines represent the same time. The only difference is that when you're in an editor, you can only add frames for properties associated with the editor. For example, in the Terrain Editor you can only add key frames associated with terrain properties.
When you preview a timeline in the Working window, you'll be able to see all the changes in your scene, including any changes you may have made in other editors or in the Advanced Motion Lab.
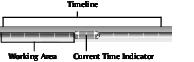
The Timeline
The Timeline is a graphical representation of time. The darker gray area within the Timeline represents the current length of your animation.
The Timeline indicates the length of your animation and the current time.
The blue colored section of the timeline represents the length of the Working Area. The Working Area can be used as a visual guide to help you isolate portions of your timeline. When you render the animation you can choose to render the entire timeline or just the Working Area. When you use the animation preview controls, only the Working Area is previewed. Refer to "Setting Up the Working Area" for more on the Working Area.
The Current Time indicator lets you move to different points in time. This is the main tool you'll use to create animations. Every time you want to add a key event, you move the Current Time indicator to a different point on the timeline.
Working with Time
The light gray area in the Timeline is called the Available Time Area and it represents all time. This area is unlimited; you can scroll the time area infinitely.
The white tick marks within the Timeline are visual cues that let you know when the time area is moving. If you move the Current Time Indicator off the screen, you'll see these white ticks move along the time area.
To scroll the time area:
You'll see the white tick marks move along the time area to the left.
Setting the Animation Range in the Timeline
The dark gray within the light gray area of the Timeline represents the total length of your animation. This area is usually hidden by the Working Area, so you may need to shorten the Working Area to adjust the Animation Range.
This area is automatically generated as you set up key events. The time of the final key event automatically creates the limit of the animation range. However, you can manually extend or shorten the area to set the range of your animation.
You cannot shorten the Animation Range below the last frame in the scene since you can't have frames outside the animation range.
To manually set the Animation Range:
- In the timeline, drag the handle that appears at the end of the Animation range to the point where you want the animation to end.
The handle may be obscured by the Current Time Indicator, so you might have to move the indicator to a different position.
Setting the Current Time for an Animation
The large green handle in the Timeline is called the Current Time Indicator (commonly called a scrubber). It sets the current time of the animation.
The Current Time Indicator is the most important tool of the Animation controls. When you're creating key events, the Current Time Indicator controls when the key event occurs in the animation.
Refer to "Recording Key Events" for complete instruction on creating key events.
As you move the Current Time Indicator the Text Display Area shows you the current time.
The Frame # changes as you change the frame rate for the animation. For example, at 15 fps Bryce will insert 15 frames within each second.
If you're using Frame number, the number of the current frame is displayed.
You can also move to a specific point in time using the Animation Setup dialog. In this dialog, you can move to either a specific time or frame.
To move to a specific frame manually:
As you drag, watch the Text Display Area. You'll notice that the final number cycles through each frame in the second of animation time. So at 15 fps the final number will cycle through frame 0-14 between seconds.
Release the mouse button when the Frame # reaches the desired frame.
The Current Time Indicator also controls which portion of your animation is being displayed in the Working window.
When the indicator is at the beginning of the animation, you're seeing the first frame of the animation in the Working window. When you move the indicator, the Working window displays a different portion of the animation. So, when you move the indicator to the center of your animation range, you're seeing what the animation looks like at the middle of the movie.
To move the current time manually:
- Drag the Current Time Indicator along the Timeline. Release the mouse button when the Text Display Area shows the desired time.
To move the current time numerically:
1 Choose File menu> Animation Setup. The Animation Setup dialog appears.
2 In the Current fields, enter the hour, minutes, seconds and frame you want to move to.
The Frame # field displays the number of the frame located at the specified time.
Time Dots
The Time Dots let you save positions on the timeline. You can use the dots to quickly jump between areas of the timeline you're working on.
To save the position of the Current Time Indicator:
1 Move the Current Time Indicator to the position you want to save.
2 Click on an empty Time Dot at the bottom of the Animation controls.
A dot is empty when it appears white.To move the Current Time Indicator to a saved position:
To delete a saved position:
Setting Up the Working Area
The blue portion of the Timeline represents the Working Area. This area highlights the portion of the timeline you're currently working on.
When you're previewing your animation, only the portion of the timeline within the Working Area is previewed.
The Working Area is most useful when you're working on a long animations as it saves on preview time, or when you're refining a specific portion of your animation.
When you're rendering the animation, you can choose to render the entire animation, or just the Working Area portion.
You can also use the Working Area to render out sections of the timeline while you're setting up the animation, and then render the entire Animation Range when you're creating the final animation.
To set the range of the Working Area manually:
- Drag either end of the existing Working Area. Release the mouse button when the Working Area is the desired length.
The Working Area cannot be extended past the end of the Animation Range.
To set the range of the Working Area numerically:
1 Choose File menu> Animation Setup or double-click the Current Time Indicator. The Animation Setup dialog appears.
2 Click the triangle icon at the top-left of the dialog and choose Working Range Low from the menu.
3 Enter the starting time for the Working Range.
4 Click the triangle icon again and choose Working Range High.
5 Enter the ending time for the Working Range.
Setting Timeline Scale
The scale indicator at the right edge of the timeline let you adjust the scale the timeline.
If you have a very long timeline, you can use this control to scale it down so you can see the whole timeline at once. If you have a very short timeline, you can use the control to scale it up so it extends across the length of the palette.
To set the scale of the timeline:
Drag right to increase the scale and left to decrease it.
The scale of the timeline does not affect its length, only how it's displayed in the Animation controls.
Scaling Animation Duration
You can adjust the length of your animation, by scaling its duration to fit within a certain amount of time. For example, you created an animation that's five seconds long, but only want it to take up three seconds, you can scale the entire animation to last only three seconds.
When you scale the animation, all the events in the animation are compressed or stretched to fit within the desired amount of time. If you increase the scale, the events are stretched out, so they take longer to complete. If you decrease the scale, the events are compressed so the action speeds up.
To set the scale of the entire animation manually:
- Hold down Option/Alt and drag the animation range handle. Release the mouse button when the duration of the animation is the desired length.
To scale the animation numerically:
1 Choose File menu> Animation Setup or double-click the Current Time Indicator. The Animation Setup dialog appears.
2 Click the Scale Animation button.
3 Enter the desired animation duration in the Duration fields.
Recording Key Events
You can record key events by enabling Auto-Record mode. The Timeline options menu, located at the right edge of the controls, lets you enable or disable Bryce's automatic animation system.
When you enable Auto-Record mode, every object transformation or change of property you perform is recorded as a key event.
A key event can store any change in size, position, orientation, material property, sky property, light property or geometry.
However, a key event can only store one change per property at a specific point in time for each object in the scene. This means that at a single point in time, you can only have one change in position, size, material, or geometry per object recorded as a key event.
If you keep changing the same properties at the same point in time, the new changes replace existing changes. Only the last change you perform is recorded as the key event.
To record more than one change in the same object's property you have to move to a different point in time. Then each change can be recorded as a separate key event and applied to the animation.
When Auto-Record mode is disabled, the animation system is off. This means that your changes are not recorded as key events, and changes in the Timeline do not effect your view in the Working window.
You can continue changing object and scene properties, but they won't be recorded as key events. If you want to record a setting or transformation you'll have to manually add a key frame using the Add Frame button. Refer to "Adding and Deleting Key Frames" for more on adding frames.
To enable or disable Auto-Record mode:
- Click the triangle icon to the right of the controls and choose Auto-Key. The animation system is on when the option has a checkmark next to it.
Choose Auto-Key again to turn off the animation system.
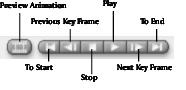
Animation Preview Controls
The Animation Preview controls let you move between the key frames in your animation.
Use the Animation Preview Controls to move between key frames in your animation and start the movie preview.
The outermost buttons move to the beginning and the end of the animation. The inner buttons move to the next and previous key frames, and start or stop the preview.
Previewing Animations
You can preview your animations using either the mini-preview in the nano-preview or by using the Animation Preview controls. Both of these methods allow you to see either a rendered preview or a storyboard.
Using the Movie Preview Window
Using the movie preview window, you can see a rendered version of your animation quickly.
To preview your animation:
2 Click the Preview Animation button.
Using the Storyboard Preview
Using the storyboard preview feature, you can review or navigate your animation, frame-by-frame.
To view your storyboard:
2 Click and hold down on the Preview Animation button.
4 Click on the Preview Animation button.
All of the frames appear in a grid pattern as they are rendered. When the rendering is finished, the movie plays in the nano-preview.
To stop the movie preview:
To exit movie preview mode:
Additional Features of the Storyboard
If you pause in the storyboard portion of the animation preview, you can perform various manipulations on your animation. You can:
- Click on a frame to select it.
- Set the current time to that frame.
- Drag the scrubber and move forward or backwards through the animation.
- Double-click the corresponding storyboard image to render any of the frames.
As you perform these manipulations, the animation updates in real-time in the movie preview window.
Using the Animation Controls
When you play an animation, all the frames in the animation within the Working Area are displayed. The preview is shown in Wireframe display mode.
Plays the animation. Click during play to pause the animation.
Setting Previewing Options
There are three options you can use to alter the preview of your animation. You can preview the animation only once. You can play the animation continuously, or you cycle forward through the animation, and then back.
To set a preview option:
1 Choose File menu> Animation Setup. The Animation Setup dialog appears.
Key Frame Controls
The Key Frame controls let you add and delete key frames in your animation.
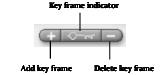
Use the Key Frame controls to add and delete key frames from the timeline.
The Key frame indicator is only active when the current time is at a key frame.
Adding and Deleting Key Frames
Usually you use the Auto-Record mode to add key frames to your animation, but there are some cases when you would need to force the system to create a key frame. For instance, if you accidentally make a number of changes while Auto-Record mode is disabled, you'll have to create a key frame to store your changes, or they'll be discarded when you move to a different point in time.
Adding Key Frames
The Add key frame (plus) button lets you add a key frame. When you are in Camera View, with nothing selected, Add key frame automatically key frames the camera. In Director's view, it does not. It also keys the sky.
In Auto-Key mode, Bryce automatically adds key frames for you, but when you disable the mode, you'll have to use Add Key frame to add key frames at points in the timeline.
If you have an object selected, Bryce only records the changes in property for the selected object. If you have nothing selected, Bryce only records the changes in the sky (i.e. changes you make in the Sky & Fog palette).
You can also modify the add key frame operation so that, for a selected object, only a specific property is recorded as a key event.
To add a key frame:
1 Move the Current Time Indicator to the point where you want to add a key frame
If you need to force Bryce to overwrite an existing key frame, leave the Current Time Indicator where it is.
2 Click the Add Key Frame button.
Any changes you made at this point are recorded in the key frame.
To add a frame for a certain property:
2 Hold down the mouse button over the Add Key frame button and choose an object property from the menu that appears.
To add a key frame for sky properties:
Deleting Key Frames
The Delete Key frame button deletes the current key frame event or a specific type of key event. In the Working window, deleting a key event deletes all the frames at the current time. In the editors the Delete Key frame button only deletes key events for the properties associated with the editor.
As with adding frames, Bryce deletes frames differently based on your current selection.
If you have an object selected, Bryce only deletes the changes in property for the selected object. If you have nothing selected, Bryce deletes the changes recorded for your scene's sky.
You can modify the Delete Key Frame button's function so that only a certain type of object property is deleted.
Adding or deleting frames will effect the shape of an object's motion path.
To delete a key frame:
1 Use the Animation Preview controls to move through the key frames until you find the frame you want to delete.
2 Click the Delete Key Frame button.
All the properties recorded at that point in time are deleted.
To delete a frame for a specific object property:
2 Hold down the mouse button over the Delete Key Frame button and choose the object property from the menu that appears.
Adding and Deleting Frames in the Editors
When you add a frame in the editors, only the properties associated with the editor are recorded as a key frame.
When you delete a frame in the editors only the properties associated with the editor are deleted. For example, it you delete a frame that contains position, material and scale data in the Materials Lab, only the material data is removed from the key frame.
Animation Options
The triangle icon to the right of the animation controls displays the Auto-Key Framing option menu. This menu lets you turn the animation system on or off.
When the animation system is enabled, every change you make to the scene is recorded as a key event. Changes can include things like moving an object, changing a material, or changing the shape of a terrain.
When the animation system is disabled, your changes are not recorded. To record a key event you have to use the Add Key Frame button. The animation system is enabled by default.
 Corel Corporation http://www.corel.com Voice: (800) 772-6735 Fax: (716) 447-7366 www.corel.com/support |