
|
| Previous Top Next |
|
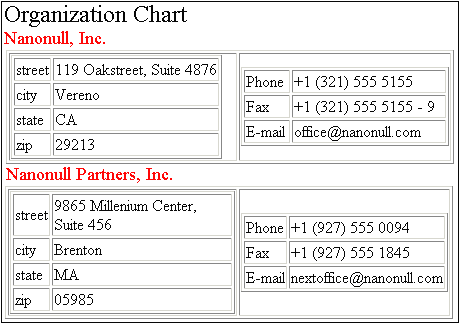
Inserting tables and applying HTML attributes
|
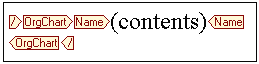
| 1. | Click the (Contents) placeholder to mark it.
|
| The lower left pane (HTML attributes window) now shows the name of the element/attribute and displays all the HTML attributes available that can be assigned to the element. You might have to drag up the window divider to see more of the attributes.
|
| 2. | Click the Text tab, then the font-size combo box and select "large".
|
| The (contents) placeholder is updated immediately, and displays the HTML attributes you select.
|
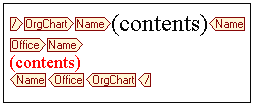
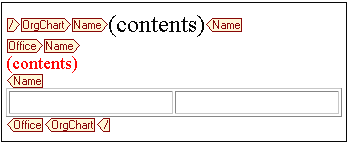
| 3. | Click to set the text cursor after the Name end tag, and hit the Enter key.
|
| This moves the OrgChart end tag, to the next line.
|
|
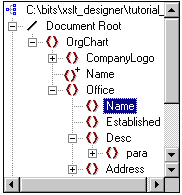
| 4. | Click the plus icon next to the Office element (in the tree view) to expand the sub-elements.
|
|
| 5. | Click the Name element (under the Office element) drag it into the Design view, and drop it in front of the OrgChart end tag.
|
| 6. | Select the Create Paragraph item from the popup menu.
|
| The start and end tags are now displayed over three lines. This is the visual indication that a paragraph is to follow each of the XML data instances in the IE Preview.
|

|
| 7. | Click the (contents) placeholder and select "medium" from the font-size combo box in the HTML attributes window.
|
| 8. | Click the Color tab in the HTML attributes window and select "red" from the color combo box. (Click somewhere else in the Design window to deselect the contents placeholder).
|
|
| 9. | Click the IE Preview tab to see the changes made to the stylesheet.
|
|
| 10. | Click the Design [Document] tab to return to the Design view.
|
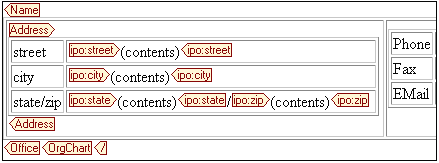
| 1. | Set the text cursor between the Name and Office end tags.
|
| 2. | Select the menu option Insert | Insert Table.
|
| 3. | Define a table of 1 row by 2 columns in the Insert Table dialog box, click OK to confirm the selections.
|
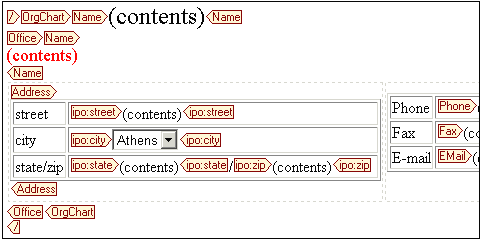
| A standard HTML table is inserted between the two tags.This is a fixed table and does not change with the underlying XML data.
|
|
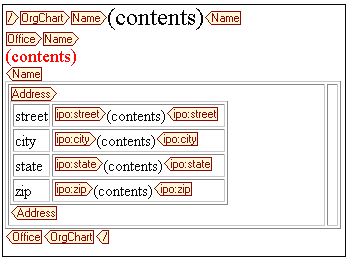
| 4. | Place the text cursor on the Address tag in the tree view, and drag the Address element into the first cell of the table.
|
| 5. | Select Create Table from the popup. This opens the "Create dynamic table" dialog box.
|
| 6. | Click the "ipo:name" entry in the Show columns list box, to deselect it.
|
| Please note:
|
| XSLT Designer supports the use of CALS and HTML tables directly in Document Editor (or in the Document Editor view of the IDE). Please see the CALS / HTML table section for more information on how to configure these type of tables for use in Document Editor.
|

|
| 7. | Click the Table grows... "left/right" radio button, and confirm with OK.
|
| This inserts a dynamic table within the table we just created. Dynamic tables adjust their size to the underlying XML data.
|
|
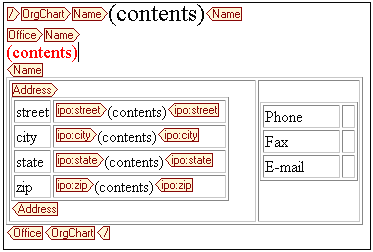
| 8. | Click in the empty column at the far right, and select the menu option Insert | Insert Table. Define the table as having 3 rows and 2 columns.
|
| 9. | Click in the first column (of the new table) and enter Phone, Fax and E-mail in each row.
|
|
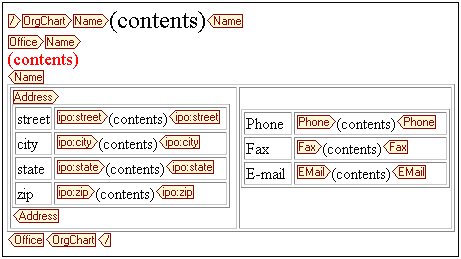
| 10. | Click the Phone element in the tree view, drag it into the Design view, and drop it next to the Phone cell. Select Create Contents from the popup.
|
| 11. | Use the same method to insert the Fax and Email elements from the tree view into the respective cells of the table. Select "Create Contents" in both cases.
|
|
| 12. | Click the IE Preview tab, to see the progress so far, then switch back to the Design tab so we can continue designing the Orgchart.
|
|
| 1. | Click in the zip cell and select the menu option Table | Join cell above.
|
| Do the same thing for the zip row label.
|
| 2. | Set the text cursor between the state and zip text, and enter a forward slash character ( / ). Enter the same character after the ipo:state end tag.
|
|
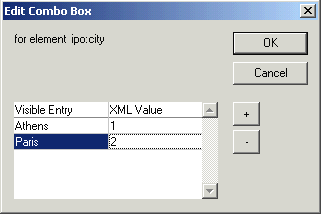
| 3. | Right click the ipo:city tag, and select Change to combo box from the popup menu.
|
| 4. | Click the "+" button, and double click in the Visible Entry field.
|
| 5. | Enter a city name, e.g. Athens and hit TAB.
|
| 6. | Enter the text or value that is to appear in the XML document, hit Enter to confirm. The XML Value can of course differ from the text in the Visible Entry field.
|
| 7. | Click the "+" button again and enter the name of a second city (e.g. Paris).
|
|
| 8. | Click OK to confirm these entries and close the dialog box.
|
|
| Please note:
|
| To edit the combo box settings: right click the combo box (not the ipo:city tags), and select "Edit properties..." from the popup menu.
|
| 1. | Click the Address tag at the top of the table, and select the menu option Table | Table properties.
|
| 2. | Click the border combo box, and select 0 from the drop down list, confirm the changes with OK.
|
|
| This removes the table border from the Design view, as well as in the IE Preview window.
|
| The table border is now displayed as a dashed line.
|
| This enables you to click the border and resize it if you wish. Click the "View table cell bounds" icon |
| 3. | Click the IE Preview tab to see the changes, then click the Design tab so we can complete our orgchart.
|
|
| Please note:
|
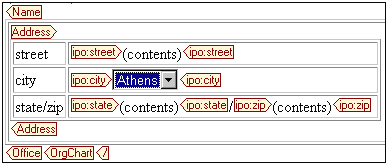
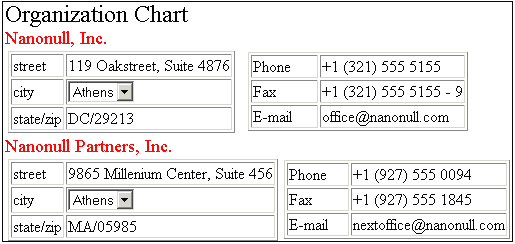
| The City combo box entries you define here, can be selected when this template is opened and completed in Document Editor, the IE Preview displays the currently defined entries. The XML Values defined in the Edit Combo box, are what actually appear in the template document in Document Editor (in this case 1 for Athens and 2 for Paris).
|
|