|
Note: The current version does not support dynamic disks.
Note: Go to the Restoring Data to a System or Other Locked Disk topic if you want to learn how to restore data to system disks.
R-Drive Image will start analyzing the computer disk configuration, the message showing the progress. Then R-Drive Image will show you the Image File Selection panel with the disks/folder structure.
Note: If other low-level disk software (including Windows internal services) is running, the message may appear and R-Drive Image will not go to the next panel. Stop this low-level disk software or wait until Windows services stop this low-level disk access before proceeding further.
When you click the file, you may view its content in the right panel.
 More information... More information...
Objects in Image Files
 Primary partition Primary partition  Logical disk Logical disk  Unallocated space Unallocated space
|
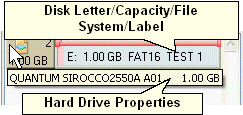
Image with one logical disk
|
|
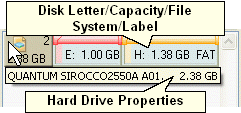
Image with two logical disks on one hard drive
|
|
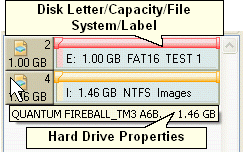
Image with two logical disks on two hard drives
|
|
|
If you select an image with incremental data backup, the Image Date/Time Selection panel will appear. Select the date and time of image creation and click the Next button.
If the image file is password-protected, the message will appear. Enter the password and click the OK button.
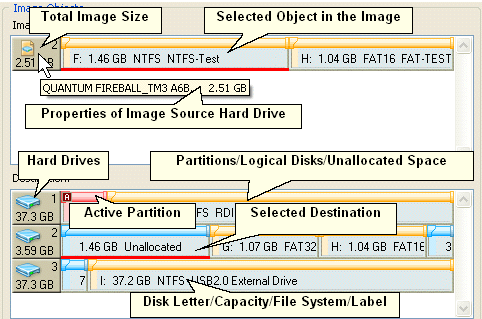
| | Select the object in the image file on the Image Object Selection panel, select a destination, and click the Next button |
You may select only one object at a time, and you need to specify the destination to proceed further. After selecting an object, you cannot go back to previous panels. Clicking the Back button will show the message.
Note: If you want to restore data from the image of an entire hard drive, you may do this only if the destination hard drive is of the same model.
More information...
If the chosen destination is smaller than the selected image, R-Drive Image will show the message and you will need to select another destination.
If you select several partitions as the destination, R-Drive Image will show the message. If you click the OK button, all those partitions will be deleted and data will be restored on that free space.
Note: Although R-Drive Image shows unallocated space instead of the deleted partitions, the partitions and their data will be actually deleted only when R-Drive Image starts restoring the data from the image.
|
Selected Object and Destination
Primary partition Logical disk Unallocated space
|
|
Restore parameters
Restore Options
|

|
You may visually adjust the location and size of the object to be restored. All other restore options will be adjusted accordingly. Also, when you adjust one or several restore options directly, these changes will be shown visually. Green marks available space.
|
Minimum partition size
|
Minimum partition size that may be allocated for the data in the image. Depends on how much free space is in the data in the image and its file system.
|
Maximum partition size
|
Maximum partition size that may be allocated for the data in the image. Depends on the file system of the selected object.
|
Free space before
|
You may specify the size of free space that will be left on the hard drive before the beginning of the partition.
|
Partition size
|
You may specify the size of the partition to be restored. Should be between the minimum and maximum partition size.
|
Free space after
|
You may specify the size of free space that will be left on the hard drive after the end of the partition.
|
Partition type
Primary (Active)/ Primary/Logical
|
You may specify the type of the partition to be restored. Do not change this setting unless you have serious reasons to do so.
|
File system for the selected partitions
|
You may select the file system for the partition to be restored.
|
Drive letter for the selected partition
|
Select the letter that will be assigned to the partition. You may select "Do not connect" if you do not want to connect this partition to your system.
|
|
If you try to restore data to a system or other disk locked by the system or other application, the message will appear.
To continue restoring you may:
| · | If you restore data to your system disk, select Restart computer (recommended) to continue restoring the data in the R-Drive Image startup mode. Read carefully the Restoring Data to a System Disk topic before you proceed. |
| · | If you restore data to a disk locked by other low-level disk software (including Windows internal services), stop this software and select Retry to lock the disk once again. |
| · | You may also try to unlock the disk by selecting Force Windows to unlock the disk (not recommended). If Windows fails to unlock the disk, the message will appear again. You will need to stop the software locking the disk manually or select Restart computer (recommended) to continue restoring the data in the R-Drive Image startup mode. |
Note: Use this option cautiously, because it may cause unpredictable results including system crash and data loss.
|
|
| Verify that the information on the Processing panel is correct and click the Start button |
You may add other objects from the same image and restore data to several partitions in one process. Select in the Next Selection on the Processing panel and click the Next button.
| Ü | R-Drive Image will start restoring the data from the image file to the selected destination. |
When the image is restored, the message will appear.
If some other program (like a file manager) is accessing the partition on which the data is to be restored, the message will appear. Close this program or make it stop accessing the partition.
If you restore data from an image of an entire hard drive to an entire hard drive, the system may not see the restored partitions until restarted. In this case R-Drive Image will show the message. Click the Yes button to restart your system.
Restoring data from CD-R/RW drives or other devices with removable storage
For the image with the file name filename.arc, R-Drive Image creates the following disk/file structure:
|
Disk
|
File name
|
The first disk
|
filename1.arc
|
The second disk
|
filename2.arc
|
The third disk
|
filename3.arc
|
...
|
...
|
You should start restoring the data from the last disk. If you insert another disk, the message will appear. Insert the necessary disk and click the OK button.
Each time R-Drive Image requires a new disk, the message will appear. Insert the necessary disk and click the OK button. Follow the device instructions on how to change its disks.
Note: At the beginning, R-Drive Image may require you to change the first/last disks several times.
|
The Disk Actions chapter explains basic disk actions.
The Advanced Disk Actions chapter explains how to perform advanced disk actions.
The Technical Information chapter gives technical information on Supported CD and DVD Recorders and List of Supported Hardware Devices
Follow this link to obtain R-Drive Image Contact Information and Technical Support
| 

