Diff
| |
 |
If you want to see the difference between the original image and the version that you are working on now, this is the filter to use. Diff is very simple to use. First, you specify the before and after images. Then, you specify how the difference should be displayed. You can also select the Output Type; either New image, New layer in the present image or on the image that you invoked the filter from (but this will destroy the image). Diff Methods· Subtract: Shows the difference value of the pixels that have been altered, exactly like the Difference Mode does (not the Subtract Mode). · Paint unchanged: Paints a mask over pixels that haven't been altered, so that only the changed parts are visible. · Paint changed: Paints changed pixels, so that only the unchanged parts are displayed. · Two tone: Paints changed pixels with the background color in the toolbox and unchanged pixels with the foreground color in the toolbox. |
ImageMap
| |
 |
Gimp's ultimate tool for Imagemap creation. Imagemaps are common items on web pages. You'll find them in navigation bars, where you click on different areas in the image to navigate with your browser. The clickable areas in a navigation bar must be defined. This usually has to be done in a separate program like MapEdit, unless you do it manually. ImageMap integrates an imagemap editor into Gimp so you will never need to launch a different program. How To Use ImageMap |
 |
Let's take a look at an example. This is a title bar for the "Fashion Clothing" company. The retro-styled navigation bar was created in Gimp with the help of Gfig, Dynamic Text in the The ImageMap InterfaceFlatten ( The four blue buttons to the left are the main creation tools; they define rectangular, circular and polygon areas. The arrow is a marker tool. You use it to mark areas that you want to move or change. To create an area, press the appropriate button and click and drag it around the object you want to define as a clickable area. If you aren't satisfied with the shape of an area, you can remodel it with the arrow tool. We have created areas around the logo and the retro people, as you can see in Figure 37.3. To remove a map area, select it and press the delete button (with the red X), and it will go away. To open the Area Settings dialog, select an area and press the magic wand button.
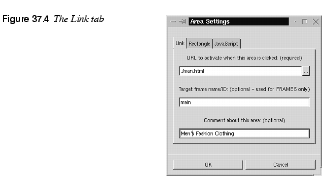
The Area Settings DialogLinkWhen you release the mouse after having created a clickable area, the Area Settings dialog will appear, displaying a link window where you specify the URL that the defined area should navigate to. In the URL to activate when this area is clicked input field you specify the URL of the link, but you can also open a file dialog to specify the file name/URL that should be the link. If there are frames in your web page you can set the target ID in the target input field. (It's beyond the scope of this book to explain all HTML/web-specific words and we assume that you are somewhat familiar with web creation.) You can also write a comment about the area, that will show up in places like Netscape's status window. We recommend that you use a comment that will inform the user where the link will take them. 
Rectangle, Circle And PolygonIf you want to edit a defined area, you can either use the arrow/select tool or the Area Settings dialog. Usually, mouse-clicking to define an area will suffice, but sometimes you need better precision. Because a polygon shape is built up of several nodes, you may want to add or remove nodes. You can't do that with your mouse, so this is where the Rectangle/Circle/Polygon tab comes in. To access the Area Settings window for a selected area, click on the magic wand tool. JavaScriptIf you want to enable a JavaScript when you drag the mouse over and away from the area, you can do that in the JavaScript tab. You don't have to include the onMouseover= " and the ending " around the JavaScript function call, because those characters are added by ImageMap.
The Main WindowThe Image WindowThe main window is divided into two sections; the image window to the left, shown in Figure 37.7, and the area window to the right, shown in Figure 37.8. The image window displays your Gimp image, and it is here that you create imagemaps. In the icon bar above the image window, you can save and open imagemap files, set preferences and zoom in and out. If two defined areas overlap each other, you can choose to send an area to front or to back using the stack control icons. The Area WindowThe area window displays a list with information of all created areas. Click one of the map areas in the list to select it. To change the specified order of overlapping areas, select the line and press the green arrows to move the line either up or down in the stack. The left field below the area window describes the (absolute) current position of the mouse cursor in the image window. The right field describes the width and height of a dragged rectangular map, the radius of a circular map and the relative cursor position for polygon maps.
GridA grid can be very helpful when you create definition areas. Click on the grid icon to add a grid system to the image window. If you aren't satisfied with the default grid size or shape, invoke MapinfoWhen you have finished mapping, it's time to think of what type of imagemap to use. ImageMap supports three kinds of map file formats: · NSCA is used by the NSCA web server and NSCA-related servers. · CERN is used by the CERN web server. · CSIM is used for client side imagemaps, i.e., imagemaps that are handled by the web browser instead of the web server. We recommend that you use CSIM maps because they are so much easier to work with. To specify the map type, press the Map Info icon (the paper icon) and the Settings for this Mapfile dialog will appear. At the time of this writing (ImageMap 0.4), only the Map file format option is enabled. To set the mapinfo (type), check the appropriate button and press OK. Creation Of The Map FileYou have to save your map file to be able to paste the map information into your HTML document. Save your file with the You will now have a map file containing all map information. All you have to do is open the map file in a text editor and open the web page that is going to include the imagemap in another text editor. Paste the map info to the appropriate place in your HTML code. (There are, of course, several editors and ways to do this, we only describe a generic way.) Because you can open a map file for re-editing, don't delete the saved map file. The map file may come in very handy if you want to change your imagemap. So, remember to always copy/paste your map info into the HTML file.
Your Map Info May Look Like This:
|
Magic Eye
| |
|
Magic Eye lets you create 3-D stereo images in Gimp. I think everybody has seen 3-D images in magazines: a strange-looking image that you have to look at in a certain way, and up pops a flower or something. Now you can do the same thing in Gimp. | |
 |
Example And Parameters 1. First create a grayscale map image, like the one shown in Figure 37.11. (This will be the image containing the 3-D thing that will pop up.) Remember that the brighter the object is in the map image, the higher it will pop up in the stereo image. 2. Create a mask image, like the one in Figure 37.12. (This is the image that will hide the map image.) The image must have several colors in it if this is going to work properly (a repeated texture is great) . 3. Bring up Magic Eye from the map image. 4. Select the mask image in the Background menu. 5. In the Strip slide bar, set how many columns (a column is one pixel wide) of the mask image you want to use for the background pattern clone strip (preferably between 50 and 100). The columns are counted from the left. 6. Remember that you must leave the first and last part of the map image black (about half the size of the background strip). 7. Depth is the amount of 3-D you want (or how much you want the thing to pop up). 8. From left will build your image from the left instead of from the middle of the image. (For some reason, a 3-D image is often easier to see if you create it from the left.) 9. Down carves the image instead of raising it. 10. You have now hopefully chosen Depth, Mask and Strip. 11. Press OK or Create, and the new 3-D image will appear (see Figure 37.13). |
Stereogram
| |
|
The Stereogram filter creates a 3-D stereogram of a grayscale image (similar to Magic Eye). If you check SIS (Single Image Stereogram), the background will be used as a pattern. In SIRDS (Single Image Random Dot Stereogram), you'll only get stereo noise for background. How To Use Stereogram 1. Create a simple grayscale image (the popup map). 2. Bring up the plug-in. 3. Choose a background (an RGB image of equal size). 4. Choose stereogram type: SIS or SIRDS. 5. Press OK. Now you have a stereogram. Take a good look at it with the focus slightly behind the image, until the 3-D representation of your image appears in the stereo image. | |
Video
| |
|
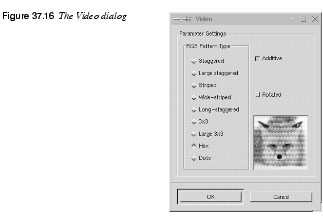
The Video plug-in creates the illusion that the image is an ordinary low-res/dot pitch video monitor. You can achieve this with different patterns, which means that you can create a whole lot of "bad monitors." 
By default the pattern is horizontal, but you can check Rotated to make it vertical instead. Use Additive to get a more realistic look. For an explanation of Additive, see "Modes" starting on page 335. If you don't use Additive, the pattern will just get on top of the image and darken it a lot. | |
| Frozenriver Digital Design http://www.frozenriver.nu Voice: +46 (0)31 474356 Fax: +46 (0)31 493833 support@frozenriver.com |
Publisher Coriolis http://www.coriolis.com |