What Are Modes?
|
|
|
Blending Modes or Transfer Modes control how the pixels in a foreground layer blend into the background layer(s). Modes are mainly used with layers, but they can also be used more directly as Paint Modes with the Bucket tool, the Blend tool or any tool that uses Brush Selection. Gimp provides 15 different modes: · Normal · Dissolve · Multiply · Screen · Overlay · Difference · Addition · Subtract · Darken Only · Lighten Only · Hue · Saturation · Color · Value · Behind (not available for layers) The modes that are available for any of the painting tools are available from the Mode pull-down menu on the Brush Selection dialog The modes used for layers are available from the Mode pull-down menu on the Layers & Channels dialog ( NormalNormal Mode is the default mode, and doesn't do anything special, as you might expect. A Normal Mode layer covers all other layers, unless there are transparent or semi-transparent areas in it. |
|

|
|
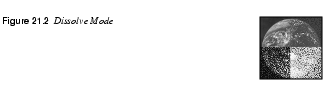
DissolveDissolve Mode is very similar to Normal Mode, but this mode is used for semi-transparency. It displays pixels as either completely transparent or completely solid, according to the level of opacity you set. In order to see the effect of this mode, you must first make the layer or paint transparent with the Opacity slider. |
|

|
|
|
If you're painting in Normal Mode at 50% opacity, you'll get a smooth semi-transparent surface. Dissolve Mode will instead produce noise effects similar to grainy film or granite rock. Instead of using semi-transparent pixels, Dissolve Mode produces either entirely opaque or entirely transparent pixels, 50% of each (if 50% is the Opacity value). As you probably know, GIFs only include transparent or non-transparent pixels. If you want a transparent GIF to look semi-transparent, you can use Dissolve Mode (or Holes in the This mode is used with semi-transparency, where it displays pixels as wholly transparent or fully solid, according to the level of transparency. MultiplyMultiply amplifies shadows or dark areas of the image. You can compare it to putting two slides on top of each other on a light table. White areas are transparent, dark areas on top of dark areas become darker. Colors act as if they were layers of colored glass on top of each other, or as color works in the CMYK color model (for example, yellow + magenta = red). |
|

|
|
|
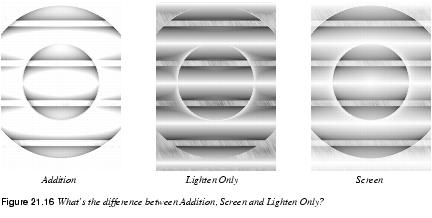
This mode works with shadow, much like putting two slides on top of each other. ScreenScreen is the mode you should use to create highlights in an image, and is in many ways the opposite of Multiply. You can compare it to projecting two slides onto a film screen. This mode depends on light, so black is transparent (just like a black spot on one slide will allow the image on the other slide to show) and the result is always lighter. Accordingly, the darker a layer is, the less it will affect the composite image, and vice versa. In Screen Mode, white covers everything, gray shades get more transparent the darker they get, and color is only visible if the other layer's color permits it (we are talking about RGB color, so yellow + magenta = white, just like on your computer monitor or television set). Read more in What Is The Difference Between Screen, Addition And Lighten Only?. |
|

|
|
|
This mode works with light, much like projecting two slides onto the same screen. OverlayOverlay Mode is something of a combination of Screen and Multiply. Medium gray is transparent in this mode. The background is the most important layer; the overlay layer is only used for modifying the background. Light and dark areas in the foreground affect the background by intensifying highlights, color or shadows, so white, black or RGB|CMY parts of the background are not affected. In other words, you can't intensify the shadow of black, you can't highlight white areas and you can't intensify a color with maximum color value. Basically, the foreground affects the background (which dominates) by intensifying color, highlights or shadows. |
|

|
|
|
In this mode, all foreground colors appear paler and more washed out. Overlay color and saturation depend mostly on the background. You can say that the foreground intensifies or modifies the background color; a green foreground on a green background makes the image a little bit greener, whereas a red foreground would make the green color slightly less green (but green nevertheless). Overlay Mode is good for adding shadows and highlights to an image, or for changing the color temperature. It adds information to the existing brightness Value in your image, so you can "paint with light." Hue and Saturation are also changed, but add no more effect than a cold shadow or reddish sunlight would. The foreground affects the dominating background by intensifying color, highlights or shadows. DifferenceThe Difference Mode displays the difference between the RGB values in two layers. Foreground and background pixels have a dramatic effect on each other. When you paint in Difference Mode, the corresponding pixels in both the foreground and the background are evaluated and the difference between them is calculated. If grayscale pixels are in one of the layers, the outcome is easy to predict. If the foreground pixel is brighter than the one in the background layer, the background pixel is inverted. If the foreground pixel is darker, the background pixel keeps its color. However, a grayish cast is added to the image, and the further the grayscale pixel is towards white or black, the weaker this shade of gray gets. |
|

|
|
|
If the pixels are colored or grayscale in both layers, the result is harder to predict, but it works the same way: | FG - BG | = outcome In other words, the result is the absolute value of the difference between the foreground pixel and the background pixel. Black pixels in either the foreground or the background are transparent (have no effect). White pixels have the most effect (a white pixel always inverts the correspondent pixel). Difference Mode is usually very colorful, and can produce psychedelic results, but it is also a powerful tool for displaying the differences between two layers. For example, if you wanted to compare the size, shape and relative position of grayscale masks in different layers, you could use Difference Mode. Where the results are black, the layers are identical. Any small difference will appear very clearly in this mode. This mode displays the difference between the RGB values in the two layers. AdditionAddition Mode is similar to Screen Mode. Addition Mode adds the RGB values of foreground and background pixels. The result is always lighter and often has white areas and unsharp edges. |
|

|
|
|
This mode adds the foreground RGB value to the background RGB value. SubtractSubtract Mode is the opposite of Addition Mode and sometimes produces results similar to Difference Mode. Subtract Mode subtracts the foreground color (RGB value) from the background color (RGB value). If your background is white (255,255,255), and you subtract red (255,0,0), the result is cyan (0,255,255). |
|

|
|
|
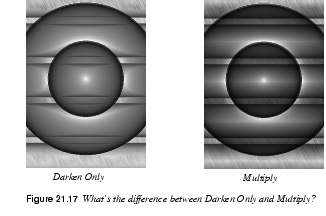
In Subtract Mode, a white shape in the upper layer against a white background will produce a black shape. So far, the result is the same as for Difference. As soon as a foreground value exceeds the background value, however, Difference and Subtract produce different results, because a zero value in Subtract Mode can be a negative value in Difference Mode. This mode subtracts the foreground RGB value from the background RGB value. Darken OnlyDarken Only Mode compares the foreground and background pixels and displays the one with the lowest RGB value. Darken Only is somewhat similar to Multiply Mode. Color can only get darker, but Darken Only will usually produce lighter colors than Multiply. If Darken Only worked on two pixels -- one bright red (243,83,47) and one turquoise blue (47,239,201) -- the result would be (47,83,47), a dark moss green. If you had used Multiply Mode, the result would have been a similar, but somewhat darker green (44,77,37). |
|

|
|
|
This mode compares the foreground and background pixels and chooses the lowest RGB value. Lighten OnlyLighten Only compares foreground and background pixels and displays the highest RGB values. It is the opposite of Darken Only. Using the same example, the result of Lighten Only used on the bright red and turquoise pixels, would be (243,239,201), an eggshell bright beige. The result of Lighten Only is similar to Screen Mode but is always lighter. If you had used Screen Mode instead, you would get a similar, but somewhat brighter color (246,245,211). If you'd used Addition Mode, you'd get a similar but much brighter color (255,255,248) as a result. |
|

|
|
|
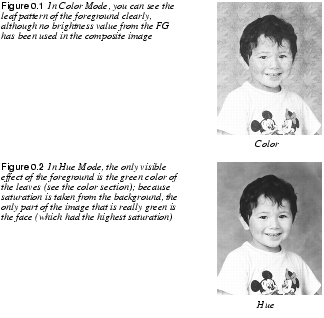
This mode compares the foreground and background pixels and chooses the highest RGB value. HueHue Mode results in a composite image that uses the background pixels' values for Value and Saturation information, while using the foreground pixels' values for determining Hue information. Hue Mode allows you to change the shade of an object without changing brightness or saturation; it only affects color. The foreground color is the color you'll get, but you'll keep the general feeling in the image; for example, a loud green on soft dark blue will be translated into a loud yellow on soft dark yellow. White, black or grayscale information in the background is not affected and can't be tinted. Note that you cannot shift a color to grayscale in this mode. Grayscale information in the foreground comes out as a scratchy red. |
|

|
|

|
A word of warning, or perhaps a tip, if you want to use this mode to tint a background with complementary colors next to each other (see Complementary Or Inverted Colors). Around the edges where complimentary colors meet and blend, there will always be shades of gray. Because Hue cannot tint gray, using Hue Mode on top of such a background will produce thin, gray contours around the objects (like a microscope would). The composite image uses the background for Value and Saturation information, while the foreground is only used for determining Hue. SaturationIn Saturation Mode, the composite image uses the background values for Hue and Value information and the foreground values for determining Saturation. You may use any color in the foreground. The background color won't change, but the background Saturation will, because it assumes the same saturation as the foreground color. |

|
|
|
The Hue can't be changed, unless you have a pure grayscale background, which will become shades of red if the foreground contains color. Because you can change Saturation, this mode is often used with gray, white or black paint because this desaturates the background. The composite image uses the background for Hue and Value information, while the foreground is only used for determining Saturation. ColorColor Mode uses the foreground values for hue and saturation information and uses the background values to determine value information. Black or white background pixels are not affected, but all other colors (grayscale or not) will get the hue and saturation of the foreground color. Color Mode does not affect the Value (brightness) of the background; dark and light information are left intact. |
|

|
|
|
Color Mode is useful for tinting grayscale photos if you want strong, clear colors. For a softer tinting, or the look of an old photo, consider using Overlay Mode instead. The composite image uses the foreground for Hue/Saturation information, while the background is only used for determining Value. ValueIn Value Mode, the composite image uses the background values for Hue and Saturation information and uses the foreground information for determining Value. Value is the same as Luminosity in Adobe Photoshop. Value Mode won't change the Hue or Saturation of the image, but will affect brightness and shadows; i.e., the structure or 3-D-quality of the image. |
|

|
|
|
Unlike Overlay Mode, Value Mode can't distinguish a dark red from a bright red. All shadows or highlights disappear from the background and Value Mode doesn't deal with a grayscale background at all (because background value is ignored). Value Mode is useful for correcting overbright or overdark colors, or it can be used to transfer patterns or structures into an image, without changing the color of the image. The composite image uses the background for Hue/Saturation information, while the foreground is only used for determining Value. BehindBehind Mode is only used for painting (and not for layers). Don't try to use this mode on anything solid, because it only affects transparent or semi-transparent areas. When you paint in Behind Mode, it's like painting on the other side of the layer. If you pretend the layer is a wall with windows in it, the Behind paint is applied to the outside of the house and is only visible through the windows. If the windows are dirty (i.e., are semi-transparent), the dirt will show against the Behind color. This is a Paint Mode where only transparent areas are affected by the paint. (It does the opposite of Keep transparent in the Layers dialog.) | |
Comparing Different Modes
|
|
|
The test squares shown in Figure 21.15 demonstrate the effect of different modes. The black-and-white test squares range from black (intensity 0) to white (intensity 255) and are placed on top of a medium gray background (intensity 127), which explains why the sixth square (also intensity 127) is invisible in Normal Mode. The colored test squares range from black through dark red to bright red. The colored background is a soft green. As you can see, Screen maintains the value variation of the grayscale squares, but all shades are brighter than in the original. Lighten Only hasn't changed the brightness of the visible squares, but all dark squares have become invisible. Addition brightens up so much that most of the squares have turned entirely white, and black is invisible for all three modes. Multiply, Darken Only and Subtract (grayscale) are the dark equivalents or opposites of Screen, Lighten Only and Addition. Overlay is only subtly different from the original. Note that medium gray is invisible in Overlay Mode. Difference shows the difference between foreground and background values. The dark colors represent a small difference between foreground and background. The Color and Hue test squares have assumed a uniform red color, so these modes obviously use the Hue of the foreground, but not the Value. As you see, Color uses the Saturation of the foreground and Hue uses the Saturation of the background. The Saturation test squares have turned uniformly green, so this mode uses both the hue and value of the background. Only the saturation is controlled to be the foreground. The Value test squares have turned softly green like the background, but the values come from the foreground
|
|

|
|
What Is The Difference Between Multiply And Darken Only?These two modes often result in similar outcomes, but Multiply is always a little darker. As you know, Darken Only chooses the darkest RGB values in each channel to produce its result. The differences and similarities between Multiply and Darken Only can be compared with the differences and similarities between Screen and Lighten Only (note that Subtraction can be thought of as corresponding to Addition, if you inverted the top layer). Multiply is mathematically the opposite of Screen. In Screen, the foreground value is mapped to zero and up, but in Multiply it is mapped to 255 and down. Therefore, the foreground value is the lightest possible value and its darkness is determined by the background value. The algorithm is simple: the composite value = FG x (BG/255). For grayscale images, the difference is much more evident. If you take a look at the pictures portraying these modes, you'll find that Darken Only looks semi-transparent, whereas Multiply looks as transparent as a slide. Multiply Mode is darker and shows a lot more of the background. In color images, you'll get more color variation (for lighter colors) with Multiply than you would with Darken Only. |
|

|
|
What Is The Difference Between Color And Hue?Hue and Color sometimes produce similar results, because in both cases the foreground controls the composite Hue, and the background determines the Value. The difference is based on which layer controls Saturation. In Hue Mode, the background controls the saturation and in Color Mode, the foreground controls the saturation. Generally, Hue and Value are the most important parameters in an image. If Saturation is roughly the same in both layers, it will be hard to tell the difference between Hue and Color Modes. You will be able to tell the difference if one of the layers is grayscale, or if there is a lot of variation in the Saturation of a layer. Another way to think of it: Color Mode is often used to add color to a grayscale, so it's important that the top layer controls Hue and Saturation, but it must not interfere with the dark or bright values of the background. Hue Mode, on the other hand, is often used for changing the existing color of a certain object. In that case, you don't want to change the Saturation in the background, because then the object would look very unnatural. |
|

|
|
| Frozenriver Digital Design http://www.frozenriver.nu Voice: +46 (0)31 474356 Fax: +46 (0)31 493833 support@frozenriver.com |
Publisher Coriolis http://www.coriolis.com |