|
|
Do you feel that your image lacks a certain something? Here are the ultimate distort tools provided by Gimp. |
Bend
| |
 |
Bend can bend the contents of a layer or the entire image (but it can't bend a selection). However, because the size of the layers increases when you run this filter, full-sized layers will end up being larger than the image area and some clipping will be required. Bend Orientation ParametersThe Depth parameter controls the amount and direction of the horizontal displacement (or vertical if you check the Bend Vertical checkbox). A depth of 100 or (-100) means that the layer width (or height for Bend Vertical) will stretch to double its original size, but it will stay centered around its original position. Negative values bend from top to left instead of from top to right, and from left to top instead of from left to bottom (Bend Vertical). De-Center controls the center of gravity of the displacement. The maximum value (100) will reverse the directions mentioned above. Instead of bending from the top and down, the layer content will bend from the bottom up, and Bend Vertical will bend from right to left. With the mid-value (50), the layer content will bend in a perfect U-shape, and the curve will be drawn toward the new center of gravity for higher or lower values. Other ParametersThe Fill Bordercolor option will fill the background (vertically or horizontally) with the color of the edge pixels of the original layer. You can also fill with transparency by checking the Fill Transparent checkbox instead. The Keep Original Layer checkbox will keep the original image, and create a new layer for the bent image. This can be handy if you want to create several bends from the same image. Bend the whole image will show the entire (bent) image. Normally, some of the bent parts will be clipped when you bend the entire image instead of just bending a small layer. If you check this option, the canvas size will automatically be enlarged so that you'll be able to see all parts of the image. |
Blinds
| |
|
Applying Blinds is like slicing your image or selection in shreds and then pasting the slices to the different sections of window blinds. ParametersIf you want a transparent background, you'll need to work in layers or add an alpha channel ( You can create either Vertical or Horizontal blinds; just check the appropriate button. The Displacement parameter refers to the open angle of the blind. A zero degree angle closes the blinds. A 90 degree Displacement angle opens the blinds as much as possible. The Num Segments parameter controls how many sections the image will be cut into by the blinds. | |
Curtain
| |
 |
The Curtain filter makes it appear as if you are looking at your image through the fabric of a thinly woven curtain. Only, this curtain has a pattern printed on it, and that pattern is your image. When you apply this filter vertically, the image is copied. This copy is rotated 180 degrees, thinly slashed and then combined with the original image. If you choose Apply horizontal curtain, the same effects will be applied, but from a horizontal perspective. You can choose to apply the filter both horizontally and vertically at the same time. |
Emboss
| |
|
Emboss stamps or carves out a three-dimensional look to your image. | |
 |
Note that Emboss only works for RGB images. ParametersThe direction of the stamp (inward or outward) is determined by the original brightness values of the image. Bright parts will appear to be raised; dark parts will appear to be carved. The Azimuth and Elevation sliders control the direction of the light. Azimuth can be described as the direction from which the sun rises in the morning. Think of Azimuth as a shining satellite, moving around your image; the light in the image will change as it moves. If Azimuth was the sun in the morning, think of Elevation as the time of day. Think of the sun when it reaches its zenith and doesn't create any shadows. Elevation works the same way. Depth determines the embossed carve depth. If your depth is large, the lowest parts will look like black holes (this filter is good at detecting edges). When the sun falls or rises, the shadows will get longer or shorter, and the direction of the shadows will also change. Emboss And Bump MapAs you may have noticed, Emboss will make your image gray. If you compare Emboss with the similar filter called Bump Map ( Figures 30.5 and 30.6 illustrate this fact. The images have been embossed and bumpmapped with the same values, so you can see the difference. Emboss makes a surface look like metal or rock. Bumpmap just adds more depth to your image, like an impression on paper or leather.
|
Engrave
| |
|
Engrave makes your image look like an etching. The Height slider determines the depth of the engraving. For more realistic etchings, use low Height values (close to 3). In order for Engrave to work you must have an image with alpha enabled (transparency); a plain RGB or grayscale image will not work. Try The Limit line width checkbox will limit the number of allowed line widths, thus reducing the visual impression of having many shades of gray in the image. You will get more contrast if you don't check this button, and the etching will look more realistic. On the other hand, you can get quite interesting results with this option checked.
| |
IWarp
| |
|
IWarp is Gimp's answer to Kai's Power Goo. IWarp is quite an amazing distort filter. You can set the amount of distortion (the Deform Amount) and how large the deformation zone should be (the Deform Radius). To create a distortion, click on the radio button for the desired effect, and drag the mouse in the preview image where you can watch the distortion take place. If you are not satisfied with a distortion, click the Reset button and the image will return to its original state. Similar to Power Goo, you can also animate the distortions you've just made and play them like a film. The Settings Tab· Deform Radius: Sets the size of the distortion area around your mouse pointer. The Deform Radius is the radius in pixels from the center of the mouse pointer. · Deform Amount: Sets the amount of deformation on a scale from 0.00 to 1.00. · Move distortion: Allows you to stretch parts of the picture. For example, you can stretch a tiny nose into something a witch could be proud of. · The Grow and Shrink distortions should be self-explanatory. · Swirl: Twists a part of the image, either clockwise or counterclockwise. · Remove: Removes an entire distortion effect, or just part of the effect. Remove is the perfect tool for adjusting a distortion. Remove allows you to avoid pressing Reset (and starting again) if you failed to create the effect you wanted. Note that if you are making an animation, the correction will appear in one of your frames. · Reset: Simply resets the image to its original state. · Bilinear: If checked, the warping effects will become more smooth. · Adaptive Supersample: An option that slightly improves the smoothness of distortion by adding a few intermediate colors. The effect is often quite subtle, unless this option is used for very small areas.
The Animate TabThe parameters on the Animate tab control the distortion animation that you can create with IWarp. If you check the Animate button, you will create a layered image, ready for making GIF animations. You can set the number of frames and in what order you want to play the frames of the film. If you don't check Reverse or Ping Pong, you'll play the animation in normal mode: The first frame is the original image, and the following frames are gradually distorted until the last frame, which displays the fully distorted image you made in the preview window. Reverse will play the animation backwards from the fully distorted image to the original image. The Ping Pong effect creates the following frame sequence: original image...distorted image...original image, etc. Reverse and Ping Pong together create the following sequence: distorted image...original image...distorted image, etc. With Reverse and Ping Pong together, you must remove the background layer after you have applied the filter to make it work properly.
Click on the OK button and IWarp will warp the frames for the animation. You can use Don't worry about how to save the animation. Because the animation is built up on layers, it will be saved if you save the image in a file format that understands layers (such as XCF and GIF). | |
Pagecurl
| |
|
Pagecurl allows you to lift and curl a corner of your image.
| |
 |
To be able to use Pagecurl, you must have at least two layers (including the background layer) or an alpha-enabled background in your image (select The top layer will curl and the bottom layer will show under the curl. If your image is only a background layer with alpha, the background will curl up to show the transparency. The color of the back of the curled page is controlled by the current colors in the toolbox. The background color will be the highlight, or the middle part of the curl gradient, and the foreground color will be the shadow, or the first and last parts of the curl gradient. You can also check the Use current Gradient instead of FG/BG-Color checkbox. With this option, the current gradient (determined by the settings in the Gradient Editor) will be used instead of the foreground and background colors. The Pagecurl dialog also allows you to put a shade under the curl by checking the Shade under curl checkbox and to set the opacity of the curled page using the Curl opacity slider. If you just want to curl a small part of the image, make a selection and then Pagecurl the selection. This allows you to make a small curl, as if the glue didn't stick properly to that corner of the image. |
Polar Coords
| |
|
Polar Coords can be used to create distorted circular or rectangular representations of your image. | |
 |
ExamplesTo create a powerful but rather unsophisticated text curve, you can apply this plug-in to a text string. You can also make a target circle out of some lines, or you can make rectangles out of straight lines. The SlidersThe Circle depth in percent slider controls how round the curve will be. If you apply the filter to your image like the one in Figure 30.14 and set this option to a high value, you will make it circular (Figure 30.15); a lower value makes it rectangular (Figure 30.16). The Offset angle slider controls where the circle/half-circle will start in degrees (see Figure 30.17).
The ButtonsThe Map from top button controls where the lower part of the original image (Figure 30.18) will turn up. If the Map from top button is checked, the bottom part will end up in the center (Figure 30.19). If it is unchecked, the bottom part will be distributed around the edges of the image, as in Figure 30.20. The Map Backwards option is a mirror function. The effect is the same as flipping the image with the Flip tool in the toolbox. The Polar to Rectangular button sets whether the image should be mapped to a circular or rectangular shape. Press this button and the original image (Figure 30.18) will map to rectangular Figure 30.21.
|
Ripple
| |
|
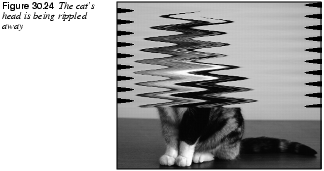
Ripple displaces the image or selection in waves or ripples so that it looks like a disturbed water surface
. 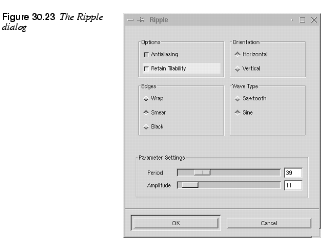
Parameter SettingsYou can displace the image in Sine or Sawtooth wave form. You can ripple in either a Horizontal or Vertical Orientation. Use the sliders to specify the Period (length) and Amplitude (height) of the wave. The Edges parameters Wrap, Smear and Black have the same functions as they do in the If you uncheck the Antialiasing checkbox, the wave pattern will get rough edges. This is normally not what you want, so we recommend that you keep this button checked. If you check the Retain Tileability checkbok, a tileable image (pattern) can still function as a seamless pattern after you have rippled it. If this checkbox isn't checked, the edges will not fit when you try to tile the image as a pattern.
| |
Shift
| |
|
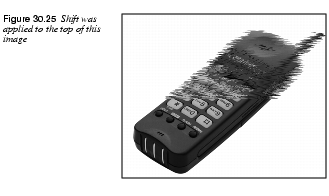
Shift creates a random displacement of each pixel row, horizontally or vertically. The Shift Amount slider sets how much a row should be displaced. You can't control whether it will displace left or right/up or down; you can only control the amount of displacement.
| |
Twist
| |
 |
Twist is a versatile plug-in that provides a variety of geometric image distortion functions. How Does It Work?Twist distorts the image by translating the original pixels according to a 2-D vector field, which is determined by the selected distortion function. Certain parameters (up to eight, depending on the function type selected) can be adjusted, resulting in different effects. Twist's output is a geometrically distorted image. The effect of a selected parameter setting can be viewed in a preview window. Each selectable function provides eight predefined effects that can help the inexperienced user get a feeling for the settings. Currently, eight different distortion functions are available. Note that you cannot distort indexed images. Convert your indexed image to RGB or grayscale before you use Twist on it. Twist's dialog is divided into four sections: Preview image, Parameter settings, Functions/Effects and Cutoff function. Functions/EffectsUnder Functions/Effects, you can choose from several distortion functions in the Functions pull-down menu. After you choose a distortion function, you must choose parameter settings that, in combination with the chosen distortion function, achieve the effect you want. There are two ways to define a parameter set. The first and easier way is to select one of eight effects from the Effects pull-down menu under Functions/Effects. The parameters defining the effect will be displayed in the Parameter settings. The effect on the image can be seen in the Preview image at the top-left corner of the dialog. Parameter SettingsThe second way to choose a parameter set is to manually set the Parameter settings sliders. Note that some of the sliders may not be available for certain functions; those parameters will not affect the image distortion effect. The labels of the sliders depend on the distortion function. To get a feel for the parameters of each distortion function, you should experiment with the sliders. If you feel that the preview image is too small, go ahead and execute Twist by pressing the OK button at the bottom of the dialog. Twist will remember all the parameters you selected when it is started again, so you can fine-tune an effect. CutoffThe Cutoff function provides a mechanism for dampening the image distortion function, depending on the distance r from the image's center. So if the Use cutoff checkbox is checked when Twist is activated, the image distortion is a product of the selected distortion function and of the Cutoff function. Some of the predefined effects use the Cutoff function, so be sure to notice if it is used when you're trying to figure out which parameters will yield an effect that you like. |
Value Propagate
| |
|
Value Propagate spreads (or propagates) certain value ranges in a specified direction. Propagate ModesMore White And More BlackThe first two parameters, More White and More Black, have a large impact on scanned photographs (see Figure 30.28). You might describe the effect as a swelling of bright (or dark) areas where the contrast is high. When you run the filter several times, those areas will clog together in large square clusters, but middle values will remain relatively unaffected. The result is often quite artistic. The More White effect resembles oil painting, and More Black looks like watercolor. This filter is also very good for drawings. A black-and-white line drawing made on the computer will look more like a real ink pen drawing if you use More White on it. More Black will just thicken the lines. Other Propagate ModesThe other Propagate modes work best with drawings and computer-made images with distinct edges. Scanned photos are either hardly affected, or the result is strange and unpredictable. · Middle value to peaks: Creates and propagates the transitional color (blend of object's edge color and background color) and blurs the image. It will blur more each time you use it, because the transitional color will be created from the new edge color. · Foreground to peaks: Draws a fine contour (with the current foreground color) around defined objects or shapes in the image. If the object border is fuzzy, the foreground outline starts where the object color fades out. · Only foreground: Propagates areas that match the exact shade of the foreground color in the toolbox. Soft and fuzzy edges don't propagate well with this option. · Only Background: Does the same thing with the background color. Sometimes, these options cause pixels of the chosen color to spread in an asymmetric way so that large lumps or clusters grow. This can occur when you spread soft brush lines, or when you run the filter several times. · More opaque and More transparent: Only apply to images with an alpha channel (a layer or an alpha-enabled background). Those options work exactly the same way as More White and More Black, but white is replaced by opaque and black by transparent. · Lower threshold and Upper threshold: Can be set to certain values if you only want to propagate areas in a certain range, like only very dark areas or only middle values. You can also set the Propagating Rate (the amount) and the direction (to Left, to Top, to Right, to Bottom) of the spreading. · Propagate Alpha and Value Channel: Can be unchecked and thereby prevent that the alpha and/or value channels are affected by the propagation. | |
Waves
| |
|
Waves simulates the effect that you get when you throw a stone in a pond (if the Reflective checkbox is unchecked). 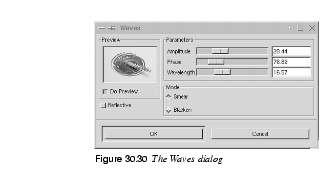
Parameter Settings· The Amplitude slider controls the height of the waves. · The Phase slider sets the position in the wave. · The Wavelength slider controls the length of the waves. · The Smear and Blacken Modes work the same as they do in · If you check the Reflective checkbox, you will not get the simple "thrown stone" effect. Instead, your wave will create an interference pattern.
| |
Whirl And Pinch
| |
|
Whirl and Pinch distorts your image in a concentric way. Whirl distorts the image much like the little whirlpool that appears when you empty your bath. Pinch can be compared to applying your image to a soft rubber surface and pressing it in different ways. If the Pinch amount slider is set to a negative value, it will look as if someone tried to push a round object up toward you from behind the rubber skin. If Pinch amount is set to a positive value, it looks like someone is dragging or sucking on the surface from behind, and away from you. ParametersThe Whirl angle slider controls how many degrees you want to rotate your image. The Radius slider sets how much of your image will be affected. If you set Radius to 2, the entire image will be affected. If you set Radius to 1, half the image will be affected. If Radius is set to 0, nothing will be affected (think of it as the radius in a circle with 0 in the center and 1 halfway out). | |

|
Tip: To create a really realistic whirlpool, combine Whirl and Pinch.
|
Wind
| |
 |
The Wind filter can be used to create motion blur, but it can also be used as a general distort filter. What's characteristic about this filter is that it will render thin black or white lines. Wind will detect the edges in the image, and stretch out thin white or black lines from that edge. This is why you can create the illusion of motion, because the edges are what will be blurred in a photograph of a moving object. Let's take a look at the train in Figure 30.34. There is no motion in the original image, but in the second image we added some wind to get the train started. First, we created a new layer, we copied the train into this layer and invoked the Wind filter. The final step was to blur the windows with the convolver tool.
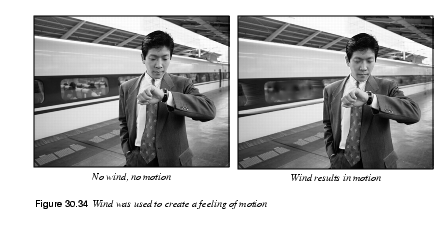
Parameter SettingsThe interface is quite simple. You can set the Strength of the wind and a Threshold value. Threshold will restrict the effect to fewer areas of the image. Strength controls the amount of wind, so a high value will render a storm. You can also increase the effect by setting the Style to Blast, which will produce thicker lines than Wind. You can only set the wind in two directions, either Left or Right. However, you can control which edge the wind will come from using the commands Leading, Trailing or Both. Because Trailing will produce a black wind, it creates a less convincing motion blur than Leading, which will produce white wind.

|
| Frozenriver Digital Design http://www.frozenriver.nu Voice: +46 (0)31 474356 Fax: +46 (0)31 493833 support@frozenriver.com |
Publisher Coriolis http://www.coriolis.com |