Working with text.
Most of Concept Draw objects, except guide lines, pictures and OLE objects, may contain text. If you select an object and start typing (or press F2), the text editing mode will turn on.
If the text appears too small, it will zoom in automatically for better visibility. Such behaviour is set by default. You can customize it in the Options dialog (menu Tools/Options), Miscellaneous tab. Here you can set the minimal font size in points from where auto zooming will activate, or disable auto zooming.
When done editing, press Esc or F2 to quit the text editing mode.
With the Edit Text tool ![]() you can
edit text in a object. When this tool is active, the lower part of the toolbar is replaced
with a set of text editing tools you can use to modify text properties. To start editing,
simply click the object with the mouse.
you can
edit text in a object. When this tool is active, the lower part of the toolbar is replaced
with a set of text editing tools you can use to modify text properties. To start editing,
simply click the object with the mouse.
![]()
Most of text editing operations involve wide usage of selected text blocks. Any formatting or settings change affects selected blocks only. You can select text blocks either with the mouse, or with Shift+<Arrow Key>.
The way text is positioned in relation to the object is determined by its text box. The
Text box tool ![]() allows you to
resize, rotate and relocate the text, changing its appearance and position independently
of its object. When a new object is created, its text box's dimensions coincide with those
of the Alignment Box.
allows you to
resize, rotate and relocate the text, changing its appearance and position independently
of its object. When a new object is created, its text box's dimensions coincide with those
of the Alignment Box.

If a hyperlinks is found in the text, it will be automatically assigned to the object on finishing editing. To learn more about this feature and hyperlinks refer to the "Hyperlink" section.
Select the object and start typing text in it. Immediately, the text editing mode turns on. When done editing, press the Esc key, or click outside the text box.
Note: There are some other methods for switching to the text editing mode:
- double clicking an object.
- selecting an object and pressing F2.
- click the object with the mouse in the Edit Text mode.
To switch to the text editing mode, select the Edit Text tool and click the object you want. If you click on the text itself, the insertion point will be placed in the position where you clicked. By clicking elsewhere on the object, the whole text gets selected.
If you start typing now with a text block selected, the text will be deleted. To prevent this, click anywhere on the text or press an arrow key.
After you make all changes you wanted, press the Esc key, or click outside the text box.
Note: There are some other methods for switching to the text editing mode:
- double clicking an object.
- selecting an object and pressing F2.
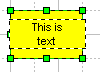
A text object is an object which contains text only. To create a text object, choose the Edit Text or Text Box tools from the toolbar. Use the mouse to draw the text box on the page. On releasing the mouse button, the text editing mode turns on. Type in the text. When you finish typing, press the Esc key, or click outside the text box.
Changing text styles in selected blocks.
The following operations can be applied to selected text blocks:
- Changing the font
![]()
To change the font, click the down arrow by the Font Name box and then click the name of the font you want in the list.
![]() Ctrl+F
Ctrl+F
- Changing the font size
![]()
To change the font size, click the down arrow by the Font Size box, and then click the size you want in the list, or type a custom size.
![]() Ctrl+S
Ctrl+S
You can also use Increase Font Size ![]() and Decrease Font Size
and Decrease Font Size ![]() buttons on the Text toolbar to increase/decrease the font size gradually.
buttons on the Text toolbar to increase/decrease the font size gradually.
| Ctrl+">" | Cmd+">" |
| Ctrl+"<" | Cmd+"<" |
- Changing text color
Click the Text Color ![]() button
on the toolbar. On the button menu, click one of the given 16 colors, or click More Colors
for extra colors. This will bring up the Choose Color dialog box, where you can choose
among 256 colors of the current palette of the document.
button
on the toolbar. On the button menu, click one of the given 16 colors, or click More Colors
for extra colors. This will bring up the Choose Color dialog box, where you can choose
among 256 colors of the current palette of the document.
- Changing font attributes
![]()
![]()
![]()
Font attributes, such as Bold, Italic or Underlined can be set by clicking respective buttons on the text toolbar or press Ctrl+B, Ctrl+I, Ctrl+U respectively.
![]() The Macintosh version of the program allows
for additional text styles:
The Macintosh version of the program allows
for additional text styles:
Outline (Ctrl+O), Shadow (Ctrl+S) Φ Condense (Ctrl+C).
Modifying Text Properties in selected objects.
You can change various text properties (such as font, font size, margins) for several objects at once. To do this, call the Text Properties dialog (menu Format/Text). Changes you make in this dialog will apply to all selected objects.
When in the Edit Text mode, some properties can be modified straight from the text
toolbar. For example, you can increase font size or make the font bold for all selected
objects.
You can use Ctrl and Shift to select other objects.
Each text consists of one or more paragraphs. Each paragraph begins from a new line and is separated from the other with line feed symbol (which is inserted each time you press the Enter key). For each paragraph, you may set alignment and indentation.
Horizontal alignment
![]()
Can be applied to paragraphs only. You can align text on the left side of the Text Box, on its right side, or on its centre. To align a paragraph, click somewhere within its bounds and choose one of the alignment tools on the toolbar: Left Align Text, Centre Align Text, or Right Align Text (Ctrl+L, Ctrl+E, Ctrl+R respectively).
Several selected paragraphs can be aligned likewise.
![]() In the MacOS version of ConceptDraw, you
can't see the results of paragraph
In the MacOS version of ConceptDraw, you
can't see the results of paragraph
alignment when in the text editing mode. The alignment will be applied after
you leave the text editing mode.
Vertical alignment
![]()
Vertical alignment determines the position of the whole text with respect to its Text Box. You can align the text at the top, middle or bottom of the Text Box. Use the following toolbar buttons: Top Align Text, Middle Align Text or Bottom Align Text.
Cutting, copying and pasting text.
When working with text, you may cut, copy and paste text blocks as you do in many other Windows applications.
The Copy command copies selected text onto the clipboard. Select Copy from the Edit menu, or use the shortcuts:
| Ctrl+C | Cmd+C |
| Ctrl+Ins |
The Paste command pastes text from the clipboard in the pointer position. Select Paste from the Edit menu, or use the shortcuts:
| Ctrl+V | Cmd+V |
| Shift+Ins |
The Cut command removes selected text from its place and puts it on the clipboard. Select Cut from the Edit menu, or use the shortcuts:
| Ctrl+X | Cmd+X |
| Shift+Del |
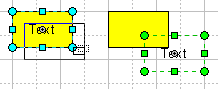
Text box is a dashed line with handles that selected objects display when the Text Box tool is chosen. You can move, rotate and resize an object's text box, modifying then position of the text in relation to the object.
When you move or resize an object, you move and resize its text box as well.
Moving a text box
To move the text box, first click on it to select it. Then click its bounds or the text inside, hold down the mouse button and then drag. When text box is selected, the pointer changes into a double box indicating it can be moved.
You can use the Arrow Keys to move the selected text box by one pixel at each keystroke for precise positioning. If more precision needed, increase the magnification.
Rotating a Text Box
To rotate a text box, drag any of the four rotation handles, located in its corners. The Text Box rotates around its rotation centre, which looks like a gray circle.
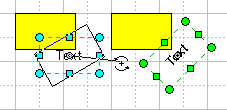
Sizing a Text Box
To resize the Text Box, drag one of its square handles. The mouse pointer will change into a double-headed arrow when it's over a handle.

Margins
You can set margins for the whole text with respect to the Text Box borders. Open the Text Properties dialog box (Format/Text), then select the Text Block tab. Under the tab, modify the values in the Margins fields. Here you may specify the values for left, right, top and bottom margins. By default, you input the values in the current measurement system. If you want to use another measurement system, specify proper abbreviation for the chosen unit of measure after the number. For example: 2,4 pt, 3.3 in, and so on.
Indents
Indents are paragraph properties. For each paragraph, you may set right, left and first line indents. These settings can be modified in the Indents subsection of the Text Properties dialog (Format/Text, Paragraph tab).
By default, you input the values in the current measurement system. If you want to use another measurement system, specify the proper abbreviation for the chosen unit of measure after the number. For example: 2,4 pt, 3.3 in, and so on.
The changes will affect the paragraphs, with the insertion point selected text.
Note: the resulting indent value includes the margin value as well.
![]() In the MacOS version of ConceptDraw, you
can't see the results of paragraph
In the MacOS version of ConceptDraw, you
can't see the results of paragraph
alignment when in the text editing mode. The alignment will be applied after
you leave the text editing mode.
By default, text has no background and text boxes are transparent (except for text boxes of connectors). You may enable the background color for a selected text block in the Text Properties dialog (Format/Text). Under the Text Block tab, uncheck the Transparent option, and click the Text Background button to choose a color. Click OK.
To disable the background color, check Transparent.
The Text Properties dialog has three tabs:
The Font tab.
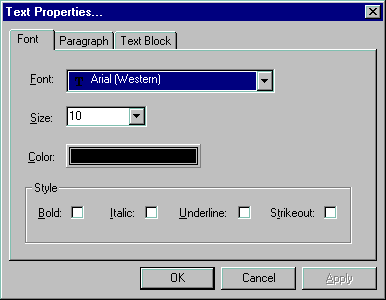
Here you may change the font properties.
- The Font Name box lets you choose a font from the list of available fonts.
- In the Font Size box, you may select a font size from the list or enter a
custom value.
- Font Color determines the font color.
- The Style section contains a group of options, that change the font style
attributes:
Bold - determines whether the text is bold
Italic - changes plain text to italic and vice versa
Underlined - underlines the text
Strikeout - displays crossed out text
The Paragraph tab.
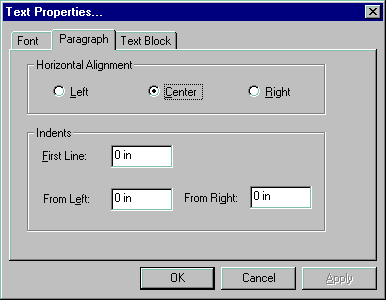
Specifies properties for the paragraph with the insertion point, or for all paragraphs of a selected object.
- The Horizontal Alignment section specifies how the paragraphs are aligned
with respect to the text box:
Left - on the left side,
Centre - by the centre,
Right - on the right side.
- The Indent section specifies the paragraph indentation:
FirstLine - for the first line,
FromLeft - for the left indent,
FromRight - for the right indent.
Note, that the indents values are displayed in the currently used measurement system. If you want to use another measurement system, specify the proper abbreviation for the chosen unit of measure after the number. For example: 2,4 pt, 3.3 in, and so on.
The Text Block tab.

Under this tab, you may set properties for the entire text box.
- The Vertical Alignment sections determines the position of the whole text
with respect to the text box.
Top - aligns text at the top of the text box
Middle - aligns text at the middle of the text box
Bottom - aligns text at the bottom of the text box
- The Margins section specifies the distance between the text and the edges of
the text box.
Left - sets the left margin
Right - sets the right margin
Top - sets the top margin
Bottom - sets the bottom margin.
Note, that the margins values are displayed in the current measurement system. If you want to use another measurement system, specify the proper abbreviation for the chosen unit of measure after the number. For example: 2,4 pt, 3.3 in, and so on.
- The Text Background section specifies the color for the text background.
Transparent - sets whether the text background has color or is
transparent.
Color - sets the background color, if Transparent is
unchecked.
Unlike other objects, a group doesn't have text associated with it. The text you type in appears on the frontmost object in the group. If you want to change another object's text, select the object and switch to the Edit Text tool (or press F2).
Note, that it's possible to change the display order of objects using the SendTo... operations.
By default, the Smart Connector's text appears:
- on its central segment, if the number of the segments is odd.
- in the place where to middle segments meet, if the number of the segments is even.

Note: use the Text Box tool for repositioning the text.