|
Click on the Options Menu, then click Properties, or press
ALT-O, followed by P to access these options. A dialog box
opens from which you can change many of the basic functions
of IrfanView.

There are several tabs on the options dialog.  If the tab
for Extensions is not at the front, click it to bring it
to the top of the stack.


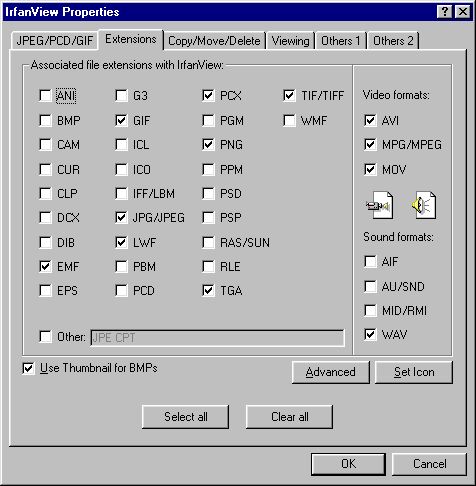
Extensions
Here you can choose which file types will be automatically
associated with IrfanView. Those files will show the icon
for the viewer next to them in file directories; double
clicking the file name will launch the viewer, with the
file already loaded. Click any of the check-boxes next
to files you want associated with IrfanView. If you want
all of them associated, click the Select all button below.
The Clear all button removes all the associations.

At the bottom of the selections area is a box for
entering Other file extensions you want associated with
IrfanView. Click the box to make it active, then type
in the extensions, each separated by a single space.

Below the selections area is a box you can click to use
thumbnails for loading bmp images. It is checked by
default. Click it to remove the option.

The Advanced button has some choices for Windows shell
operations. Click the button to access these options:
Add IrfanView To Send-to Menu, and Add Open-browse to
Shell Menu. Check either or both boxes, the close the
dialog, or exit with Cancel.

The Set Icon button allows you to choose a different
icon for IrfanView. Click the button to see several
choices; click one of the option buttons to choose
that icon. Click OK to finish your choice, or Cancel
to exit without making any changes.

When you are done, click OK at the bottom of the dialog.
To exit without making any changes, click Cancel. Another
way to close is to click the X in the upper right corner.

For a helpful reminder of many of the functions in the
Extensions dialog, click the ? in the upper right corner
of the box, point the mouse at an item in the box, and
click again. A message will appear to tell you what that
item is for.
|
