Your First Model
Initial version of
this tutorial was made by Smoke
OK peeps, this is the fun part !
Your first Quake Model (unless
you've already made one) is going to be a spiffy new animated
missile for the Rocket Launcher !
Creating a frame
First we are going to
create a single frame that we will use as the starting point for
our model. You create and edit the 3D frame with the frame editor.
Setting up the frame
editor
Before we start, we need to set up
the frame editor so you can see the model fairly well. Make sure
you have opened the editor by clicking the  button.
We are first going to change the
background color of the frame editor. To do this click
"Options|Edit" in the menu bar. It will bring up the options
dialog, now click the tab
that says "Frame editor" you will see a group with a
caption saying "Background color". In this group there
will be a little box with a number and the words "Palette
index" in front of it. Now press the button with
"..." on it to bring up a color palette. OK select a
color in the top row of the palette that looks like a nice gray
not too light and not too dark. After you click a color the
palette index should be set somewhere in the range 7 to 10.
That's where mine is set, most of the gfx in Quake are dark and
this gray color will allow you to see the objects better. Don't
select white unless your ready to be blinded :) OK now close the
options dialog by pressing the OK button
Now back to the frame editor.
Because we want to be able to line-up vertices later on, you
should press down the  button, to get parallel projection instead of
perspective projection.
button, to get parallel projection instead of
perspective projection.
Because a missile is a relatively
small model, we need to setup the viewer to get a close-up look
of the model, select a zoom factor of 900 % using the  button.
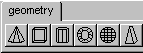
You will need to insert a lot of
objects from the object library in this tutorial. So if you can't
find the object library palette in the upper right corner of the
qME main
window you have a problem.
You should see something like this...
If for some strange reason you
can't find it, then something went wrong during installation of
qME. If you do see the geometry tab, then just skip to the next
paragraph. The "geometry" tab is nothing more than a
directory on you hard disk, so you need to find and select the
directory that contains the "geometry"
directory Let me repeat that... you need to find the directory
that contains the "geometry"
directory. You can change the directory by using the options
dialog under the general
tab and then select OK after you have set the path to the object
library correctly.
Now we've got all that setup, we
are ready to start editing.
Keep in mind that you can use
these  buttons to
select different views to help line things up and I highly
suggest it!
buttons to
select different views to help line things up and I highly
suggest it!
Creating a fin for our rocket
What we are going to do first is
create a fin for our rocket. Because there will be two fins in
our model, we are going to create a prefab fin model that we can
insert twice.
- Insert a cube by pressing the
 button on the
object library palette.
button on the
object library palette.
- Hit the
 button to
get the object scale tool.
button to
get the object scale tool.
- Click on the cube to select
it, then put a cursor in the scale boxes and scale the
cube down to .4 .7 .2. If you have typed in a value,
hitting the return key will actually set the value, but
also going to another edit box will set it.
- Now hit the
 button to
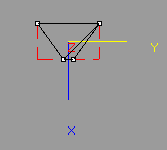
edit the vertices to make our cube look more like a fin.
Viewed from above with the render mode set to wireframe
this should look something like this:
button to
edit the vertices to make our cube look more like a fin.
Viewed from above with the render mode set to wireframe
this should look something like this:
- Now select
"File|Save Model" from the menu and save the
model in a file called "FIN.MDL". Remember
where you put it, you will need it shortly.
Note, you also
could put the fin into the object library. If you save the fin in
a directory on the same level as the geometry directory or in the
geometry directory itself, and you select
"Options|Edit" followed by clicking OK, the object
palette will be updated and your model will be available from the
object library.
Creating the rocket
- Lets start from scratch again
by selecting "File|New Model" .
- Now press the
 button on the
object library palette to put a sphere into your model.
button on the
object library palette to put a sphere into your model.
- Hit the button to
get the object scale tool.
- Click on the sphere to select
it, then put a cursor in the scale boxes and scale the
sphere down to .3 .3 .3.
- Now insert a cylinder
 and scale it
down to .7 .2 .2, pretty easy eh?
and scale it
down to .7 .2 .2, pretty easy eh?
- Now for some confusion, do
you see the colored lines? Good. Now, the blue line faces
the front of the model, we are making a missile so we
want the shaft (shaft = the cylinder you just added) to
point away from the front, like a tail. I'm not going to
show you exactly how to do it cause you have to learn how
to use the program sometime, but you should select the
object move tool
 to move objects around. Anyway, you'll know
when this isn't lined up right when you launch a missile
and it fly's sideways towards its destination :).
Anyway...after scaling the cylinder down, line it up
using the object move tool, so it sticks out of the
sphere and starts to look somewhat like a weird missile.
to move objects around. Anyway, you'll know
when this isn't lined up right when you launch a missile
and it fly's sideways towards its destination :).
Anyway...after scaling the cylinder down, line it up
using the object move tool, so it sticks out of the
sphere and starts to look somewhat like a weird missile.
- Now we need to insert our
fins into the model. Select "File|Merge Model"
and select your prefab "FIN.MDL". You will see
that a fin is merged into your model.
- Hit the
 button to get
the object rotate tool and select the fin you just
inserted. Put the cursor in the rotate boxes and rotate
the object to 90,0,0.
button to get
the object rotate tool and select the fin you just
inserted. Put the cursor in the rotate boxes and rotate
the object to 90,0,0.
- Now we need to insert the
second fin into the model. Select "File|Merge
Model" and select the "FIN.MDL" again.
- Use the object move tool to move the
fins to where a fin on a missile would go. Note that
these fins are supposed to stick out of BOTH sides of the
shaft. Just mess around with the fins until they look
good.
- Now insert a cone from the
object library palette. Rotate it 90 degrees on the Y
axis (hint: X Y Z).
Scale it down to .2 .2 .2 and put it on the end of the
shaft so it looks like a flame.
- Now, since this is a missile
from the Rocket Launcher we want it to glow and smoke so
we click this
 button. You should see the model
properties editor
now. In there you will see a check box under
"Flags" marked "Rocket Smoke Trail"
put a check mark in it and click OK. That will make the
model have the "EF_ROCKET" flag and when shown
in Quake it will glow and smoke. Cool eh? :)
button. You should see the model
properties editor
now. In there you will see a check box under
"Flags" marked "Rocket Smoke Trail"
put a check mark in it and click OK. That will make the
model have the "EF_ROCKET" flag and when shown
in Quake it will glow and smoke. Cool eh? :)
Read on, to find out how to paint
on your newly created model.
Painting a skin
You can paint on the
skin in either 2D with the skin texture editor or in 3D directly
on the model in the frame editor.
To use the 2D skin
texture editor, click this  button. You can also paint the skin with an external
paint program, just export it, paint on it and import it again. I
will teach you how to export or paint it within qME, I won't
teach you how to use a different program to paint it though :).
button. You can also paint the skin with an external
paint program, just export it, paint on it and import it again. I
will teach you how to export or paint it within qME, I won't
teach you how to use a different program to paint it though :).
Internal painting
- Select the
 button to
get the pencil.
button to
get the pencil.
- To select the color you want
to use in painting, select a color from the color palette
you normally find on the bottom of the main window. You
also can right click on the skin to select a color
already present in the skin itself.
- Draw, either in the Skin
Texture Editor or in the Frame Editor.
External painting
Now if you want to paint your skin
in a different program (like Paint Shop Pro) this is what ya do.
- Click in the upper left panel
that contains these
 lines.
- Select the skin you want to
paint on, in this case it will most likely be called
"new skin". To change the name of the skin
click on the skin you want to rename and click the name
label. After clicking it, the label will go into edit
mode. Anyway, select the skin you want to export (NOTE:
you MUST select a skin before you can export and if there
are more than one skin, select the right one!) now use
the "File|Export Skin" menu to save the skin.
- Select a place and name for
the file you are exporting and click OK.
- Fire up your fav paint
program on it and DRAW! =▐~
- After drawing the skin in a
different program you might want to import it into your
new model. So, if you closed qME open it back up and open
your model, click "File|Import Skin" menu to
find the file that contains your skin and click OK.
- Now if the skin you just
imported is not the FIRST in the list, grab it (left
click drag) and drag it onto the first skin this will
move it to the first place in the list.
- Voila your first Quake model
with qME ! Pretty easy huh? :)
Read on, to find out how to add
animation frames to your model.
Animating the model
Now we are going to add some
animation frames.
What we are trying to accomplish
here is making the rocket look more realistic during flight. If
you ever have seen a real missile launch from close by, you might
have noticed that these things behave quite differently from the
normal Quake missiles. In particular at take-off the missiles
control mechanisms that guide it make it jump wildly as it hurls
towards it target.
What we are going to do is add a
client side animation. This means you can let Quake do the
animation playing without programming a single line of QC code !
To create an animation this is
what you need to do.
- First we need to set up the
joints in the model. Joints are the animation parameters
that define motion for the model. Select the root object
in the object tree panel, right click and select "Edit
Object Joints" from the local menu.
- Now in the dialog you see
now, check the TY and TZ boxes and give the joints the
names "left right" and "up down".
Click close to close the dialog. We now have created two
joints in our model that allow us to control the
animation in the Joint Track Editor.
- Now select our single frame
in the frame tree panel, right click and duplicate the
frame 10 times, then duplicate the first frame again, so
you get a total of 12 frames.
- Well lets start animating !
Open the Joint Track Editor by pressing the
 button and
select the cells in the first column of the grid. Press
the
button and
select the cells in the first column of the grid. Press
the  button to turn these two values into key values. The
values turn now from gray in to black, which means you
can change them. You need to double click the values to
edit them.
button to turn these two values into key values. The
values turn now from gray in to black, which means you
can change them. You need to double click the values to
edit them.

- Well go on with changing gray
tween values into key values for frame 4, 6,7 and finally
frame 10. If you are finished with changing the key
values, press the
 button. This will calculate the in-between
values and update the model. Your grid should now look
exactly likethe one you see above.
button. This will calculate the in-between
values and update the model. Your grid should now look
exactly likethe one you see above.
- Now go to the frame editor
and play the animation by using the green play button
from the animation controls
 and see how the rocket jumps up
and down and moves from left to right.
and see how the rocket jumps up
and down and moves from left to right.
- Finally we need to instruct
Quake that it needs to play the animation automatically.
To do this, right click the scene in the frame tree panel
and select "Group Frames for Scene" from the
local menu. Now we are halfway there. Again select the
scene and right click it again and choose "Edit
Duration of Frames for Scene". Make all durations
'0.05' which will play back the animation at a framerate
of 20 frames per second.
Read on to find out how you can
use your new rocket in Quake.
Using your missile in Quake
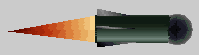
Well this is what I got in the
end, does yours look anything like it ?
OK, now you wanna see the thing in
Quake right? Right. This is what ya do. Let's assume you
installed Quake in C:\QUAKE\, then this is the root directory for
new game patches. If you installed Quake in another directory,
that's OK, use that directory in the description below whenever
you see C:\QUAKE\ in the text.
We are going to create a new game
patch to view our missile. Use the explorer or a DOS box to
create the MYMDL sub directory directly under the game root. Then
create a PROGS sub directory directly under that one. The result
should be C:\QUAKE\MYMDL\PROGS\ . Now go back to qME and choose
"File|Save As" to save your model as MISSILE.MDL in the
PROGS directory you just created (You don't have to type the
extension, qME will automatically put ".mdl" at the
end!)
Now you start a DOS box, change
the current directory to C:\QUAKE\ and type :
quake -game mymdl +map e1m1
Now once you're inside Quake bring
down the console with "~" and type "impulse
9" this will give you the rocket launcher and all other
weapons.
Now get ready for some serious
gibbing with your collection of spanking new rockets :)
If you want to see your missile a
little less in motion, save it as GRENADE.MDL in the same PROGS
directory where you saved it as MISSILE.MDL, this will replace
the grenade with your missile model. You will then see your
missile bouncing of walls instead of the normal grenade.