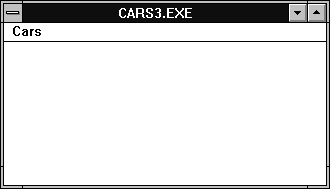
Figure A - The Windows version of this application looks like the TurboVision version.

In last month's issue of Borland C++ Developer's Journal, we showed how you could apply a Model/View/Controller (MVC) design to a command-line DOS program using version 3.1 of the Borland C++ compiler (C++ Design - Implementing a Model-View-Controller design in C++). In that article, we migrated our example application to the TurboVision application framework in order to show how an MVC design could add portability to your applications.
However, a TurboVision application determines for itself how it will handle events, draw windows, and so forth. Moving a DOS or TurboVision application to the Windows platform can be difficult because Windows handles some of these issues for you.
In this article, we'll show how you can use the view classes
that are part of version 2.0 of the ObjectWindows Library (OWL)
to simplify migrating an MVC design to an equivalent Windows application.
In addition, we'll describe some new model classes you
can create that will be compatible with the DOS and TurboVision
versions of the application.
A common approach to using an application framework like TurboVision or OWL is to derive new display classes from the ones the framework provides. For example, if you want to display a dialog box in an OWL application, you can derive a new class TMyDialog from the TDialog class and then create data members for each of the TButton, TEdit, or TListBox objects that will appear in the dialog box.
One advantage of this approach is that it lets you easily access the individual display objects inside member functions of the TMyDialog class. However, if you're not going to change the behavior of the dialog box itself (for example, what happens when you double-click on an item in the dialog box's list box), you may not need to create the TMyDialog class.
In this case, instead of deriving a new class from the TDialog class, you can simply add the individual display objects to a standard TDialog object. Using the existing display classes this way has at least two advantages.
The most obvious advantage of using the existing classes is that Borland has already tested and debugged them. If you derive your own classes from the OWL classes, you may need to perform extensive testing to confirm that your additions or changes haven't introduced bugs.
A more subtle advantage is that you won't be able to place in the view classes functionality that truly belongs in the controller classes. If, for example, you decided to create the TMyDialog class, you might be inclined to override some of the initialization functions from the TDialog class in order to preset values in the various display objects that appear in the dialog box.
If you use the existing OWL classes, you'll have to use the transfer buffer mechanism that Borland provides for the TDialog class to initialize the dialog box's display objects. (For more information on initializing a dialog box from a transfer buffer, see ObjectWindows 2.0 - Using transfer buffers with OWL 2.0 list boxes) By initializing the view objects from the corresponding controller class, you'll have successfully transferred the MVC design technique to your OWL application.
Now, let's migrate the CARS.EXE TurboVision application
from last month's article to an OWL 2.0 application for
Windows. We'll use the previous model and view classes
for this application and change only the implementation of one
member function from the controller class.
One benefit you'll see from using an MVC design in your programs is that it tends to isolate the model classes from changes in the view and controller classes. In this example, we'll reuse the AUTOMOBI.H header file from last month. For your convenience, this file appears in Listing A.
Listing A: AUTOMOBI.H
class Automobile
{
  char make[20];
  char model[20];
  int  year;

 public:
  Automobile(char* ma, char* mo, int ye)
  { strcpy(make, ma);
    strcpy(model, mo);
    year = ye; }

  char* getMake()
  { return make; }

  char* getModel()
  { return model; }

  int getYear()
  { return year; }
};

class CarViewController
{
  Automobile** array;

 public:
  CarViewController(Automobile** ar) :
   array(ar) { }

  void displayModel();
};
To begin, launch the Borland C++ 4.0 Integrated Development Environment (IDE). If necessary, choose New from the File menu and enter the code from Listing A. (If you still have the file from last month, you won't need to re-enter it, but you'll need to copy it to the \CARS3 directory.) When you finish entering the code, choose Save from the File menu, enter AUTOMOBI.H in the Save File As dialog box, and then click OK.
Next, choose New Project... from the Project menu. In the New Project dialog box, enter \CARS3\CARS3.IDE in the Project Path And Name entry field, select Application [.exe] from the Target Type list box, select Windows 3.x (16) from the Platform combo box, and then select the OWL check box in the Standard Libraries section. Click OK to create the new project.
When the Project:\CARS3\CARS3.IDE window appears, double-click on the name CARS3 [.CPP]. When the editing window for this file appears, enter the code from Listing B.
Listing B: CARS3.CPP
#include <owl\applicat.h>
#include <owl\checkbox.h>
#include <owl\dc.h>
#include <owl\framewin.h>
#include <owl\owlpch.h>
#include <owl\eventhan.h>
#include <owl\listbox.h>

#include "automobi.h"

TApplication* myApp;

class TCars3App : public TApplication
{
  Automobile* arrayOfCars[3];
  public:
   TCars3App()
   { myApp = this;
     arrayOfCars[0] = new
       Automobile("Ford", "Probe GT", 92);
     arrayOfCars[1] = new
       Automobile("Honda", "Civic", 92);
     arrayOfCars[2] = new
       Automobile("Datsun", "240Z", 72); }
   ~TCars3App()
   { delete arrayOfCars[0];
     delete arrayOfCars[1];
     delete arrayOfCars[2]; };

   void InitMainWindow()
   { TFrameWindow* frame =
       new TFrameWindow( 0, "CARS.EXE");
     frame->AssignMenu(1);
     SetMainWindow( frame ); }

   void ViewCars();

  DECLARE_RESPONSE_TABLE(TCars3App);
};

DEFINE_RESPONSE_TABLE1(TCars3App,TApplication)
  EV_COMMAND(101,ViewCars),
END_RESPONSE_TABLE;


void
TCars3App::ViewCars()
{ // Respond to the View Cars command
  CarViewController control(arrayOfCars);
  control.displayModel();
}

void
CarViewController::displayModel()
{ // Display the dialog box list of cars
  TListBoxData listBox;
  for(int carCount = 0;
      carCount < 3;
      ++carCount)
  { listBox.AddStringItem(array[carCount]->
      getModel(), carCount); }

  TDialog* carListDialog =
    new TDialog(myApp->GetMainWindow(), 1000);

  TListBox* carListBox =
    new TListBox(carListDialog, 1500);
  carListBox;
  carListDialog->SetTransferBuffer(&listBox);
  carListDialog->Execute();
  carListDialog->Destroy();
}

int
OwlMain(int, char**)
{
  return TCars3App().Run();
}
When you finish entering the code, choose Save from the File menu. Then, choose New from the File menu and enter the resource code from Listing C in the editing window that appears.
Listing C: CARS3.RC
1000 DIALOG 6, 15, 154, 128
CAPTION "CARS"
{
 PUSHBUTTON "OK", IDOK, 54, 106, 50, 14
 LISTBOX 1500, 15, 12, 124, 82, LBS_STANDARD
}

1 MENU
{
 POPUP "Cars"
 {
  MENUITEM "View Cars", 101
 }
}
When you finish entering the code for the resource file, choose Save from the File menu, enter CARS3.RC in the Save File As dialog box, and then click OK. To allow the compiler to use its default module definition file, right-click on the name CARS3 [.DEF] in the project window and choose Delete Node from the pop-up menu. Click Yes when the IDE asks if you want to delete this node.
Now, build and run the application by choosing Run from the Debug menu. When the compiler finishes building the application, the main window for the CARS3.EXE application will appear, as shown in Figure A.

Figure A - The Windows version of this application looks like the TurboVision version.
To display the list of cars, choose View Cars from the Cars menu.
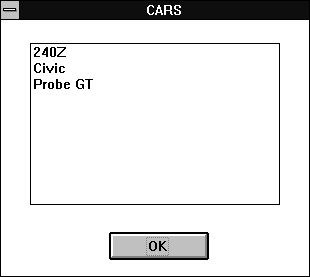
When the CARS dialog box appears, it will resemble the one shown
in Figure B.

Figure B - You'll see the same information in the Windows dialog box that you saw before.
When you finish viewing the list of cars, click OK. To exit the
CARS.EXE application, double-click on its System menu icon.
You've seen that CARS3.EXE is functionally equivalent to the DOS and TurboVision applications. Now, let's take a closer look at the source code. As we mentioned earlier, we used the AUTOMOBI.H header file unchanged, so we'll go ahead and examine the CARS3.CPP file. If you've built an OWL 2.0 application before, most of this code won't require much explanation.
First, we derive a new application class, TCars3App, from the TApplication class. Upon close examination, you'll notice that the constructor and destructor code for the TCars3App class and the TCarsApp class from last month's article are almost identical. In fact, the only significant differences between these two classes and their corresponding member functions are the differences between an OWL 2.0 application and a TurboVision application.
As evidence of this, compare the member function TCars3App::ViewCars() with the TCarsApp::ViewCars() member function. The bodies of these two member functions are the same.
The real meat of this program occurs in the CarViewController::displayModel() member function. In this function, we bring together the interface functions from the Automobile class (our model) and the interface functions from the OWL TDialog and TListBox classes (our view classes).
In the CarViewController::displayModel() member function, we begin by creating a TListBoxData object. Borland provides this class as part of the OWL framework so you can easily initialize the contents of the list box that a TListBox object controls.
Typically, you'll make a TListBoxData object part of a structure that contains transfer buffer elements for each display object that appears in the dialog box. However, since our dialog box contains only one display element (the list box), we can use a TListBoxData object by itself.
After we initialize the transfer buffer element with the data from the array of Automobile objects, we create a new TDialog object from resource ID 1000. Then, we create a new TListBox object that will correspond with resource ID 1500. (You'll need to create this TListBox object to use the transfer buffer mechanism.)
Finally, we pass the address of our TListBoxData object
to the dialog box object's SetTransferBuffer()
member function and display the dialog box by calling its Execute()
member function.
So far, we've created only one model class: Automobile. However, you can also create model classes to describe higher-level work.
For example, if you want to read the data for a number of Automobile objects from a disk file, you can create a model class called Garage that manages retrieving these objects from the file. In reality, this would present a more accurate model class for the view classes we're using, since the CARS dialog box displays a set of Automobile objects.
In a future issue, we'll add this type of functionality
by implementing our example application using the ObjectWindows
Doc/View architecture. Since the Doc/View model is a straightforward
extension of the Model/View/Controller design technique we've
shown here, this process will be fairly simple.
In our original command-line DOS program, CARS.EXE, we created
a model class that is still usable for the OWL version of this
program, CARS3.EXE. By carefully applying the MVC design process
to your applications, you can gain this level of portability and
insulate stable components from those that change frequently.
Copyright (c) 1996 The Cobb Group, a division of Ziff-Davis Publishing Company. All rights reserved. Reproduction in whole or in part in any form or medium without express written permission of Ziff-Davis Publishing Company is prohibited. The Cobb Group and The Cobb Group logo are trademarks of Ziff-Davis Publishing Company.