
September, 1994 - Vol. 1 No. 9
Achieving application portability is one of the more sought-after goals of today's programmer. However, if you're interested in writing portable applications, there aren't many user interface class libraries or application frameworks that cover every possible computing platform (DOS, Windows, OS/2, Macintosh, and so on). In addition, many programmers are discovering that customizing some of the interface classes from an existing library can be complicated.
In this article, we'll show how you can isolate much of
your application's core classes from the user interface
classes by using a Model-View-Controller (MVC) design. By applying
this technique to your Borland C++ projects, you'll simplify
any transition from one platform to another.
As the name implies, MVC designs have three components: the Model, the View, and the Controller. Let's look at each of these elements separately.
The Model component is the class or classes that implement the internal structure of the data that your program manipulates. For example, if you're writing a program that monitors activities in the stock market, you might create classes like Stock, Future, ItemTransaction, and so on. Since each of these classes models an element of the real-world system, we'll call them model classes.
The View component of an MVC design is the class or classes that communicate information or commands to and from the user. The standard streams cin and cout, the TInputLine class in the TurboVision framework, and the TListBox class in the ObjectWindows Library (OWL) are examples of view classes.
The Controller component is perhaps the most complex part of an MVC design. For any given view class you use to display the data from a specific model class, there will be a corresponding class that controls the transfer of information between the model and view.
Since this controller class uses the member functions of
both the model class and the view class, it will change if either
the model or the view member functions change. However, if you
write the controller class correctly, you'll be able to
change the content of the corresponding view easily, and you'll
frequently be able to use off-the-shelf view classes instead of
writing your own or customizing an existing library class.
To demonstrate how you can apply this design technique with Borland C++, let's create a very simple command-line application and then migrate it to the TurboVision framework. In future issues, we'll move this application to Windows by using the OWL 2.0 framework.
The purpose of this application is to display descriptions of three automobiles. Therefore, the model class for the application will maintain the make, model, and year of each vehicle.
Initially, we'll write the program with a command-line interface. To implement this version, the view class that displays the descriptions of the cars is ostream_withassign (cout is a global object of this class).
Finally, we'll create a controller class that retrieves
the appropriate information from the model class. After formatting
the information (if necessary), the controller class will pass
that information to the view class.
To begin, create a new subdirectory of the \BORLANDC directory and name it CARS. Make CARS the current directory and launch the Borland C++ 3.1 DOS Integrated Development Environment (IDE).
When the IDE's menu bar and desktop appear, choose New from the File menu. In the empty data-file window that appears, enter the code from Listing A.
Listing A: AUTOMOBI.H
class Automobile
{
  char make[20];
  char model[20];
  int  year;

 public:
  Automobile(char* ma, char* mo, int ye)
  { strcpy(make, ma);
    strcpy(model, mo);
    year = ye; }

  char* getMake()
  { return make; }

  char* getModel()
  { return model; }

  int getYear()
  { return year; }
};

class CarViewController
{
  Automobile** array;

 public:
  CarViewController(Automobile** ar) :
   array(ar) { }

  void displayModel();
};
After you've finished entering this code, choose Save from the File menu to display the Save File As dialog box. Then, enter AUTOMOBI.H in the dialog box's Save File As entry field and click OK.
Next, choose New from the File menu again. When the new data-file window appears, enter the code from Listing B.
Listing B: CARS.CPP
#include <iostream.h>
#include <string.h>
#include "automobi.h"

void CarViewController::displayModel()
{ for(int carCount = 0;
      carCount < 3;
      ++carCount)
  {
    cout << array[carCount]->getModel();
    cout << endl; }
}

int main()
{
  Automobile* carArray[3];

  carArray[0] = new
    Automobile("Ford", "Probe GT", 92);
  carArray[1] = new
    Automobile("Honda", "Civic", 92);
  carArray[2] = new
    Automobile("Datsun", "240Z", 72);

  CarViewController control(carArray);

  control.displayModel();

  delete carArray[0];
  delete carArray[1];
  delete carArray[2];

  return 0;
}
Use the same technique you used before to save this file as CARS.CPP. When you've saved the file, choose Compile from the Compile menu.
When the compiler finishes building the CARS.EXE executable, choose
DOS Shell from the File menu. At the DOS command prompt, enter
CARS. You should see
Probe GT
Civic
240Z
Enter EXIT to return to the DOS IDE. To close the data-file
windows for the CARS.CPP file and the AUTOMOBI.H file, choose
Close All from the Window menu.
To begin creating a TurboVision version of this program, create a new project file by choosing Open... from the Project menu. Then, enter CARS2.PRJ in the Open Project File entry field of the dialog box and click OK.
Now, choose New from the File menu. In the empty data-file window, enter the code from Listing C.
When you finish entering this code, choose Save from the File menu to display the Save File As dialog box. Enter CARS2.CPP in the dialog box's Save File As entry field and click OK. Now, you'll add this file to the current project.
Choose Project from the Window menu to make the Project window the front window. Then, choose Add Item... from the Project menu to display the Add To Project List dialog box.
Enter CARS2.CPP in the dialog box's Name entry field and click Add. When the dialog box reappears, click Done.
To set the memory model for this project (the TurboVision framework requires the Large memory model), choose Compiler from the Options menu and then choose Code Generation... from the Compiler submenu. In the Code Generation dialog box, select the Large radio button in the Model section and then click OK.
To set the Linker options, choose Linker from the Options menu and then choose Libraries... from the Linker submenu. In the Libraries dialog box, select the TurboVision check box in the Libraries section and then click OK.
To make sure that the compiler can locate the appropriate header
and library files, choose Directories... from the Options
menu. In the Directories dialog box, add
\BORLANDC\TVISION\INCLUDE;\BORLANDC\CLASSLIB\INCLUDE;
to the Include Directories entry field and add
\BORLANDC\TVISION\LIB;\BORLANDC\CLASSLIB\LIB;
to the Library Directories entry field. Click OK to save these
changes.
In most respects, CARS2.CPP is a minimal TurboVision application. Therefore, we won't discuss the TCarsApp class's initMenuBar() and initStatusLine() member functions or the main() function. Instead, let's examine the constructor, destructor, and handleEvent() function for the TCarsApp class and the new version of the CarViewController class's displayModel() function.
In the command-line version of this program, we created the primary data structures in the main() function. In the TurboVision version, we've moved these structures to the TCarsApp class and moved the allocation and deallocation of these items to the TCarsApp class's constructor and destructor.
In the TCarsApp class's handleEvent() function, we examine each event. If the user selects the View Cars... command, we call the displayModel() function of the application's CarViewController object.
In the displayModel() function of the CarViewController class, we create a new TStringCollection object and insert copies of the strings that describe the cars. Next, we create a standard TurboVision dialog box and place in it a TListBox object and a TScrollBar object. To allow the list box to display the items in the string collection, we call the list box's newList() member function. Finally, we display the dialog box and then clean up by destroying the dialog box and deleting the string collection.
To build and run this application, you choose Run from the Run menu. When the compiler finishes building the CARS2.EXE file, the program's menu bar and desktop will appear.
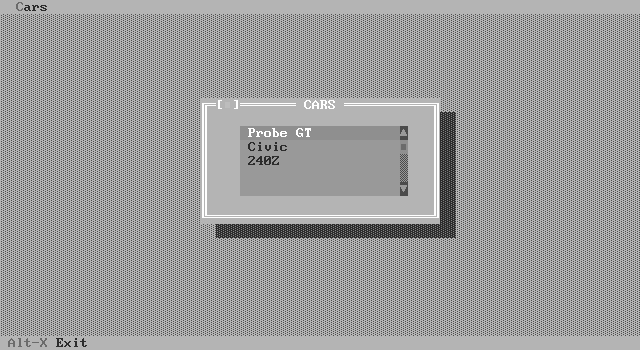
To display the list of cars, choose the View Cars...
command from the Cars menu. When the CARS dialog box appears,
it will display the same list that appeared in the command-line
version, as shown in Figure A.
Figure A - The CARS2 application displays the same data by using the model class from the CARS application.

As you've probably noticed, the Automobile class contains data members that we're not currently displaying ( make and year). You can easily modify the CarViewController class's displayModel() function to add this information.
First, add the following #include statement immediately
below the one for <string.h>:
#include <stdio.h>
This statement lets you use the sprintf() function to format the Automobile class's year data member as a character string.
Then, add the following lines to the CarViewController::displayModel()
function:
strcat(temp, " - ");
char temp2[3];
sprintf(temp2, "%d - "
        array[carCount]->getYear());
strcat(temp, temp2);
strcat(temp, array[carCount]->getMake());
(You'll add these lines after the line that calls the strcpy() function, but before the call to the atInsert() member function of the carModelStrings object.)
To rebuild and rerun the application, choose Run from the Run menu. Again, the CARS2 menu bar and desktop will appear.
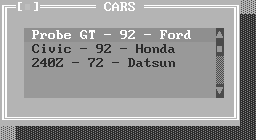
Redisplay the list of cars. This time, you'll see the year
and make data for each Automobile object in
the list, as shown in Figure B.

Figure B - You can change the information that appears in the view class objects by modifying the controller class.
To quit the CARS2 application, choose Exit from the CARS menu.
When the IDE reappears, choose Exit from the File menu.
One issue you may have noticed is that our program now has two lists relating to the Automobile objects. The first is the array of Automobile objects itself, and the second is the collection of strings that describe the Automobile objects.
By default, the TStringCollection class will sort alphabetically any string you add to the collection by using the insert() member function. By using the atInsert() member function instead, we're able to place the strings in the same positions that their corresponding Automobile objects have in the array.
If you need to let the user select an item based on its position
in the list box, you'll need to synchronize the two lists
in a similar manner. Otherwise, the index the view returns to
the controller object may not correspond to the appropriate element
in the model.
Copyright (c) 1996 The Cobb Group, a division of Ziff-Davis Publishing Company. All rights reserved. Reproduction in whole or in part in any form or medium without express written permission of Ziff-Davis Publishing Company is prohibited. The Cobb Group and The Cobb Group logo are trademarks of Ziff-Davis Publishing Company.