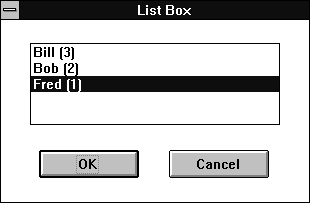
Figure B - The main dialog box's list box contains all the data we placed in the transfer buffer.

Even a trivial Windows application will use dialog boxes. Modal dialog boxes, in particular, provide an excellent form of communication between your application and the user. Unfortunately, initializing a list box in a dialog box and retrieving the selected item from the user in a traditional Windows application can be an error-prone process.
In this article, we'll show how you can use a transfer
buffer to initialize list boxes easily in a dialog box of an ObjectWindows
Library (OWL) 2.0 application. In addition, we'll show
how you can use the transfer buffer to store and retrieve data
other than just the index of the selected item.
In a Windows application written in C, you'll specify most of the behavior of a dialog box in its corresponding dialog box procedure. As you're probably aware, Windows will call your dialog box procedure any time Windows needs to send a message to the dialog box. Figure A shows the format of a routine dialog box procedure.
Figure A - In a traditional Windows application, you typically perform the initialization and data retrieval from a dialog box procedure.
BOOL CALLBACK _export MyDlgProc(HWND hDlg,
    UINT msg, WPARAM wParam, LPARAM lParam)
{
  int selectedItem;
  switch(msg)
  {
  case WM_INITDIALOG:
    char* str1 = "Bob";
    char* str2 = "Bill";
    char* str3 = "Fred";
    // Add the strings
    SendDlgItemMessage(hDlg, IDD_LIST,
                LB_ADDSTRING, 0, (LPARAM) str1)
    SendDlgItemMessage(hDlg, IDD_LIST,
                LB_ADDSTRING, 0, (LPARAM) str1)
    SendDlgItemMessage(hDlg, IDD_LIST,
                LB_ADDSTRING, 0, (LPARAM) str1)
    // Select Item 0
    SendDlgItemMessage(hDlg, IDD_LIST,
                LB_SETCURSEL, 0, 0)
    return FALSE;

  case WM_COMMAND:
    switch(wParam)
    {
    case IDOK:
      selectedItem = SendDlgItemMessage(hDlg,
                IDD_LIST, LB_GETCURSEL, 0, 0);
      // Take action on the selected item
      break;

    case IDCANCEL:
      EndDialog(hDlg, NULL);
      break;
    }
  default:
    return FALSE;
  }
  return TRUE; // We handled this message
}
As you can see, Windows holds the string and index information. If you want to perform multiple operations on the strings that appear in the list box, you'll need to build an array and initialize each element yourself. If you create the list box using the LBS_SORT flag (to automatically sort the strings alphabetically), you'll need to alphabetize your array as well.
If you want to redisplay a dialog box at a later time and reinitialize
its controls to the same values they had before, you'll
need to write code to store these values and then reset each control.
To reinitialize a list box this way would be cumbersome.
The basic purpose behind using the OWL framework is simplifying Windows programming. To this end, OWL 2.0 uses a mechanism introduced in OWL 1.0: transfer buffers.
For each type of control that can display data in a dialog box, there is a corresponding type of transfer buffer. Table A shows the relationship between the OWL objects you use to create and manipulate a dialog box, their transfer buffers, and the Window controls the OWL objects use.
Table A - In an OWL application, an OWL object can use a transfer buffer to communicate with its corresponding Windows controls.
| TStatic | char [] | Static Text |
| TEdit | char [] | Edit Field |
| TList Box | TListBoxData | List Box |
| TComboBox | TComboBoxData | Combo Box |
| TRadioButton | WORD | Radio Button |
| TCheckBox | WORD | Check Box |
For complex dialog boxes, you'll create a structure that contains an appropriate type of transfer buffer for each Windows control you want to initialize. (If you don't want to initialize a particular control, call the corresponding OWL object's member function SetTransferStatus(FALSE).)
When you're ready to initialize the dialog box, you'll need to create an instance of your transfer buffer structure. After you've initialized each element of the transfer buffer structure, you'll need to make sure an OWL object exists for each control. Then, you'll call the SetTransferBuffer() member function of the TDialog-derived object with the structure's address.
When you call the TDialog-derived object's Execute() member function, each OWL object will initialize its control using part of the data from the transfer buffer structure. (Because the OWL objects perform this action in the same order you created them, you'll need to make sure the corresponding transfer buffer in the structure appears in this order as well.)
Finally, if the user exits the dialog box and the Execute()
function returns the value IDOK, you'll be able
to extract data values from each element of the transfer buffer.
If the user cancels the dialog box instead, the OWL objects won't
update the transfer buffer, and it will contain the same data
as before.
For list boxes, you'll use a transfer buffer that's an instance of the TListBoxData class. This class provides four key data members you can use to initialize and retrieve data from a list box: SelCount, SelIndices, Strings, and ItemDatas.
SelCount is an integer value that equals the number of items the user selected. You'll never set this value directly; OWL will set it for youbut only if the user clicks an OK button.
SelIndices is an array of integers beginning with item 0. This array contains the index of each item the user selected. (You'll use the SelCount data member to determine how many items in this array are valid.)
Strings is an array of string objectsnot to be confused with String objects from the standard library class. Each element of this array contains the text for an item in the list box. You can return a pointer to the actual string by calling the c_str() member function of a string object. By the way, if you create the list box using the LBS_SORT style, the OWL framework will automatically rearrange these strings into alphabetical order.
ItemDatas is an array of DWORD values. You don't
have to use this array, but if you do, you can place in it ID
numbers, initial indices, or even pointers to objects (since a
DWORD is an unsigned long value). If the OWL framework
rearranges the strings in the Strings data member, it
will rearrange the ItemDatas values accordingly.
To see how transfer buffers work with list boxes, let's build a simple OWL 2.0 application that displays a dialog box and then reports information about what a user selected in a message box. To begin, launch the Borland C++ 4.0 Integrated Development Environment (IDE).
When the IDE's main window appears, choose New Project... from the Project menu. In the New Project dialog box, enter \TRANSBUF\TRANSBUF.IDE in the Project Path And Name entry field, select Application [.exe] from the Target Type list box, select Windows 3.x (16) from the Platform combo box, and then select the OWL check box in the Standard Libraries section. Click OK to create the new project.
When the Project window appears, double-click on the name TRANSBUF [.CPP]. When the editing window for this file appears, enter the code from Listing A.
Listing A: TRANSBUF.CPP
#include <owl\applicat.h>
#include <owl\checkbox.h>
#include <owl\dc.h>
#include <owl\framewin.h>
#include <owl\owlpch.h>
#include <owl\eventhan.h>
#include <owl\listbox.h>
#include <stdio.h>

class TBufferApp : public TApplication
{
  public:
	 TBufferApp() {}
	 ~TBufferApp() {}

	 void InitMainWindow()
   { TFrameWindow* frame =
       new TFrameWindow( 0, "TRANSBUF.EXE");
     frame->AssignMenu(1);
     SetMainWindow( frame ); }

	 void ViewList();

	DECLARE_RESPONSE_TABLE(TBufferApp);
};

DEFINE_RESPONSE_TABLE1(TBufferApp,TApplication)
  EV_COMMAND(101,ViewList),
END_RESPONSE_TABLE;

struct MyDialogBuffer
{
  TListBoxData list;
};

void TBufferApp::ViewList()
{
  MyDialogBuffer buf;

  buf.list.AddStringItem("Fred (1)", 100, TRUE);
  buf.list.AddStringItem("Bob (2)", 23);
  buf.list.AddStringItem("Bill (3)", 506);

  TDialog* dialog =
    new TDialog(GetMainWindow(), 1000);

  TListBox* listbox = new TListBox(dialog, 1500);
  listbox;
  dialog->SetTransferBuffer(&buf);
  while(dialog->Execute() == IDOK)
  {
    char temp[80];
    int idx = buf.list.GetSelIndices()[0];
    int itemID = (int)buf.list.GetItemDatas()[idx];
    const char* itemText = buf.list.GetStrings()[idx].c_str();
    sprintf(temp,
            "You selected %s, ID %d at index %d",
            itemText,
            itemID,
            idx);
    GetMainWindow()->MessageBox(temp, "Selected Item Detail");
  }
  dialog->Destroy();
}

int
OwlMain(int, char**)
{
  return TBufferApp().Run();
}
When you finish entering the code, choose Save from the File menu. Then, choose New from the File menu and enter the resource code from Listing B in the editing window that appears.
Listing B: TRANSBUF.RC
1000 DIALOG 19, 15, 154, 91
STYLE WS_POPUP | WS_CAPTION | WS_SYSMENU
CAPTION "List Box"
{
 DEFPUSHBUTTON "OK", IDOK, 19, 65, 50, 14
 LISTBOX 1500, 15, 12, 124, 45, LBS_STANDARD
 PUSHBUTTON "Cancel", IDCANCEL, 84, 65, 50, 14
}

1 MENU
{
 POPUP "Menu"
 {
  MENUITEM "Dialog", 101
 }
}
When you finish entering the code for the resource file, choose Save from the File menu, enter TRANSBUF.RC in the Save File As dialog box, and then click OK. To allow the compiler to use its default module definition file, right-click on the name TRANSBUF [.DEF] in the project window and choose Delete Node from the pop-up menu. Click Yes when the IDE asks if you want to delete this node.
To build and run the application, choose Run from the Debug menu. When the TRANSBUF.EXE window appears, choose Dialog from the menu. When the dialog box appears, it should resemble the one shown in Figure B.

Figure B - The main dialog box's list box contains all the data we placed in the transfer buffer.
Notice that the selected item in the list boxFred (1)was the first item we added to the transfer buffer, but it now appears at the end of the list. This is true because we used the LBS_STANDARD style in the resource description of the list box, which specifies the LBS_SORT option to sort the list items alphabetically.
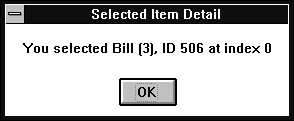
Click on the item Bill (3) and then click OK. When the dialog box disappears, a message box will appear in its place. In this message box, you'll see the correct text, ID number, and index data for this item, as shown in Figure C.

Figure C - If you click OK in the dialog box, you'll see detailed information about that item in this message box.
When you dismiss the message box, you'll notice that the dialog box reappears with the item Bill (3) selected. Since the association between the dialog box object dialog and the transfer buffer buf is still valid (we haven't destroyed either object), the dialog box object will reinitialize the list box control with previous values. If you cancel the dialog box and then redisplay it, you'll notice that the ViewList() function resets the current selection to Fred (1).
To exit the application, double-click on its System menu icon. To exit the IDE, choose Exit from the File menu.
Next month, we'll show how you can use a transfer buffer
to manipulate a more complex dialog box. In addition, we'll
look at the transfer buffer elements for the other Windows controls,
including combo boxes.
Transfer buffers are a valuable component of the OWL framework.
By taking advantage of transfer buffers in your OWL 2.0 applications,
you'll simplify communication between your dialog box and
the rest of the application.
Copyright (c) 1996 The Cobb Group, a division of Ziff-Davis Publishing Company. All rights reserved. Reproduction in whole or in part in any form or medium without express written permission of Ziff-Davis Publishing Company is prohibited. The Cobb Group and The Cobb Group logo are trademarks of Ziff-Davis Publishing Company.