Each ConceptDraw shape is described by dozens of parameters, such as numbers,
text or formulas.
All the parameters are brought together in the shape parameter table
where you can modify any of them. The table thus gives you full control over
the appearance and behavior of the shape.
Displaying the Shape Parameter Table
The Table's Sections
Formulas
Adding Control Handles to a Shape
Adding User-Define Context Menu to a Shape
Using Formulas to Control Shapes
Variables Describing a Document
Function Reference
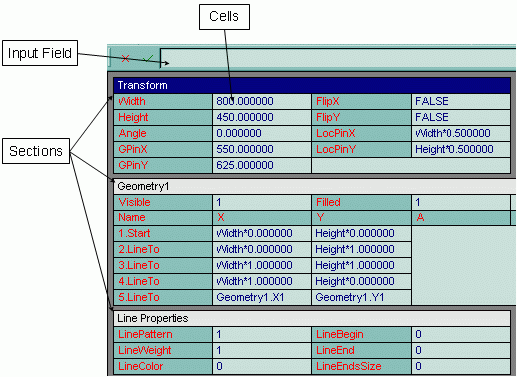
To call the Parameter Table of a shape, select it and use the Show Table command from the Shape menu, or just press the F3 key. This will open the shape's table in a new window.
You can use the following elements of the table:
- the input field lets you edit the contents of the selected
cell (enter the value or formula);
- the sections represent groups of parameters: transform characteristics,
geometries, line properties, fill format, text format, protection, etc.;
- the cells show the value or formula for each parameter of
the shape; you can select a cell and modify its contents in the input field;
The menu bar holds the commands which you can apply to the table (save the table, modify the table view, manipulate sections, etc.).
The input field is at the top of the window. When you click
a cell in the table, its contents appears in the input field where it can be
edited.
By double-click a cell its contents in the input field will also become selected.
To finish editing and apply the changes, press the Enter key.
To return to the initial values, press the Esc key.
You can also use the corresponding buttons to the left of the input field.
If you enter an invalid formula or value, the program will display an error
message.
A cell is the place where the application stores a certain
parameter of the shape.
To select (activate) a cell, just click it with the
mouse. Once the cell is active, you can edit its content in the input
field at the top of the table window. You can use the Arrow
keys to activate another cell.
To quickly start editing, double-click the needed
cell, and its content appears selected in the input field.
What you see in the cell depends on which viewing mode is set for
the table: Values or Formulas.
When in the Values mode, all cells show the values in the current
units of measure set for the document.
When the Formulas mode is on, all cells that contain formulas
display the formulas. The cells which have no formulas show the values in the
tenths of millimeter or in radians (for angles).
To switch to the needed view mode, just check the corresponding option
in the View menu.
Note that if a cell contains a formula, the input field will always
show a formula when you select the cell, regardless of the viewing
mode.
You can input values in the units of measure other than default, by specifying the corresponding suffix after the number, e.g. 12 in, 3.5 ft, 0.66 m. When editing a cell, you can use the data stored in another cell, by clicking that cell with the mouse:
| Single click on a cell | Inserts the formula from the cell you clicked into the input field |
 Ctrl + click on a cell
 Cmd + click on a cell
 |
Inserts the numeric value of the cell into the input field |
|
Inserts the cell title into the input field (to refer to it in formulas) |
The Shape Parameter Table has a number of sections. Each section describes a certain property of the shape (for instance, its position, dimensions, text, etc.). You can hide any section or make it visible again. To show/hide the sections, use the View Sections dialog (select Sections in the View menu).
Some sections may be missing if the shape does not have the corresponding attribute or function (for instance, control handles or the context menu).
To add sections, use the Insert Sections dialog. To call it, select Insert Section from the Edit menu.
Here is the list of sections the table may have: Transform, Geometry, Endpoints, Controls, Connect, Variables, Line Properties, Fill Format, Protection, Text Transform, Character Format, Paragraph Format, Text Block Format, Text Field, Miscellaneous, Actions, Glue Info, Custom Properties.
One of the sections is active (its title bar appears in blue). You
can edit the contents of the cells in the active section.
To activate a section, just click its title bar or
any of the cells inside it.
Each section can be minimized to its title bar. To minimize
a section, activate it and then click on its title bar.
If the section is minimized, you can click on the title bar again to
expand the section.
For some sections (such as Geometry, Controls, Connect, Variables, Font Format, Paragraph Format, Actions), a row of cells may describe a single element of the shape (such as a control handle, a linear segment of a figure, and so on). It this case, operations on the whole row are possible: Add Row, Delete Row. They are available from the Edit menu, or from the context menu.
For more information about the View Sections dialog see Dialogs - Modal Dialogs - View Sections.
By using formulas, you can make one parameter of a shape dependent on other parameters, or on the actions of the user. Here are some examples of formulas:
 |
Variables.X1+(Variables.X2-Variables.X1)*0.293 |
|
_min(0;Geometry1.X2-Variables.X2) |
|
=_IF(Variables.X1=1;_Setf("Variables.X1";0);_Setf("Variables.X1";1)) |
If you want to reference a cell in a formula, indicate the cell name (displayed in red near the cell), for instance Width, TextAngle, etc.
| <cell_name> |
The sections to which you can add cells (such sections as Geometry, Controls, Connect, Variables, Font Format, Paragraph Format, Actions) are referred to in a different way:
| <section_name>.<cell_name> |
The cell name is made up of the column name
and the line number,
For example: "Controls.YDyn1"; "Variables.Y2";
"Connect.X1".
For the Geometry section, the section name
also includes the section number - because a figure may have more than
one geometry.
For example: "Geometry1.Y1", "Geometry2.C2".
So, for the first two cells the names look like this: "Geometry1.Visible"
and "Geometry1.Filled".
Formulas often include functions. The full list of functions and their specifics can be found in the Function Reference section.
You may need to address cells describing other shapes.
Every shape has its identification number: you can see it in the title
bar of the table window, or on the Information tab of
the Shape Properties dialog (the ID field).
This ID is used when you address the parameters of the shape:
| <Shape_ID>.<section_name>.<cell_name> |
For example: "ObjID13.Geometry2.X1", "ObjID2.Width".
If the shape belongs to a group, the Parent prefix is used to access the group parameters:
| Parent.<section_name>.<cell_name> |
For example: "Parent.Height".
If you need to refer to a shape inside a group, the following structure is used:
| Child<number>.<section_name>.<cell_name> |
Íàïðèìåð: "Child2.Angle".
The number parameter corresponds to the order of the
shape within the group. You can find this number in the Information
tab of the Shape Properties dialog (the SubID
field).
The application creates some formulas automatically. Such formulas are called default formulas. For instance, when you create a line, the program will describe one of its parts as follows:

Here, "Width*0.75000" and "Height*0.666667" are default
formulas.
Due to these formulas the vertices maintain their relative positions with respect
to the alignment box of the shape when the shape is resized. These formulas
change automatically when you reposition the shape's vertices or the shape
itself.
If a formula has the "=" sign near it, it means
that the formula can not be changed in any way other than by editing its
cell.
If the formula hasn't the "=" sign before it, it
may be altered automatically when you modify the shape and apply actions which
change this parameter.
If the parameter indicates dimensions (width, height, etc.), you need to specify the unit of measure for the value. You can use the corresponding suffix after the value - for instance, 15 mm, 25 in, etc. For instance, the Width parameter of the Transform section can look like this:
=15 mm
If you don't specify the unit of measure, the value will be in ConceptDraw internal units (1 internal unit = 0.1 mm).
For angles the internal units of measure are radians. If you want to set angles in degrees, add "deg" to the value:
= 30 deg
Operators in Formulas
Starting from ConceptDraw V you can use operators in formulas, apart from the
logical functions AND,
_IF, _NOT,
_OR and XOR.
The following operators are supported: logical operators AND,
EQV, IMP, NOT,
OR, XOR; comparison operators
<, >, <=,
>=, =, <>;
exponentiation ^ or**; negation/subtraction
-; adding +; multiplication and division
*, /; integer division \;
modulo arithmetic MOD; string concatenation &.
Logical operators
Operator |
Description | ||||||||||||||||||||||||||||||
| AND | Logical "AND", conjunction. TRUE if both arguments
are TRUE, otherwise FALSE. If the arguments are numbers, performs bitwise
comparison. |
||||||||||||||||||||||||||||||
| EQV | Used to perform a logical equivalence on two expressions. For logical expressions returns TRUE only if both expressions evaluate to TRUE, or if both expressions evaluate to FALSE. The same (only bitwise) applies to numeric expressions. The following table illustrates how result is determined:
For numeric expressions.
|
||||||||||||||||||||||||||||||
| IMP | Used to perform a logical implication on two expressions.
For numeric expressions works bitwise. The following table illustrates how result is determined:
For numeric expressions.
|
||||||||||||||||||||||||||||||
| NOT èëè ! | Used to perform logical negation on an expression. For
numeric expressions works bitwise. The following table illustrates how result is determined:
For numeric expressions.
|
||||||||||||||||||||||||||||||
| OR | Used to perform a logical disjunction on two expressions. Returns TRUE if at least one of the expressions is TRUE, otherwise returns FALSE. For numeric expressions works bitwise. The following table illustrates how result is determined:
For numeric expressions.
|
||||||||||||||||||||||||||||||
| XOR | Used to perform a logical exclusion on two expressions. Returns TRUE only if one of the two expressions is TRUE, and the other is FALSE. The following table illustrates how result is determined:
For numeric expressions.
|
Comparison Operators
The operators <, >, <=, >=, =, <> are used to compare two expressions.
Syntax:
<result>=<expression1> <comparison_operator> <expression2>.
Arithmetic Operators
Arithmetic operators are: Exponentiation ^ or **; negation/subtraction-; adding+; multiplication and division *, /; integer division \; modulo arithmetic MOD; string concatenation &.
| Operator | Description |
| ^ èëè ** | Used to raise a number to the power of an exponent. |
| - | Used to find the difference between two numbers or to indicate the
negative value of a numeric expression. |
| + | Used to sum two expressions. Returns a Boolean value if both expressions are Boolean, or a numeric value if both expressions are numeric. For string expressions, concatenates the strings. If one of the expressions is a string, and the other is not a string - the non-string is converted to a string and both strings are concatenated. Ïðèìåð: |
| - | Subtracts one expression from the other. Example:
|
| * | Used to multiply two expressions. |
| / | Used to divide two expressions and return a floating-point result. Division by zero returns the first expression and no error occurs. |
| \ | Used to divide two numbers and return an integer result. |
| MOD | Used to divide two numbers and return only the remainder. |
| & | Used to force string concatenation of two expressions. Returns a String value. If an expression is not a string, it is converted to a string prior to the operation. Example: Note: In fact, this operator is not arithmetic, but belongs to this group because it has the same precedence as other arithmetic operators. |
Note: Negation and Subtraction are different operators with different precedence, though they are denoted with the same sign "-".
Operator Precedence
When several operations occur in an expression, each part is evaluated and resolved in a predetermined order. That order is known as operator precedence. Parentheses can be used to override the order of precedence and force some parts of an expression to be evaluated before others. Operations within parentheses are always performed before those outside. Within parentheses, however, normal operator precedence is maintained.
The operators, supported in ConceptDraw, can be divided into 3 groups: arithmetic, comparison, logical. When expressions contain operators from more than one category, arithmetic operators are evaluated first, comparison operators are evaluated next, and logical operators are evaluated last.
Within individual categories, operators are evaluated in the order of precedence shown below:
Arithmetic Operators |
Comparison Operators |
Logical Operators |
^ or ** |
= |
NOT |
negation"-" |
<> |
AND |
*, / |
< |
OR |
\ |
> |
XOR |
MOD |
<= |
EQV |
+, - |
>= |
IMP |
& |
For more information about the functions see Function
Reference
For more information about the Shape Properties dialog see
Dialogs - Modal Dialogs - Shape Properties.
Control handles are defined in the Controls section of the table. Control handles can be used to create shapes with intelligent behavior. They can be associated with a parameter or a group of parameters of a shape, allowing you to easily modify the shape by repositioning its control handle. Many library shapes have control handles.
The Controls section is used to create control handles. To add this section to the table, select Insert Section from the Edit menu. In the Insert Section dialog enable the Control Handles option and click OK. This inserts the Controls section in the table. The section already contains one row.
Example:
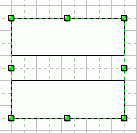
In this example, a control handle is added to a group of two rectangles so that
the second rectangle move when the control handle is moved.
Create a new document by selecting New Document from the File
menu, or pressing the button  on the main toolbar. Then choose the Rectangle tool - either from the Drawing
Tools toolbar (
on the main toolbar. Then choose the Rectangle tool - either from the Drawing
Tools toolbar ( ),
from the Insert menu, or from the keyboard:
),
from the Insert menu, or from the keyboard:
|
Ctrl + 7 |
Ctrl + 7 |
 Draw
two rectangles.
Draw
two rectangles.
Select them and group using the Group command from the Shape menu.
Now lets display the Parameter Table for the entire group. Press F3 or select Show Table from the Shape menu.
We need to create two sections in the table: the Controls section, describing the control handle, and Variables section, which will be used to pass the coordinates of the control handle from the parent shape to the child shape. Choose Insert Section from the Edit menu and in the dialog enable the Control Handles and Variables options.
Click OK. Two sections - Controls and Variables will be inserted in the table.
Now you need to edit the Variables section so that it contains the coordinates of the control handle.

In the Variables.X1 cell, enter "Controls.X1". In the Variables.Y1 enter "Controls.Y1". Now these values are to be passed to the child shape.
Then, lets protect the control handle from repositioning vertically. To do this, enter 1 in the Controls.YBeaheviour1 cell.
Select the frontmost rectangle in the group. Press F3 to call its parameter table. We'll need the Transform section.
![]()
In the GPinX cell enter Parent.Width*0.500000+Parent.Variables.X1-Width/2.
This means that when you move the control handle with the mouse horizontally, the frontmost rectangle will move together with the control handle. You can program much more complex behavior by using the formulas. The libraries contain a lot of shapes with such behavior.
For more information:
about the Controls section see The Table's
Sections - Controls,
about the Variables section see The Table's
Sections - Variables,
about the Main toolbar - see Toolbars
- Main
about the Drawing Tools toolbar - see Toolbars - Drawing
Tools,
about the Insert Sections toolbar see Dialogs - Modal
Dialogs - Insert Table Sections,
about the functions see the Function Reference.
You can use the shape parameter table to create user-defined menu for shapes. A user-defined menu is convenient for changing the shape's form or text quickly. The Actions section is used to describe the user-defined menu.
Example:
Let's create a custom menu for a rectangle. This menu will contain one item: "Make Width 200mm" which will set the width of the rectangle to 200 mm.
Create a new document using the File / New Document command,
or by clicking on the
main toolbar.
Then on the Drawing Tools toolbar click ,
or select Insert / Rectangle from the menu - or use the keyboard:
|
Ctrl + 7 |
Ctrl + 7 |
Now draw a rectangle and press F3 to display its table (or choose Shape / Show Table from the menu).
By default, the Actions section doesn't exist in the table - you need to create it. Select Insert Section from the Edit menu. In the Insert Section dialog, choose Actions. The Actions section will be added to the table. It already contains one row, which is enough for this example.
To the Action cell enter
_SETF("Width";200 mm)
_SETF if a function that sets a value for a parameter. In our case, it sets a 200 mm width for the shape.
In the Menu cell enter the name of the menu item - Make Width 200mm.

Now if you close the table, and right-click the rectangle, you'll see a new item in the menu - "Make Width 200mm", which will make the width of the rectangle equal to 200 mm.
For more information:
about the Actions section see The Table's
Sections,
about the Main toolbar - see Toolbars
- Main
about the Drawing Tools toolbar - see Toolbars - Drawing
Tools,
about the functions see Function Reference.
In ConceptDraw V it became possible to program behavior of shapes, which is triggered by an event - such as repositioning the shape, resizing it, etc.
Events are specified in formulas, separated with a semicolon:
<formula>; <event1>; <event2>; <event3>
On event a formula is re-calculated and the contents of cells, referenced to by the formula, is updated.
Below is an example of how the program handles events. In the example there is a connector connected to two shapes.
The are the cells from the Glue Info section:
| ConnectObjBegin | 1;ShapeID1.EventMove |
| ConnectObjEnd | 2;ShapeID2.EventMove |
After the semicolon go the events on which the parameters will be re-calculated (when either of the shapes is moved). The parameters themselves - the IDs of the connected shapes - are not changed, however, other parameters in the EndPoints section are dependent on them.
| BeginX | _CONNECTBEGINX(ConnectObjBegin;ConnectObjEnd;ConnectTypeBegin) |
| BeginY | _CONNECTBEGINY(ConnectObjBegin;ConnectObjEnd;ConnectTypeBegin) |
| EndX | _CONNECTENDX(ConnectObjBegin;ConnectObjEnd;ConnectTypeEnd) |
| EndY | _CONNECTENDY(ConnectObjBegin;ConnectObjEnd;ConnectTypeEnd) |
These parameters include the parameters, to which the event is assigned and they will be re-calculated on that event.
Let's describe the events that exist in ConceptDraw V.
Shape's Events.
The following events can be assigned to any ConceptDraw shape. They are specified in the formula in this form:
[<shape_name>.]<event_name>
| Event | Triggered When |
| EventMove | The shape is moved. |
| EventResize | The shape is resized. |
| TextEventMove | The shape's text box is moved. |
| TextEventResize | The shape's text box is resized. |
| CharPropEvent | The Character Properties section of the table or text formatting in shape are changed. |
Also, changing any variable in the parameter table can be an event. For instance, if after a semicolon you write <èìÿ îáúåêòà>.Width in a formula, the formula will be re-calculated only when the width of the specified shape is changed.
Apart from the variables from the shape parameter table you can use in formulas some variables, which contain various properties of the document (these properties are contained in the Document Properties dialog:
| DocTitle | The title of the document. |
| DocSubj | The subject of the document. |
| DocAuthor | The author. |
| DocCompany | The name of the company / organization. |
| DocDesc | The description. |
| DocSnapSens | Snap sensitivity. |
| DocPageSizeX | Returns the page width in the current units of measure. |
| DocPageSizeY | Returns the page height in the current units of measure. |
| DocShadowOffsetX | Horizontal shadow offset. |
| DocShadowOffsetY | Vertical shadow offset. |
| DocScale | Scale of the document. |
| PageName | The name of the current page (can be changed by double-clicking the page name in the Page Navigator floating dialog). |
For more information about the Document Properties dialog
see Dialogs - Modal Dialogs - Document Properties.
For more information about the Page Navigator floating dialog
see Dialogs - Floating Dialogs - Page Navigator.