|
|
|
|
Combining Components
The Deep Texture Editor gives you unparalleled control over the look and feel of each one of the components that make up a texture, but the control doesn't stop there. The Deep Texture Editor also lets you control how those components are combined to create the final texture.
Blend Modes
Components are combined using Blend modes. These modes are filters applied to the components to determine how the properties in each component are combined with the other components' properties to form the final texture.
The number of blend modes you can use varies depending on how many components you're using to build the texture.
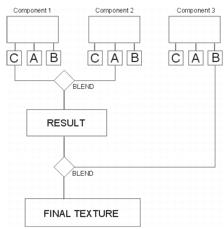
If you're using only one component, the properties in the component are applied directly to the final texture. When you're using two components, they're blended using a single blend mode, and the result is then applied as the final texture.
When you're using three components, the first two components are blended together using a blend mode, then the result of that blend is combined with the third component using a second blend mode. The result of all the blending is then applied as the final texture.
This diagram explains when the blend modes are applied as you combine components to form a texture.
Depending on the Blend mode, the different types of output can affect each other during the combination process. So its possible that the Bump output of one component may affect the Color output of another.
To apply a blend mode:
1 Display the Deep Texture Editor.
2 Click the text above a component and choose a mode from the menu.
There are nineteen blend modes you can use to combine your components:
Parallel
This mode does not blend components. Use it when each component has a different output type. If two components share an output type, only the first output will be applied to the final texture.
For example, if Component 1 has output= Color and Bump, and component 2 has output=Color and Alpha, only the color from Component 1 will be applied to the texture.
Combine
Combine is a blend mode for colors only. When you use this blend mode, the first color in Component 2 is used as an alpha channel. Wherever that color appears in Component 2, it is replaced with the colors from Component 1.
For example, lets say Component 2 has Yellow, Green and Blue and Component 1 has Orange, Purple and Black as its color scheme.
When you combine them using the Combine blend mode, Yellow disappears from Component 2. Everywhere that Yellow appeared, you'll see Orange, Purple and Black.
Average
Average is normal blend mode where all the component values are mixed with equal weight. So if one component is white and the other is black, the result is gray.
This is a good all-purpose blend mode to use for creating textures.
Multiply
When you use this blend mode to combine components, you'll get a darker result. In this mode, when a black component is combined with a gray component, the result is black. When a gray component is combined with a white component, the result is gray. When two shades of gray are combined, the result is proportionally darker.
In the case of Bump output, this mode will flatten most areas since black is flat and darker values create flatter bumps.
Maximum
When two components are combined using Maximum, the two components are compared and the one that's lighter becomes the result.
Blend Maximum
Blend Maximum works the same as Maximum, except that it creates blurring at points of sharp transition.
When Blend Maximum is applied to Bump output, the resulting bump map will have many high points and few deep pits.
This mode works best on Bump output.
Minimum
This mode is the opposite of Maximum. When two components are combined, they're evaluated and the darker areas of both are combined to produce the result.
Blend Minimum
Blend Minimum works the same as Minimum except that it creates blurring at points of sharp transition.
When Blend Maximum is applied to Bump output, the resulting bump map will have mostly low areas with very few high points.
Add
Add combines colors so that they appear dramatically lighter. However, it doesn't have the same effect on Bump output.
Subtract
When you combine grayscale components using Subtract, they tend to turn out black or very dark. When you use it with colored components, the result is brilliant colors that tend to compliment the original colors.
Blend v1 and v2
These two blend modes let you use one of the components as an alpha channel for blending.
When you choose Blend v1, the noise in the first component is used as an alpha channel to blend the two components.
When you choose Blend v2, the noise in the second component is used as an alpha channel to blend the components.
Blend Slope
Using Blend Slope, components are combined according to an object's slope. The first component is applied to areas that are flat and the other is applied to areas that are steep.
Fast Slope
Fast Slope works exactly like Blend Slope except that the transition from one component to the other is more abrupt.
Blend Altitude
This mode blends components according to an object's altitude. The first component appears at low altitudes and the second appears at high altitudes.
Blend Orientation
In this mode, one component is applied in all directions, while the other is applied in only one direction. You can use this mode to simulate things like moss that only grow on one side of a tree.
Blend Random
This mode introduces an extra layer of noise and uses it as an alpha channel for combining the two components. Component 1 appears in some areas of the new noise, and Component 2 appears in other areas.
Since this mode adds another layer of noise, you're also adding more processing time.
Procedural Blend
Procedural Blend combines two components so that the color and values of Component 1 are applied to Component 2 based on the gray values in Component 2. In essence, the Alpha output from Component 2 is used as a guide for blending.
Where Component 2 is light, Component 1 is not applied. Where Component 2 is dark, Component 1 is made darker. Where Component 2 is gray, Component 1 is applied without change.
This mode usually results in more saturated colors.
Difference
Difference finds the difference between the noise in the two components and displays the result.
This mode only works on output of like types. So if Component 1 has Alpha and Color output while Component 2 has only Alpha, the two Alpha outputs are combined and the Color output is left unchanged.
Global Changes
The component window in the center of the editor, called the Combination component, represents the final combined texture. Any changes you make to this final component are considered global changes since they affect the entire texture.
The Combination component can have its own color scheme, filter, noise pattern or phase. These attributes are applied to all the component elements. For example, the Combination noise values affect the noise within each component.
Global changes give you a way of applying a last layer of complexity to your texture.
Global Colors
The colors in the Combination component interact with the combined colors in the three components. They act as a final color filter for the texture. After the colors in each component are combined, they are blended with the combination component colors to produce the colors in the final texture.
You can also apply a final Color Blending method to the combination component. The Blending method you apply to the combination component is applied on top of the other modes used in the components.
For example, if you choose Altitude in the Combination component, the texture color is applied using the blend modes in the components and then also applied by altitude.
To add colors directly to a texture:
1 Click the top color circle in the Combination component window and choose a color from the palette.
2 Repeat for each of the other two color circles.
Global Noise
When you change the noise in the Combination component, (i.e., globally) it applies to all the components equally. So if you increase the noise in the final component, the noise in each of the components increases. Likewise, when you decrease the noise globally, the noise in each individual component decreases.
Global noise can be different than component phase, so you can introduce a completely different type of noise into the texture.
Use this option cautiously. The more noise you introduce into your texture, the longer it takes to render and draw. If you introduce too much complex noise patterns into a texture, you may find your render time increased significantly.
You can adjust global noise in the same way you would for a single component, using the Noise palette or the Noise editor.
To adjust noise globally:
1 Click the top left button in the combination component window.
2 Drag the slider to adjust the noise value.
Click the top left corner of the Noise palette to display the Noise Editor.
Use the editor's controls to design the global noise pattern or grain.
Global Phase
As you adjust the Global Phase value, new phase is introduced into each of the components.
Global phase can be different than component phase, so you can introduce a completely different type of phase into the texture.
You can adjust global phase in the same way you would for a single component using the Phase palette or the Phase Editor.
To adjust phase globally:
1 Click the bottom-right button in the combination component window.
2 Drag the slider to adjust the phase amplitude.
Click the top left corner of the Phase palette to display the Phase Editor.
Use the editor's controls to design the global phase.
Global Filtering
The Filter affects the final look of the noise within a component. The Global Filter affects the look of the combined noise. The Global Filter is applied to the noise in the Combination component.
The global filter only affects the noise, not the phase in the component. Any of the filters you used in the components can be used as the global filter.
Use this option cautiously. The more complex the noise in your texture, the longer it takes to render and produce. If you introduce too much complexity, you may find your render time increased significantly.
To filter noise globally:
1 Click the top-right button in the combination component window.
The Filtering palette appears.
2 Choose a filter and adjust its variables to create the desired effect.
 Corel Corporation http://www.corel.com Voice: (800) 772-6735 Fax: (716) 447-7366 www.corel.com/support |