
Select an object. > Modify panel > Modifier List > UV Coordinate Modifiers > Unwrap UVW
Select an object. > Modifiers menu > UV Coordinates > Unwrap UVW
The Unwrap UVW modifier is used to assign planar maps to sub-object selections, and to edit the UVW coordinates of those selections. Existing UVW coordinates on an object can be unwrapped and edited as well. Maps can be adjusted to the proper fit on a Mesh, Patch, and Polygon model.
The Unwrap UVW modifier can be used as a self-contained UVW mapper and UVW coordinate editor, or in conjunction with the UVW Map modifier. If you use Unwrap UVW in conjunction with the UVW Map modifier, it is usually because you want to map the model with a method other than planar mapping, such as cylindrical or spherical mapping. UVW coordinates can be animated by turning on the Animate button and moving the UVW coordinate vertices at different frames.
Rather than creating a large modifier stack by first making a sub-object selection of faces, then adding a UVW Map modifier to specify the type of mapping, you can use the Unwrap UVW modifier to do both. Sub-object faces or patches can be selected, stored as named selections, planar mapped, and then the UVW coordinates for each sub-object selection can be edited, all from within the Unwrap UVW modifier. For example, to map a character's face using three planar maps, you could create three sub-object selections of the front and sides of the face, planar map the selections individually and then edit the UVW coordinates for each selection, without leaving the Unwrap UVW modifier.
When the Unwrap UVW modifier is applied, it takes the current UVWs applied to the object and stores them in the modifier. If no UVWs have been applied, it does a planar mapping to create new ones. If the incoming data on the stack is a face-level sub-object selection, then only the UVWs for the selected faces are brought into the modifier.
When the modifier is evaluated, its UVWs are reassigned to the object flowing down the pipeline. So if the UVWs upstream are changed, the changes won't make it past the Unwrap UVW modifier. If the Unwrap modifier is operating on a selection of faces, then upstream changes to unselected faces will still be able to flow past the Unwrap modifier.
In gmax, UVW Unwrap supports polygon faces and Bezier quad and tri patch faces in addition to triangles and quads.
Although not its primary purpose, the Unwrap UVW modifier can be used to freeze UVWs. You can apply mapping after an animated deformation and have the mapping stick to the object. For example, you can apply Unwrap UVW above a Morpher modifier in the modifier stack, apply planar maps and edit the UVW coordinates. The mapping will follow the morphing geometry.
Procedures
Example: To assign and edit three planar maps on a box:

 Create a box.

 In the Material Editor, create a diffuse-mapped material with a distinct map, and assign it to the box.
 In the Material Editor, turn on Show Map In Viewport. This displays the map on the box in shaded viewports.
Shade the Perspective viewport.
Because of the way boxes are mapped, a repeat of the map appears on each side of the box.
 On the Modify panel, choose UV Coordinate Modifiers > Unwrap UVW from the Modifier List.
In the stack display, choose the Unwrap UVW modifier's Select Face sub-object level.
In the viewports, select one side of the box.
A planar texture gizmo displays. Next you re-assign planar mapping, which will also create named selections.
On the Parameters rollout, click Planar Map.
A named selection is created in the Named Selection Sets list on the main toolbar.
On the main toolbar, open the Named Selection Sets drop-down list.
"PlanarMap0" is the named selection for this side of the box.
In the viewports, select another side of the box.
Click Planar Map.
In the viewports, click another side, and click Planar Map.
If you check the Named Selection Sets drop-down list on the main toolbar, you will find three named selections for three sides of the box.
In the Parameters rollout, click Edit.
The Edit UVWs dialog displays. The map in the material on the object should display as the background in the window. By default, all the UVW IDs display at once. We need to filter the UVWs, to work on each side of the box, one at a time.
 In the Edit UVW dialog, on the lower toolbar, click Filter Selected Faces.
On the main toolbar, open the Named Selection Sets drop-down list, and choose "PlanarMap0".
In the viewports, one side of the box is selected and a planar mapping gizmo displays. In the UVW Edit dialog, the UVW coordinates for the selection are displayed.
 In the Edit UVW dialog window, select and move a UVW vertex.
In the viewports, the texture slides around the selected side of the box.
On the main toolbar, open the Named Selection drop-down list, and choose "PlanarMap1"
In the viewports, the selection changes to a different side of the box. In the UVW Edit dialog window, the UVW coordinates for the selection are displayed.
In the Edit UVW dialog window, select and move a UVW vertex.
In the viewports, the texture slides around the selected side of the box.
In the viewports, click to select the side of a box.
If the side you selected is one of the sides that was planar mapped earlier, then its UVW coordinates display in the UVW Edit window. This is another way of choosing what you want to work on.
As you can see, from within the Unwrap UVW modifier you can assign multiple planar maps with corresponding named selections, and then edit the UVW coordinates to fine-tune map placement on the geometry.
Interface
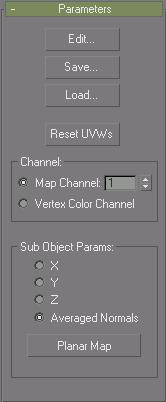
After applying the modifier, its panel appears, consisting of an Edit button, Save button, Load button, a Reset UVWÆs button, Channel, and Sub Object Params groups.
Edit: Displays the Edit UVWs dialog.
Save: Saves the UVW coordinates to a .uvw file.
Load: Loads previously saved .uvw files.
Reset UVWs: Resets the UVW coordinates in the Edit UVWs dialog.
Clicking this is almost the same as removing and reapplying the modifier, except that a map assigned in the Edit UVWs dialog is not deleted. For example, if you forgot to turn on the Generate Mapping Coordinates check box for an object, and then applied the Unwrap UVW modifier, the modifier would have no UVW coordinates to use and its settings would be wrong. If you then go back in the Stack and turn on Generate Mapping Coordinates, you'd need to click the Reset UVWs button. When you click this button, an alert warns you that you're losing any edits you've made.
Channel group
Map Channel Use the spinner to specify which map channel to use. Define up to 99 map channels.
Vertex Color Channel Use the spinner to specify the channel for Vertex Color.
When you change channels, you should reset your edits, since the edits for one channel usually won't work for the next channel. An alert appears that lets you choose between resetting the coordinates or leaving them as they are. In almost all cases, it's best to reset them. For more information, see UVW Map Modifier.
Sub Object Params group
You can apply a planar map, to selected faces, patches, or surfaces aligned to X, Y, Z or to an average of the normals.
X, Y, Z: Align the planar map to X-, Y-, or Z-axis.
Averaged Normals: Aligns the planar map to an average of the normals of the selected faces.
Planar Map: Applies planar mapping to the currently selected faces, patches or surfaces, and creates a named selection in the Named Selection list on the main toolbar. The named selections are one way of selecting which UVW coordinates you want to work on.
For example, selecting each face on a box and clicking Planar Map will planar map the six sides of the box and create six named selections. If Filter Selected Faces is on in the UVW Edit dialog (lower toolbar), then choosing one of the six named selections displays only the UVW vertices for one side of the box. This allows you to edit UVW vertices (texture placement) for each side of the box individually.