Create panel > Lights > Create a light. > General Parameters rollout
The General Parameters rollout is displayed for all types of lights. These controls turn a light on and off, adjust its color, exclude or include objects in the scene, and select which color components the light affects.
In the Modify panel, the General Parameters rollout also lets you change the light from one type to another.
Procedures
To turn a light on and off:
Turn the On toggle on or off.
Default=on.
To choose the color of a light using the color selector:
Click the color swatch next to the On check box.
A modal Color Selector dialog is displayed.
Use the Color Selector to choose a new color, and then click OK.
Shaded viewports update to show the new light color.
To choose the color of a light using the General Parameters spinners:
Use the RGB and HSV spinners to change the light's color.
The color swatch now shows the light's new color.
To change a light's intensity:
Increase or decrease the light's HSV Value in the Color area of the General Parameters rollout.
Shaded viewports are updated to show the new light intensity, which also appears in renderings.
You can animate a light's value.
If the light is not bright enough at full value (255), add another light to the scene. If multiple lights still aren't adequate, you can try increasing the light's Multiplier.
Interface
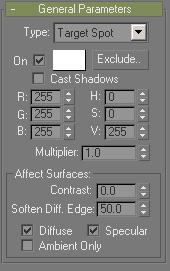
These are the general parameters for lights.
Type: Changes the type of the light. The light can be an omni, target spot, free spot, target direct, or free direct light.
This parameter is available only in the Modify panel.
On: Turns the light on and off. When On is on, shading uses the light to illuminate the scene. When On is off, the light is not used in shading. Default=on.
In viewports, the interactive renderer shows the effect of turning lights on or off.
Color Swatch: Shows the color of the light. Clicking the color swatch displays the Color Selector dialog so you can choose a color for the light.
Exclude: Excludes selected objects from the effects of the light. Click this button to display the Exclude/Include dialog.
Excluded objects still appear lit in shaded viewports. But exclusion takes effect when you apply vertex colors.
R, G, B / H, S, V: Set the color of the light by adjusting the red, green, and blue components or by adjusting the hue, saturation, and value. The effect of adjusting the spinners is visible in the color swatch above them. You can also click the color swatch to display the Color Selector dialog. Default=white (RGB=255,255,255; HSV=0,0,255).
Multiplier: Amplifies the power of the light by a positive or negative amount. For example, if you set the multiplier to 2, the light will be twice as bright. Multipliers are also useful for subtracting light and selectively placing dark areas in the scene. Default=1.0.
Using this parameter to increase intensity can cause colors to appear "burned out." In general, leave Multiplier set to its default of 1.0 except for special effects and special cases.
High Multiplier values wash out colors. For example, if you set a spotlight to be red but then increase its Multiplier to 10, the light is white in the hotspot and red only in the falloff area, where the Multiplier isn't applied.
Negative Multiplier values result in "dark light." That is, the light darkens objects instead of illuminating them.
Affect Surfaces group
Contrast: Adjusts the contrast between the diffuse and ambient areas of the surface. Leave this set to 0 for normal contrast. Increase the value to increase the contrast for special effects: for example, the harsh light of outer space. Default=0.0.
Soften Diffuse Edge: Increasing the value of Soften Diffuse Edge softens the edge between the diffuse and ambient portions of a surface. This helps eliminate edges that can appear on a surface under certain circumstances. Default=50.
Note: Soften Diffuse Edge reduces the amount of light, slightly. You can counter this, to some extent, by increasing the Multiplier value.
Diffuse: When on, the light affects the diffuse properties of an object's surface. When off, the light has no effect on the diffuse surface. Default=on.
Specular: When on, the light affects the specular properties of an object's surface. When off, the light has no effect on the specular properties. Default=on.
For example, by using the Diffuse and Specular check boxes you can have one light color the specular highlights of an object, while not coloring its diffuse area, and then have a second light color the diffuse portion of the surface while not creating specular highlights.
Ambient Only: When on, the light affects only the ambient component of the illumination. This gives you more detailed control over the ambient illumination in your scene. When Ambient Only is on, Affect Diffuse Affect Specular, Contrast, Soften Diffuse Edge, and shadow parameters are unavailable. Default=off.
The effect of Ambient Only isn't visible in viewports.